Bunny Treat Bags – a free sewing pattern

| |

Sew adorable Bunny Treat Bags to put in your Easter Baskets this year! This easy project is perfect for a beginner. You’ll find the free pattern below that works with pre-cut charm squares or any four 5” squares of fabric. Filled with Easter treats, I think they are way cuter than plastic eggs.

UPDATE: This blog post has been converted to an optional PDF that’s optimized for printing. Find it here. The Bunny Treat Bag pattern in the blog post below is totally free to read, print, and sew! Just hit CTRL +P on your computer to print. The PDF download for $2 is totally optional.

DSC_0510_01.JPG

You will need:

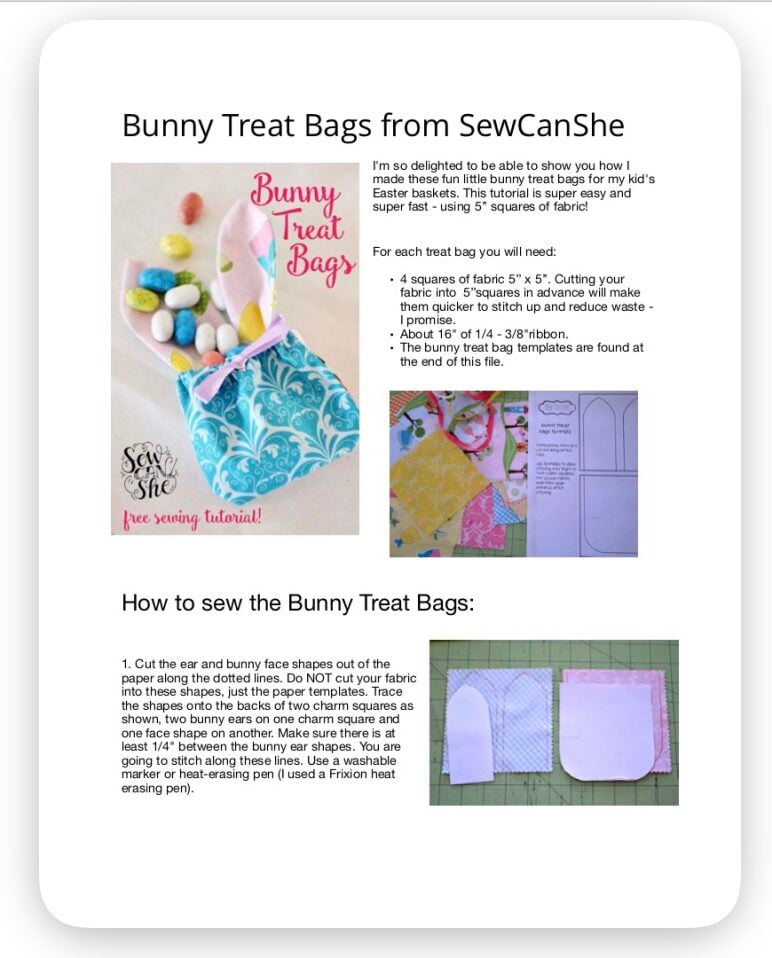
For each treat bag you will need four 5″ squares of fabric (cutting them into squares before hand will make them quicker to stitch up and reduce waste – I promise).

My treat bags were made with a charm square bundle from Riley Black. It included twenty one 5″ squares, and I was able to make 5 treat bags with one square left over (each treat bag requires four 5″ squares). My favorite place to buy charm packs is Fat Quarter Shop.

Of course you can use scrap fabric to make these little bunnies too. Just cut your scraps into 5” squares before getting started.

You will also need:

  • about 16” of 1/8” – 1/4” wide ribbon
  • a pencil or fabric pen
  • a sewing machine
  • thread

How to Sew Bunny Treat Bags – Instructions

So let’s get started!

CLICK HERE TO DOWNLOAD YOUR BUNNY TREAT BAG TEMPLATES.

TRACE THE TEMPLATES

1. Use scissors to cut the ear and bunny face shapes out of the paper along the dotted lines. Do NOT cut your fabric into these shapes.

2. Trace the shapes onto the backs of two charm squares as shown, two bunny ears on one charm square and one face shape on another. Make sure there is at least 1/4″ between the bunny ear shapes. You are going to stitch along these lines. If you don’t have a fabric pen on hand, you can use a pencil, washable marker or heat-erasing pen (I used a Frixion heat erasing pen).

MAKE THE CASING

1. Take the two charm squares you have chosen for the bag (face) and iron the top edge down 1/4″ and then again 1/2″ to make the ribbon casing. Don’t stitch yet.

2. On the square that will make the front of the bag, draw a 3/8″ vertical line for a button hole. The button hole should be in the center just under the folded edge.

3. Open out the folds you just ironed (important!) and sew a button hole over the line you just drew.

Here you see my finished button hole.

Pin and Sew the Bunny Treat Bags

1. Pin the four charm squares right sides together. Pin the one with a button hole to the other one with creases ironed to the top, but open out the creases for this step.

2. Stitch over all of the lines you traced, starting at the top of the charm squares. See how I opened up the casing for the bag? that’s important.

SEW ON THE BUNNY EARS

1. Trim away the extra fabric and cut the ears apart, leaving about 1/4″ of seam allowance (it might be less between the bunny ears). Cut the point off the bunny ears, but don’t cut your stitching!

2. Turn the ears right side out and press. Don’t turn the bag right side out yet, but press the casing back into place.

3. On the back of the bag, tuck the ears under the casing and pin. The side of the ears that are showing  here will end up being the back of the ears on the finished bag. Pin the casing down on the front with one pin, if desired.

Unless you have an itty-bitty free arm on your sewing machine, you will need to carefully flip the bag right side out for this part.

4. Stitch the casing along the folded edge, stopping and starting at one side seam and catching the ears in the casing as you go. Be sure to backstitch.

Finishing the Easter Bunny Bag

Turn the bag right side out and you’re almost done… just thread about 16″ of ribbon through the buttonhole to make the drawstring. So cute!

Now make a litter of bunny treat bags filled with candy for your Easter Basket! I think the tracing and stitching method really helps to cut down on time. I made all five in just a couple hours – and that was stopping to take pictures too.

If you like this cute Easter project, you will love my roundup of Bunny Sewing Patterns!

Disclosure: some of my posts contain affiliate links. If you purchase something through one of those links I may receive a small commission, so thank you for supporting SewCanShe when you shop! All of the opinions are my own and I only suggest products that I actually use. 🙂

Similar Posts

57 Comments

  1. Kay Eyles says:

    These are really cute, and so easy to make. Thanks for sharing.

  2. Laura Hayward says:

    Your little bunny treat bags are precious. My niece and nephew will love those. Thank you for sharing them.

  3. Lori Smanski says:

    these are adorable, thanks for the pattern and tutorial
    quilting[dash]lady[at]comcast[dot]net

  4. I will save this for next year as we are expecting our first grandson in June! Thank You for your daily inspiration!

  5. These are adorable!! I am definitely making them for my grandchildren.

    Thanks for sharing.

    Kathy

  6. Gina J Klemp-Koston says:

    Oh my goodness these are adorable! I know what I’m making for Easter! :o) I know some kids who will just love these!

  7. These are absolutely adorable!! Love them!! Thanks for the tute!

  8. I made one of these last night. So quick and easy and very cute! I have a daycare and it will be perfect for my "KIDS".
    Cheryl

  9. This is so cute! I am going to see my granddaughter next week. I will try to make her one before I leave. Is there a pdf. version to print off? I wanted to print it to have at my machine while I sew it, but there are so many ads and comments, that it was 14 pages long. I can reduce it by leaving off the comments, but the ads take up about the entire right side of the page on the first few pages, then leave that side blank on the last pages. A pdf link would really be helpful. Thanks if you can make it work. 🙂

  10. Abigail Borkowski Broska says:

    I stink at button holes so I subbed pleats and put my treats in a baggie tied with ribbon and they look pretty cute. Thanks for sharing this quick, fun, little bunny bag. I had fun making it.

  11. i love your bunny treat bags, they are just so dawgone cute. thank you for sharing! i am really going to try and get some done for this season.

  12. Thanks Caroline for sharing such a sweet easter treat. I tagged this to make with my grand daughter. She’s 7 and just getting into sewing. So appropriate to since she also has a pet rabbit. Jane

  13. Gail Elizabeth says:

    These are just adorable– just perfect for all the wee ones in my life. Thanks for sharing the tutorial.

  14. Geez, I love, love, love this blog! Every day something new and wonderful. This tutorial is so ridiculously cute I can’t stand it. I have the whole extended family at my house for Easter, including nine kids under the age of 10, so these will absolutely be on my pre-Easter to-do list. Thank you so much!!

  15. In agreement with Cindy below. This can’t be printed without over half the page ads and the actual pattern is tiny and takes up just 2.5" of the left side of the paper. Either a pdf version or please fix the web page such that the ads print smaller than the pattern.

    Love the pattern – am about halfway through it. I’ve got 6 bags going made of fun bright scraps. Can’t wait to send them to my Grandma’s (both over 90 and living on their own!) as I know they will appreciate a homemade gift for Easter!

    1. I’m sorry you guys are unhappy with my web page. I don’t control the way that it prints… I use a blog/website hosting service called squarespace. I’m not a computer programmer or code writer. 🙁

      If you desperately want something printable you can copy and paste the text and pictures into a word document and then print just the parts that you want.

      Good luck!

  16. Lisa Allsup says:

    Thank you for a great and easy Easter Surprise pattern. I’ve made 3 today and as they are for some guys who wouldn’t appreciate girly fabric I’ve made them all orange and now they actually look like bunny ears on the Easter Bunny’s carrots. Terrific both ways, thanks again.

  17. Oh man!!! These are amazing. Thank you so much! I loooooove your blog and my little ones are going to absolutely adore these.

  18. I made several of these today. What a happy way to spend Friday afternoon. They are adorable!

  19. Faye Hadfield says:

    made 2 – love them! Thank you so much for the pattern!
    Faye

  20. Loreto Izquierdo says:

    Delicious! Thank you for the pattern and tutorial. 😀

  21. Very nice. I’m so glad I found you from Pinterest. I think I’ll go on the blog hop! Thanks for letting us visit.

  22. Laurrie Sobie says:

    Laurrie Sobie here, of Edmonton, Alberta
    This is cute and a clever use of small pieces of fabric. Consider a group doing this sort of thing for Ronald MacDonald House, a children’s ward in a hospital – etc., etc.

  23. Halena Frick says:

    These are great! Thanks for the tutorial. I am making them for my nieces and nephews. 2 down and 8 to go. I am using the twirl by Me & My sister designs. I have had the charm pack sitting there for ages.

    1. I’ve also had a charm pack sitting on my sewing table forever!! What a great idea you had!

  24. I love these! I’ve made 20 so far and will give them to my teachers!!

  25. shirley tener says:

    I made some they are precious, but I think I will put elastic and a necklace for it so when the kids open can they can put it in this little bunny pocket, now to make this BOY.. lol

  26. Thank you for sharing this tutorial. I’ve made 20 bunnies with 3 complete charm packs because I also added a layer and needed 6 charm pack pieces per bunny. My kids as well as my family and neighbours loved them. They are so cute and even though they are relatively small they can hide quite big items. I also made bigger ones but the ears made them look quite strange…

  27. Sally King says:

    Seven grandkids…seven bunny bags..done! Thank you for the fun pattern! Have a happy Easter!

  28. Love these, they look great! Still making them… Easter 2017!!!

  29. I love your patterns. I wish that you would make your tutorials in a printer-friendly format.

  30. L Georgia says:

    Thank you so much for this post. I made 20 of them today and it was much fun. Very easy to make and very little time.

  31. Jill Wright says:

    These are so darn cute! Your tutorial was very easy to understand. Thank you!

  32. I finally got around to making these for my grandchildren. Since I cannot be with them this this year I can mail them something special from Grandma. They were easy to make, as long as you follow the directions. I may have jumped ahead and skipped a step (buttonhole BEFORE stitching together). They still turned out great even with my mistake. Thank you for this pattern.

  33. Susan Weech says:

    My daughter is on spring break and we made several of these for her college friends yesterday. They turned out great and we had fun assembly line sewing them. They hold many wrapped chocolates perfectly for a gift. I just increased the pattern pieces 150% on my copier (Which makes them the size to fit perfectly on my 10” square stash and I’m going to make 10 more of the larger size to gift my “Bunny Bait” snack mix (put in ziplock bags first) to our neighbors. This is yet another EXCELLENT pattern from SEW CAN SHE! Thanks Caroline! We LOVE your teaching style!

Leave a Reply