How to Make a DIY Heating Pad for Shoulders and Neck – Free Tutorial
Sew a heating pad that is like warm hug around the neck! This cute heating pad is 24” long and 6” wide, just the perfect size and weight to wrap around your neck and shoulders. Heat it up in the microwave for 1-2 minutes and then relax, relieve stress, and ease your tired muscles. Did you know that the average head weighs in at about 12 pounds? No wonder so many of us suffer with sore muscles in our neck and shoulders. We use these muscles all the time. When your muscles stiffen up from overuse, a little heat is just what you need to increase the blood flow to the affected area. For more detailed information about the proper use of heat therapy for deep injuries and instructions on how to apply heat (or ice) correctly, consult your doctor or physical therapist.
UPDATE: This blog post has been converted to an optional PDF that’s optimized for printing. Find it here. The pattern in the blog post below is totally free to read, print, and sew! Just hit CTRL +P on your computer to print. The Optimized for Printing PDF download for $2 is totally optional. Did you know you can get ALL the Optimized for Printing PDF files organized in a library for you to access anytime you want? Check it out.
When you experience minor aches and pains from normal wear and tear, the application of heat can increase oxygen and shut off pain receptors. You might find that icing works better so keep in mind that this neck and shoulder heating pad can also be used to administer cold. Just throw it in the freezer and use it instead of that frozen bag of peas or ice cubes that are going to melt.
So go ahead. Pamper your neck and shoulder muscles with a relaxing hot (or cold) pack using this pattern for a heating pad that is sure to soothe those sore, overworked muscles.
Make your own therapeutic neck-wrap heating pad with a few scraps of fabric and some rice, barley, or other grain that will contour to your body and hold heat or cold . The neck and shoulder heating pad folds into a small stack you can tie with a ribbon for the perfect gift for a friend or teacher. Are you ready to get sewing neck and shoulder heating pads for everyone on your gift list?
Materials:
For each basic Neck and Shoulders Heating Pad, you will need:
-
8 strips of fabric 3 1/2” x 6 1/2”
-
1 backing strip 6 1/2” x 24 1/2”
-
3-4 cups of rice (or other grain for filling)
to scent filling (use one per project or section)
-
- lavender oil or buds for relaxation
- frankincense or peppermint essential oil for inflammation
- orange, lemon, or rosemary essential oil for pain reduction
- eucalyptus essential oil to open nasal passages
This project is a perfect scrap buster but can also be made with less than 1/2 yard of material purchased specifically for this project. Some people like to use flannel because it is soft against your skin and is thicker than regular quilting cotton.
The fabric I used is Riding Hood by Josephine Kimberling for Blend Fabrics. That print on the far left below reminds me of a cozy afghan. And it has all my favorite colors.
Step 1: Constructing Sectioned Front Piece
For my heating pad project, I cut 3 1/2″ x 6 1/2″ pieces that create the compartments of the heating pad. I wanted to use my scraps and end up with a scrappy look. This also meant that I didn’t have to measure the compartments later in the construction when rice was added. The seam lines determined the size of the sections.
If you decide to use a full length of cloth for both the front and the back of your heating pad, you will need to measure and mark the size of the rice compartments. I strongly recommend the use of compartments to contain the rice and spread it evenly across the length of the heating pad. This also allows for some built-in bend to the completed heating pad so it contours snugly against your neck.
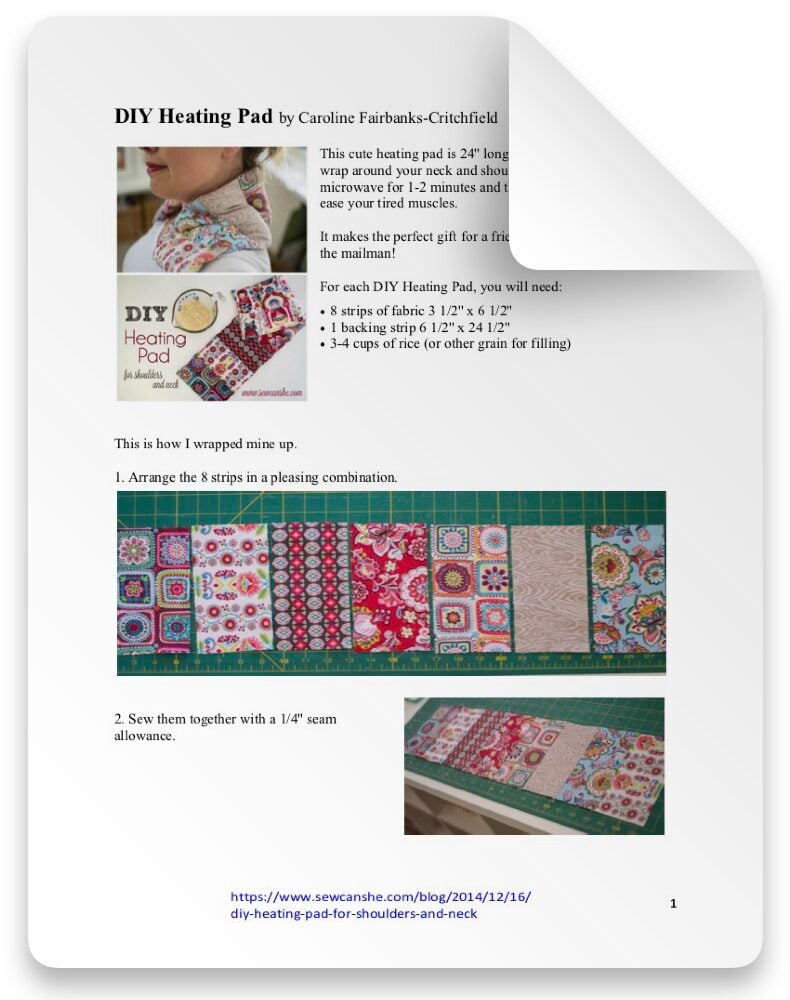
1. Cut the 8 strips into 3 1/2″ by 6 1/2″ units. Arrange the 8 strips into a combination that is pleasing to the eye.
2. Use a 1/4” seam allowance to sew the pieces together. Use a cotton thread since this is going to be heated repeatedly during its lifetime.
3. Press all the seams to the side in the same direction. Since all of your sections could be dark in color, pressing to the dark side may be confusing so please remember to just press all your seams in the same direction. This is important for when we close each section later in the construction process.
Step 2: Cutting the Backing Fabric of the Homemade Heating Pad
You could simply cut a rectangle that is 24″ x 6″ – the size the finished (pieced) front should. FYI… I don’t really cut my backing strip until my pieced front is done, then I lay the front on top of the backing fabric and cut around it, being careful not to cut the front anymore. It’s easier that way and then they are already RST (right sides together) and ready to sew.
Step 3: Sewing
- Lay the back and front right sides together (RST), if you haven’t already done so.
- Stitch around the rectangle with a 1/4” seam allowance, leaving a 4” opening on one short end. The opening should be on the end that the pressed seams face.
- Stitch again a second time to reinforce the seam.
Note: the seam allowances should all be pressed toward the end with the opening.
Step 4: Turning
- Clip the corners (without cutting the stitching) to reduce bulk.
- Turn right side out through the small opening you left at one end.
- Roll the seams between your thumb and index finger or use a tool inside the bag to push the seams outward. You want the edges to be nice and crisp without any folds or creases.
- Press the seams to flatten them as much as possible. This is the last opportunity you will have to really get a good press done.
- Press the seam allowances at the open end to the inside. This will create a nice pressed seam for when you close the opening later.
Step 5: Filling and Top-stitching Sections of Heating Pad
- If you are using an essential oil, measure the total amount of filling and add a drop or two of the oil and mix thoroughly. Do not add oil to the smaller measured amounts for each compartment as a drop is very concentrated and would be overpowering.
- Measure between 1/3 to 1/2 cup of rice or other filling like barley, buckwheat, flax seeds, or even crushed walnut shells. 1/2 cup makes a firm section while 1/3 cup makes a squishier section. I like somewhere between firm and squishy. Adjust the amount as you prefer.
- Pour this amount into the pouch you just created. This should be enough to fill one compartment or section. A funnel is helpful with this step although a rolled up piece of paper works pretty well.
6. Sew the compartment closed by top-stitching just beside the stitch line you made when you sewed the front pieces together. The seams were pressed so they overlap the stitch line. By top stitching to close the compartment, you are reinforcing the stitch line, too. Be sure to take your time so you don’t hit any rice with your needle.
7. When you get to the last compartment, fill it with only 1/3 cup of rice. There isn’t room for more rice because it has to be kept away from the presser foot when you sew this closed. Use plenty of pins to hold it closed.
8. Sew all the way across the top to top-stitch and close the opening using a short stitch length. You will want to use your sewing machine rather than hand sew this shut. You want the filling in the last compartment to stay inside the heating pad and with hand stitching, the rice can come out.
Wrap up and gift!
Now you can make your own DIY heating pad for the neck and shoulders. Microwaves vary so test the amount of time it takes to heat this up to a comfortable temperature. I usually go about 2 minutes then test and add more seconds as necessary. Be careful not to overheat the heating pad. It can scorch and then it smells bad.
You could make a larger version of this heating pad if you want something for back pain or menstrual cramps. A larger version could take the place of an electric heating pad or a hot water bottle for reliving abdominal pain or even to warm cold sheets. The process would be the same. Only the amounts of fabric and filling will be different.
By the way, these also make great cold packs. We keep ours in the freezer for bumps and bruises. Then, it easily heats up when we need it warm. Maybe I should make another one just for the freezer.
Looking for more teacher gift ideas? I’ve also given them Ribbon & Vinyl Zipper Pouches, Wrist Strap Keychains, and 2 Sided Zips.
Happy sewing!
Disclosure: some of my posts contain affiliate links. If you purchase something through one of those links I may receive a small commission, so thank you for supporting SewCanShe when you shop! All of the opinions are my own and I only suggest products that I actually use. 🙂
I wish I would have seen this yesterday – I think they would have turned out so much cuter than the oven pinch-pads I made for my kids’ teachers 🙂 But there’s always next year! Thanks for the tutorial 🙂 Merry Christmas!
Thank you! I am a teacher/librarian and have many volunteers that work in my library! Perfect thank you gift for all their hard work!
these are beautiful, love the fabric! as for the filling, i think rice is not encouraged because it doesn’t last as long as the other grains. personal preference in the long run. thanks for the great idea!
thank you for this tutorial… my daughter bought me on years ago.. always wanted
to know how to make one ,,, and what was inside.. think mine has some kind of
bean.. boy they sure do work for pain…
thanks
debra
has anyone made this with play sand?
doesn’t rice invite bugs?
I imagine that zapping it in the microwave to heat it up would prevent bugs, as would storing it in the freezer.
Absolutely.
I am a pretty active person so IÂ have a few ailments were heat helps. I use a product called TriHeat which helps relieve my pain in multiple areas while allowing me to be in a comfortable position. Check it out for yourself Triheating.com hopefully it will help you like it’s helped me.
Cute project, thanks! BUT… the ads on EVERY SINGLE PHOTO ARE FREAKING IRRITATING and ENOUGH TO STOP ME FROM SAVING YOUR BLOG.
Thanks, this looks really useful!
Too many ads. It just kills the entire thing. I dont mind supporting you but from now on I will use an ad blocker so I can see and read your blog. Sadly this will prevent you from getting paid for the ads as they won’t appear. Oh well your choice.
There is no mention of using cotton thread. I thought you had to have 100% materials for anything that you put in a microwave.
Nope. Polyester thread is just fine. Never had a problem. 🙂
How do you stop all the roce getting in the way? I use wheat for mine and i cant manage to section them without getting the needed caught on the wheat and sewing terribly! What foot do u use? Thanks 🙂
You must work section by section. If the rice or wheat is still getting in the way, you are putting too much in. Good luck!
Rice keeps getting in the way no matter how little I fill the sections. Can you hand stitch in between sections instead of machine? Any tips would be so appreciated! 🙂
Hand stitching will work too. Good luck!
After you fill up each compartment with rice, just add a line of pins across to block the rice from interfering with the stitching. Works perfectly
This is fabulous!!! So much classier than the "tube sock" method. Thank you for sharing.
I used dried lavender to fill mine. It turned out great! I do however agree with the comment on the ads. They are very irritating and block out important parts. One has to continuously close the ads in order to see the instructions,
I made these for all my family…guys and girls and were well received. I just made 2 strips then sewed like you did filling and making a seam every 3 1/2 ". They turned out great. Made a dozen!!!
When I made mine before i made all the pockets and left the ends open with enough fabric to make one long double fold over hem. Also I’ve been told barley holds heat longer.
Those are great tips. Thanks!!!
Thank you the idea…can these be washed and dried?
I don’t believe so. I try to keep mine clean and use (microwave) them regularly to keep any bugs away. But when they start to look too dingy, it’s time to make new!
Your directions are great. I plan to start making some first thing tomorrow! Thank you.
Thank you. This is such a cute design compared to the long tube concept. I used your pattern to create one a few weeks back and I love it. I used flax seed to fill mine and am very pleased. I’ve been used it regularly to warm my feet when I get in bed during the cold weather season.
I made one this morning, fast and easy. I used cotton fabric and thread, just like I do with the microwave bowl cozies. But when I heated it for 2 minutes, it was so hot I could hardly touch it. I am thinking a layer of warm and natural might help that, and might even keep it warm a little longer.
Looking at the print optimized tutorial I can’t tell where you sew the separate compartments.
Hi Nora! That’s on page 3.
xoxo,
Caroline
Hi Caroline! I have enjoyed following several of your ideas in the last few years! I did make the heating pads for my daughters for Mothers Day. I had enough strips and rice to also make them heating pads for their eyes for sinus/allergy headaches. They turned out cute and smelled great! Thank you!
Thank you for this tutorial. These will also make great gifts! I used rice in mine. That last little compartment was a booger. The rice kept wanting to escape! I used wonder clippies to keep it at bay.
Hello! Do you use backing strips on both sides? This is my first sewing project 😊
Read and re reread and still missed the stitching of each individual compartment on neck warmer/cooler. Good size and thanks.
Hi Mary,
I hope your computer is showing it all. Do you see the picture of my Pyrex measuring cup with 1/3 cup of rice? The instructions for filling each compartment are right under that.
xoxo
Hi – my first time to your blog – I think I’ll be back! Wondering about the separate pieces which are then sewn together – someone who loves beautiful fabric will love it – someone who prefers a more plain look (like a GUY!) might want all one color fabric. Is there any reason not to use 2 long strips and just mark where to sew the seams for the rice ‘pockets’?
No problem at all!
This may seem like a silly question but is there a preferred type of rice? Long grain, Minute, Basmati,…? I ask because they all have different qualities.
I am not a rice connoisseur. Would anyone else like to guess the qualities of rice hidden in cotton bags and heated in the microwave?
Just cheap rice is fine. I happened to have basmati that did not taste right, so used it. Just measure out the half cup and see what fits.
You want a long grain rice (basmati, jasmine), definitely not minute rice which is partially cooked! that would go rancid the fastest. Whatever cheap long-grain is in the bulk section works perfectly. You can also use dried beans or corn (the animal feed kind, not the popping kind, for obvious reasons; pet food stores might have some)
For the Heating pad for shoulder and neck do you need to use cotton thread?
You can but I don’t think it matters.
Thank you so much for sharing your fabulous tutorials. I am going to make these heat packs for my family for Christmas gifts. I LOVE them 🙂 and I think they’ll be perfect gifts.
I lined the plain back with flannel and the front with muslin. This makes putting the rice in much easier and also adds comfort to the wrap.
Awesome for gift giving! Thank you for this pattern!
I’d suggest a zipper down the long side, even if it means the compartments can’t be 100% separated; they’d still keep the rice pretty well contained. It would be good to have a way to dump it out and refill it when the rice inevitably goes bad (it takes quite a few runs through the microwave before it goes strange, but it always does) or if the fabric needs to be cleaned for any reason