Easy to Sew Free Wallet Pattern: Just Fold and Stitch!
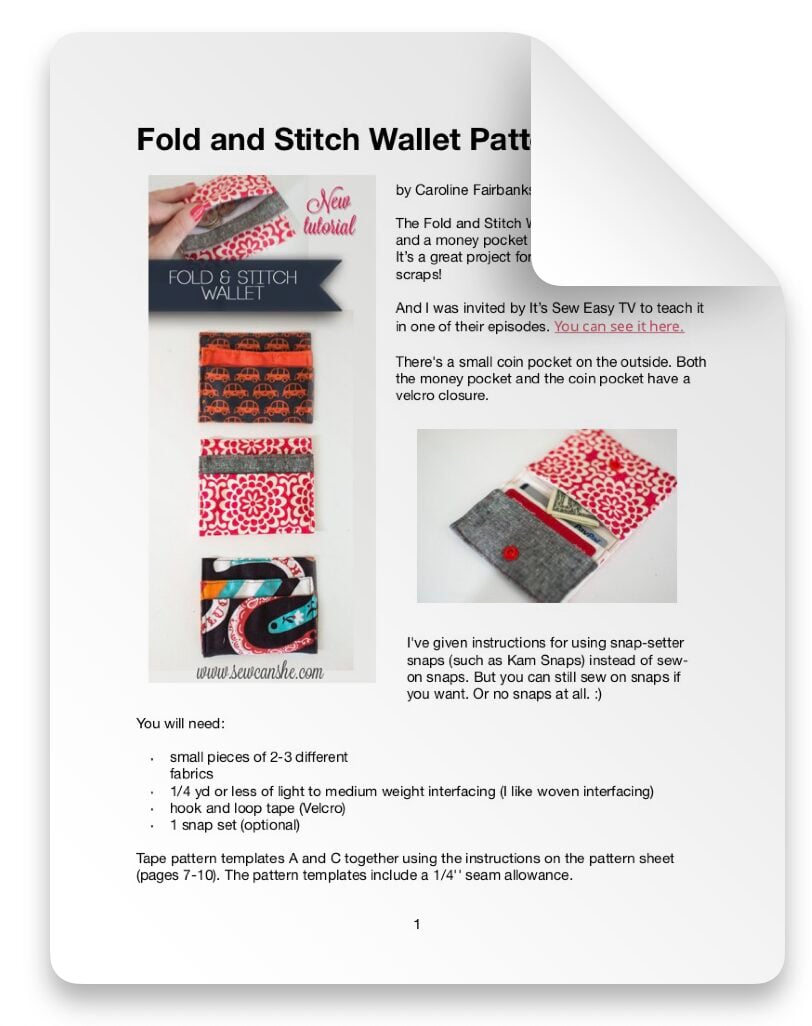
Learn how to sew an easy wallet that’s great for kids or adults. This free sewing pattern for a Fold and Stitch Wallet has two card slots and a money pocket on the inside. It’s a great sewing project for small pieces of fabric, even scraps! This is a great beginner sewing pattern and you’ll learn how to use plastic snaps.

It’s a great sewing project for small pieces of fabric, even scraps! This is a great beginner sewing project and you’ll learn how to use plastic snaps.
And I was invited by It’s Sew Easy TV to teach it in one of their episodes. Take a look!
The blog post below is totally free to read, print, and sew! Just hit CTRL +P on your computer to print. There is an optional PDF download offered at the end of the post. Join our Sewing Bee Community for access to over 300 PDF patterns (including this one), live workshops, premium video courses, and more.

I’ve also written a NEW Fold and Stitch 2.0 Wallet Pattern with a completely different look – but still 2 card pockets!

This particular wallet pattern has a small coin pocket on the outside. Both the money pocket and the coin pocket have a velcro closure.
It’s a great way to use up scraps and the wallet is a super little gift. I’ve provided instructions for using snap-setter snaps (such as Kam Snaps) or you can use sew-on snaps. Or no snaps at all.
{Download the free Fold and Stitch Wallet pattern}
You will need:
- small pieces of 2-3 different fabrics
- 1/4 yd or less of light to medium weight interfacing (I like woven interfacing)
- hook and loop tape (Velcro)
- 1 snap set (optional)
Tape pattern pieces A and C together using the instructions on the pattern sheet. The pattern pieces include a 1/4” seam allowance.
1. Cutting
To make the Fold and Stitch Wallet, cut:
- 1 from pattern piece A (wallet exterior)
- 1 from pattern piece B (wallet exterior accent)
- 1 from pattern piece C (wallet interior)
- 2 rectangles 4 1/2” x 16” of light to medium weight interfacing (I like woven interfacing)
- 1 set of hook and loop tape (velcro) 3 3/4” long – both sides

(this picture also shows my snap pieces.)
Cut the notches with your pattern pieces, or mark them on later like I did. Also mark the velcro placement spots.
2. Make the exterior

Pin piece A and piece B together matching up the single notch ends. Stitch with a 1/4” seam allowance.

Press the seam allowance open.
3. Stabilizer
Fuse the 4 1/2” x 16” pieces of interfacing to the backs of both pieces.
4. The Hook and Loop tape (velcro)

Cut the hook and loop tape pieces in half lengthwise to make two of each.
Each side of the wallet will get 1 scratchy piece and 1 soft piece.


Refer to the markings on the pattern pieces, and sew both velcro pieces on the exterior.
On the interior piece, only sew on the piece near the middle. Leave off the piece near the edge for now.
5. Wallet assembly

Pin the two wallet pieces right sides together. Make sure that you match up the ends with double notches. Stitch around three sides, leaving the side with no notches open.
Clip the corners after stitching.

Turn right side out, and press carefully. Poke out the corners with a chopstick and turn out the edges as well as possible.

On the open end, turn the raw edges to the inside by 1/2” (the first fold line on the pattern) and press.

On the interior side, sew the remaining piece of velcro close to the edge, closing up the opening.
6. (Optional) Snap-Setter Snaps

If you are using snaps that require a snap-setter, install them now on the wallet exterior.
On the left side (the main print) the snap should be centered and 2” from the short end.
On the right side (the accent fabric) the snap should be centered and 1 1/2” from the other short end.
If you are hand sewing on snaps, you can do that now or later. Or not at all; snaps are optional.
7. Folding
You can refer to the fold lines on the pattern piece if you need to, but it’s pretty simple. Lay the wallet out with the interior side up.

First fold the money pocket together by matching up the two pieces of velcro on the interior.

Flip the wallet over so that the exterior side is up.

Close the coin pocket by matching up the other two pieces of velcro.

Fold back the flap on the right about 2”. You will still see about 1/2” of the interior fabric on the end.

Pin the flap in place if you need to, and then turn the wallet over again.
This last fold might seem tricky, but once you fold it, you’ll know. Fold along the dotted lines in the picture above.
This will make the accent fabric show about 1/2” on the other side as shown in the picture below.


If you peek on the other side, you’ll see this.

You can also snap the snap together to make sure it looks right.

Return to this side and pin the card pocket side together. The other side will stay closed from the velcro.
8. Topstitching
Note: If you aren’t using it already, switch to a heavy duty needle – at least 14/90.

Topstitch all the way around the outside edge, going slowly and easing around the snaps.

After topstitching, mark the placement and attach sew-on snaps if that’s what you’re using.
And we’re done!
This quick wallet is great for boys and girls too.
Don’t forget you can catch a video tutorial for the Fold and Stitch wallet on my YouTube channel too!
Have fun!

FOLD AND STITCH WALLET SEWING PATTERN
Purchase this pattern in PDF format! The PDF file contains all of the instructions, plus the step by step photos that have been reduced to fit the page nicely with no ads.
Download the file immediately and keep your confirmation email so you can download it again later. Unlimited downloads are available from the confirmation email. Free patterns must be downloaded within 30 days.
Disclosure: some of my posts contain affiliate links. If you purchase something through one of those links I may receive a small commission, so thank you for supporting SewCanShe when you shop! All of the opinions are my own and I only suggest products that I actually use. 🙂