Log Cabin Hexagon Potholder Free Sewing Pattern
If your scrap pile is reaching critical mass, it’s time to turn those cherished fabric pieces into something beautiful and functional. The Log Cabin Hexagon Potholder is the ultimate “weekend win” for sewists who love a quick finish. Unlike square potholders that can feel a bit predictable, the six-sided geometry of this design adds an instant designer touch to your stovetop.

This is a fantastic way to practice partial seams a small scale, allowing you to master this surprisingly easy technique without the stress of a large-scale project. Plus, when done, you will have a beautiful and useful item.
The blog post below is totally free to read, print, and sew! Just hit CTRL +P on your computer to print. There is an optional PDF download offered at the end of the post. Join our Sewing Bee Community for access to over 300 PDF patterns (including this one), live workshops, premium video courses, and more.
Sometimes I give them away and (I admit) a lot of the time I keep them for myself. Having a cute potholder makes cooking bearable for me. Why only bearable? Because I’d much rather be sewing. 🙂

I stitched these three potholders in an afternoon. Two of them are totally scrappy – one from my green scrap bag and one from my pinkish-purple scrap bag. I decided to use mostly solids on the third one so the tutorial photos wouldn’t hurt your eyes. 🙂
Except for the Insul-bright insulated batting, these were made entirely of scraps from other projects. So let’s get started!
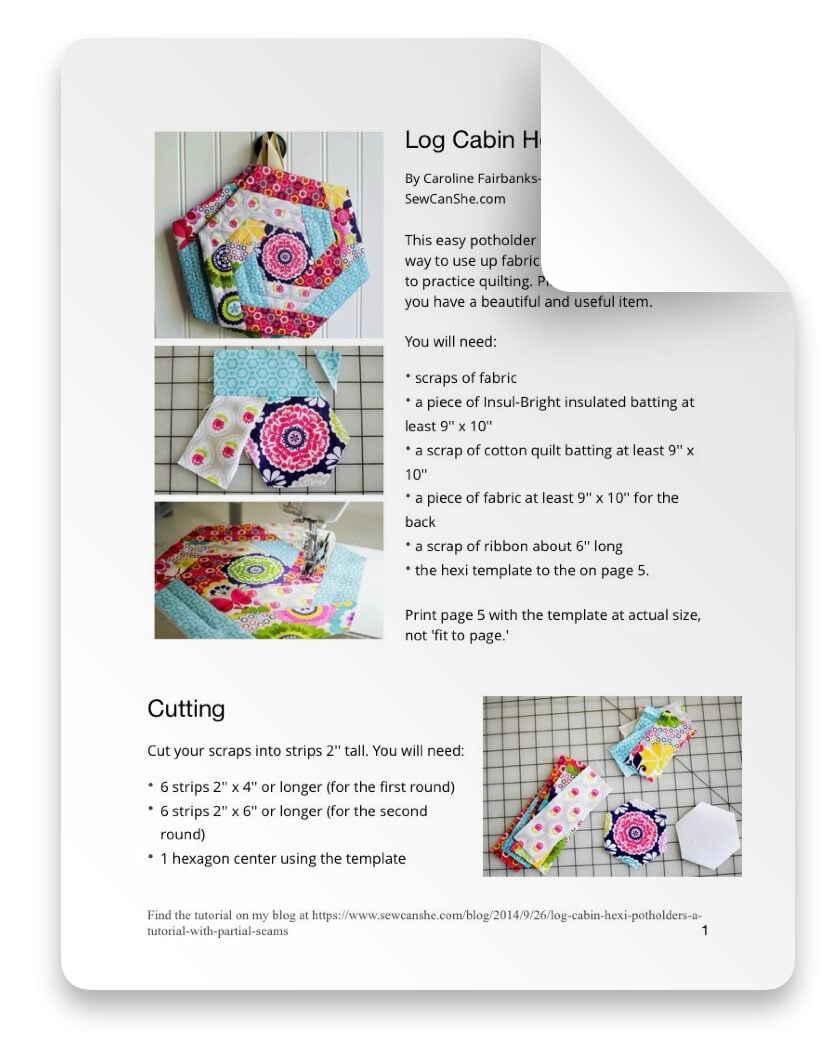
Log Cabin Hexi Potholder Pattern
You will need:
- scraps of fabric
- a piece of Insul-Bright insulated batting at least 9” x 10”
- a scrap of cotton quilt batting at least 9” x 10”
- a piece of fabric at least 9” x 10” for the back
- a scrap of ribbon about 6” long
To cut the center hexagon, you will need a hexagon template with 2’’ sides. I used a 2’’ hexagon paper piecing paper. I also made a printable template for you that you can download here.

Cutting
Cut your scraps into strips 2” tall. You will need:
- 6 strips 4” or longer (for the first round)
- 6 strips 6” or longer (for the second round)
Then cut out 1 hexagon with 2’’ sides (using a 2’’ sided paper piecing paper as a guide).

Sewing
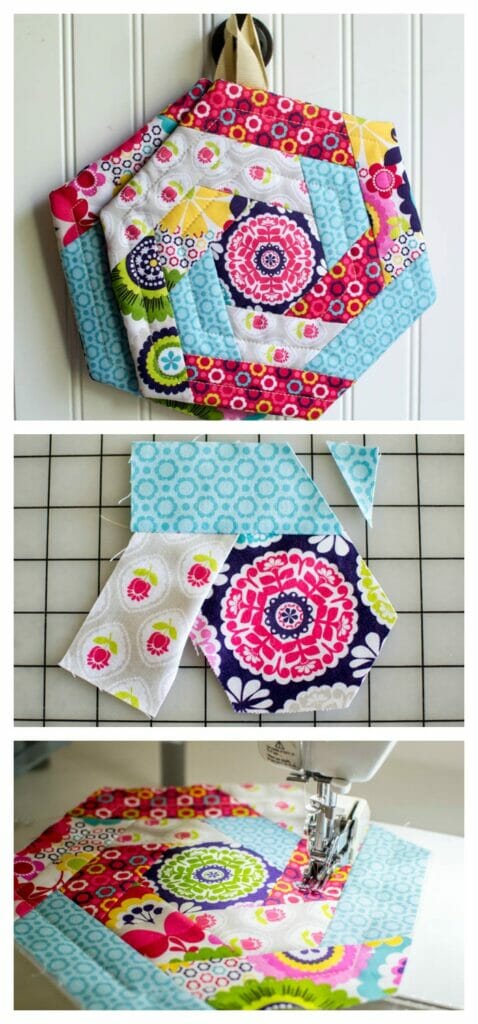
1. For the first round, use your shorter strips that are 4” long. Lay the first strip on any side of the hexi (right sides facing).
Line the bottom of the strip up with one corner of the hexi and let the rest hang off the top.

2. Start sewing halfway down the first side of the hexi with a 1/4” seam allowance. This is the partial seam. You will sew half of it now, and half of it later.

3. Open the fabric and press or finger press flat. Trim away the extra triangle of fabric to make a straight edge for the next strip.

4. Working in a clockwise direction, place the second 4” or longer strip of fabric on the next side of the hexi. This strip should cover the hexi side plus the first strip. Sew with a 1/4” seam allowance.

Press or finger-press the second strip open and repeat Steps 3-4 until you have 6 strips sewn to the center hexagon. You’ll need to fold back the first strip to sew on the 6th strip.

5. Fold back the first strip to trim away the little triangle from the last strip.

6. Pin the first strip over the last strip, taking care that it extends in a straight line. Stitch, ending your stitching in the same place where you began. Press.

7.. Using a ruler and rotary cutter (or a pencil to mark the place to cut) trim away the extra fabric from each strip. You should be able to align the seam lines with the 1 3/4” mark on your ruler and slice off the top.

8. Repeat steps 1-8 with the 6” or longer strips for the second round.

9. Use your finished ‘top’ as a pattern to cut out one backing, one piece of Insul-Bright, and one piece of cotton batting.

10. Stack the finished top on the piece of Insul-Bright (shiny side toward the top) and ‘quilt as desired,’ or don’t quilt at all if you wish. On this one, I quilted in a spiral pattern in the middle of each strip and stitched ‘in the ditch’ along the inner seams.

11. When you are done quilting, fold the 6” scrap of ribbon in half and baste the ends near one corner of the potholder.

12. Stack the piece of cotton batting on the bottom (if you are using one) and the backing on top (right sides together). Pin in the corners. Stitch all the way around, leaving a 4” opening on one side (not the side with the ribbon). Clip the corners without cutting the stitching.

13. Turn right side out, pushing all of the corners out. Press. Hand-sew the opening shut. Alternatively, you could topstitch all the way around the potholder to close the opening. But I like the puffy edges so I would rather not topstitch.

Now comes the hard part… are you going to keep it or give it away? Make sure to share the potholders you make with my potholder pattern on Instagram and tag them @sewcanshe so I can take a look.
Happy sewing!

P.S. If by any chance your log cabin hexagon turned out a bit wonky, you will LOVE all the tips and techniques that I share in my new My Log Cabin Hexi Pincushion Video Course. Let me show you how to make perfectly shaped log cabin hexies – plus a new size is included!
LOG CABIN HEXI POTHOLDER SEWING PATTERN
Purchase this pattern in PDF format! The PDF file contains all of the instructions, plus the step by step photos that have been reduced to fit the page nicely with no ads.
Download the file immediately and keep your confirmation email so you can download it again later. Unlimited downloads are available from the confirmation email. Free patterns must be downloaded within 30 days.
Disclosure: some of my posts contain affiliate links. If you purchase something through one of those links I may receive a small commission, so thank you for supporting SewCanShe when you shop! All of the opinions are my own and I only suggest products that I actually use. 🙂