Handy Purse Organizer Sewing Pattern – Free!
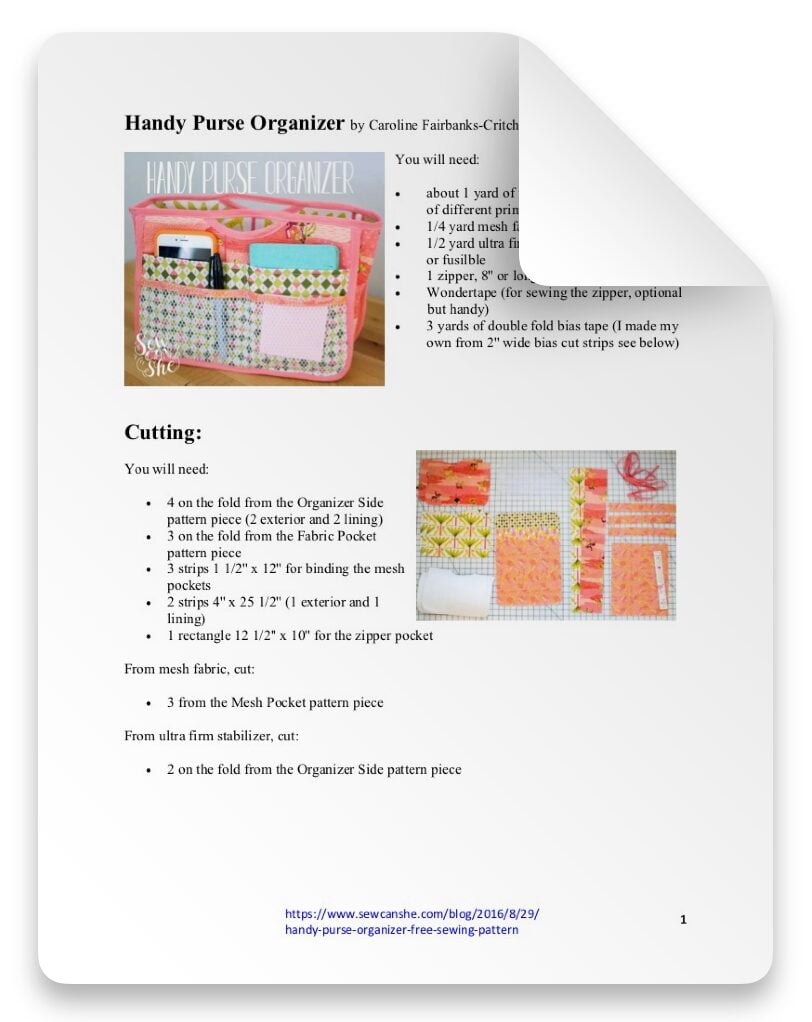
Keep all your bags organized with my free purse organizer sewing pattern! This handy organizer has pockets all over and is perfect for holding all those little things in your purse that get jumbled together. When you’re ready to switch bags – you can simply take the organizer out (with all the things inside) and move them all to the new bag, easy peasy!

The blog post below is totally free to read, print, and sew! Just hit CTRL +P on your computer to print. There is an optional PDF download offered at the end of the post. Join our Sewing Bee Community for access to over 300 PDF patterns (including this one), live workshops, premium video courses, and more.

I am completely convinced that the DIY version is much better than what you would get ordering something online.

For one thing, you can use whatever fabric you want. 🙂
There are 13 pockets – 6 mesh, 6 fabric, and one interior zipper pocket. As you can see in the photo above, this organizer is sturdy enough to stand on its own, but it will also lay flat or fit in a slim purse or laptop bag.
Download the free Handy Purse Organizer Sewing Pattern templates here
The free PDF pattern download includes the pattern templates only. Instructions for the purse organizer sewing pattern are below.

You will need:
- about 1 yard of fabric total (I used a bunch of different prints).
- 1/4 yard mesh fabric
- 1/2 yard ultra firm stabilizer (Peltex), sew in or fusilble
- 1 zipper, 8” or longer
- Wondertape (for sewing the zipper, optional but handy)
- 3 yards of double fold bias tape (I made my own from 2” wide bias cut strips see below)
Cutting:
Download the sewing pattern templates (see link above), and cut the following out of fabric:
- 4 on the fold from the Purse Organizer Side pattern piece (2 exterior and 2 lining)
- 3 on the fold from the Fabric Pocket pattern piece
- 3 strips 1 1/2” x 12” for binding the mesh pockets
- 2 strips 4” x 25 1/2” (1 exterior and 1 lining)
- 1 rectangle 12 1/2” x 10” for the zipper pocket
From mesh fabric, cut:
- 3 from the Mesh Pocket pattern piece
From ultra firm stabilizer, cut:
- 2 on the fold from the Organizer Side pattern piece

If you are making your own bias binding, cut strips 2” wide. Sew the strips together to make 3 yards and press (that little tool on the left is my Clover 1” bias tape maker).


Fold and press the 1 1/2” x 12” binding strips for the mesh pockets in the same way.


Make the 4-pocket sides:
1. Fold each fabric pocket piece in half, wrong sides together and topstitch 1/4” from the folded edge. Set aside.

2. Wrap a binding strip around the top of each mesh pocket piece and stitch the binding in place about 1/8” from the fold. Set aside.

3. Layer a mesh pocket on top of a fabric pocket. Place both pockets on top of an exterior side piece. Then place all three on top of one of the stabilizer pieces. All of the bottom edges should be aligned.
4. Pin the layers in place and baste all the way around 1/4” from the edge.


5. Turn the piece over, and place a lining side piece, a fabric pocket, and a mesh pocket on the back of the stabilizer piece you just sewed. Pin and baste all around the edges.
6. From the exterior side, sew a dividing line starting at the top of the fabric pocket and going down to the bottom of the pockets.
7. Repeat steps 3-4 above with the remaining stabilizer, exterior side, fabric pocket, and mesh pocket pieces. Sew the dividing line down the middle of the pockets. Set this half-finished side piece aside while you make the zipper pocket.


Make the Interior Zipper Pocket:
1. On the wrong side of the 12 1/2” x 10” rectangle, draw a long skinny box that is 1/2” tall, and 1” from the top and side edges. (I simply draw 2 horizontal lines 1” and 1 1/2” away from the top edge, and then connect them 1” away from the sides.
2. Pin the pocket rectangle to the remaining side lining piece, with the top edge of the rectangle 1/2” below the curved edge on the side lining piece, right sides together.
3. Use my Welt Zipper Pocket tutorial to finish the pocket. Don’t worry, it’s easy!
4. Pin the interior side with the finished zipper pocket to the back of the stabilizer piece from step 7 above. Baste all around it, 1/4” from the edges.


Bind the ‘Smiles’:
1. Cut 2 pieces of bias binding, each 6” long.
2. Wrap a piece of binding around the curved edge at the top of each side. Pin in place. Stitch about 1/8” from the fold. Check to make sure the binding is stitched down on both sides.
Note: this is a 1-step method for applying binding. For the rest of the tutorial I will show a 2-step method that takes longer, but doesn’t take the chance of not sewing both sides like the 1-step method.

Prepare and Attach the Boxing Strip:
1. Pin the two boxing strips wrong sides together and baste all the way around 1/4” from the edge.

2. Mark the boxing strip on both long sides 7 1/2” from either end.

3. Make a bunch of clips on either side of the marks about 1/4” apart and 1/4” deep. Clip to the basting stitches, don’t stress if you clip through them. Repeat around each mark. These clips will help the strip fit around the corners.

4. The marks on the pattern pieces show the middle of each corner. Transfer these marks to the side pieces.


5. Place the boxing strip against one of the side pieces, with the lining sides together. Match the short ends with the top of the side piece and the markings at the corners with the markings on the boxing strip.
It will be a tight fit because the strip matches the side at the stitching line, not along the cut edge. The clips in the boxing strip should spread wide and help you ease around the corners.
Pin all around the U-shaped edge using lots of pins. You can trim the side piece a little bit if you need to.

6. Baste the boxing strip to the side piece 1/4” from the edge.

7. Place the sewn side (with the boxing strip) on top of the remaining side, linings together, and pin the remaining long edge of the boxing strip to the other side piece, the same way as the first side.

8. Baste the pieces together, just like step 6 above, keeping the first side out of the way.

Sewing the Binding around the Purse Organizer:
We’ll bind these edges with a 2-step method.
1. Open one edge of the bias trim binding, and align the raw edge against the edge of the boxing strip at the top.

2. Sew the binding to the boxing strip with a 1/4” seam allowance, right over all your basting stitches. Sew all the way around the U-shaped edge. Then cut off the extra binding.

2. Wrap the binding around to the front of the organizer and sew it in place close to the fold.

3. Flip the organizer over and apply binding to the other side following steps 1-2 above again.

4. Apply the binding to the top edge from the inside first. Fold back the short edge by 1/2” before you start sewing to make it turned under in the next step.


5. Sew the binding to the inside top edge with a 1/4” seam allowance as before. When you get to one of the bound ‘smiles,’ backstitch and cut the threads.
6. Lay the binding piece across the top of the ‘smile’ without stretching. Then backstitch and continue sewing at the other side of the ‘smile.’

7. Sew binding all the way around the inside of the organizer and overlap the beginning by about 1 inch. Trim away the extra binding.

8. Wrap the binding around to the outside of the organizer and stitch in place close to the fold. When you sew across the handles, you will simply be sewing the binding together. Sew all the way around the top and your purse organizer is done!

Enjoy easily moving your organized items from one purse to another with my free purse organizer sewing pattern!
Hint: it fits perfectly in the Patchwork Charm Tote sewn from my class Colorful Patchwork Bags and Baskets.
xoxo,

HANDY PURSE ORGANIZER SEWING PATTERN
Purchase this pattern in PDF format! The PDF file contains all of the instructions, plus the step by step photos that have been reduced to fit the page nicely with no ads.
Download the file immediately and keep your confirmation email so you can download it again later. Free patterns must be downloaded within 30 days.
Disclosure: some of my posts contain affiliate links. If you purchase something through one of those links I may receive a small commission, so thank you for supporting SewCanShe when you shop! All of the opinions are my own and I only suggest products that I actually use. 🙂