How to Sew 1-Yard Magic Bags (2 tote bags from one yard of fabric!)
This sweet bag design lets you make 2 tote bags from 1 yard of fabric! Sew some DIY tote bags with zippers and a lining. The smaller one is just the right size for a purse. You’ll need just a few other supplies like nylon or metal zippers, fusible interfacing, and bag handles (or fabric to make them.

If you want to make these bags without zippers, sew the body of both bags in the same way that I made this quilted tote.
This blog post has been converted to an optional PDF that’s optimized for printing. Find it here. The blog post below is totally free to read, print, and sew! Just hit CTRL +P on your computer to print. The PDF download is inexpensive, optional and also includes the tutorial for my Japanese Style Bag Handles.

Here is a graphic that Lecien shared with me – it’s the inspiration for my totes! I used linen blend Lecre fabric. The large tote is approximately 15” tall and 20” wide. The smaller tote (that I’d still call ‘medium-sized’) is approximately 10” tall and 15” wide.

I sewed my fabric bag handles using Essex Linen fabric. This project is very easy and fast because there are few details. If you want one or more pockets on the inside of your bag, try my Welt Zipper Pocket tutorial or see how I made slip pockets for my Tote with Many Pockets. Make sure you place the pockets low enough inside the bag so they won’t be sewn over when you attach the handles.

One year, I made this pattern with gnome fabric! These two bags made the best gifts. This fabric is long out of print, but the manufacturer was Arvidssons Textil if you want to search for it.
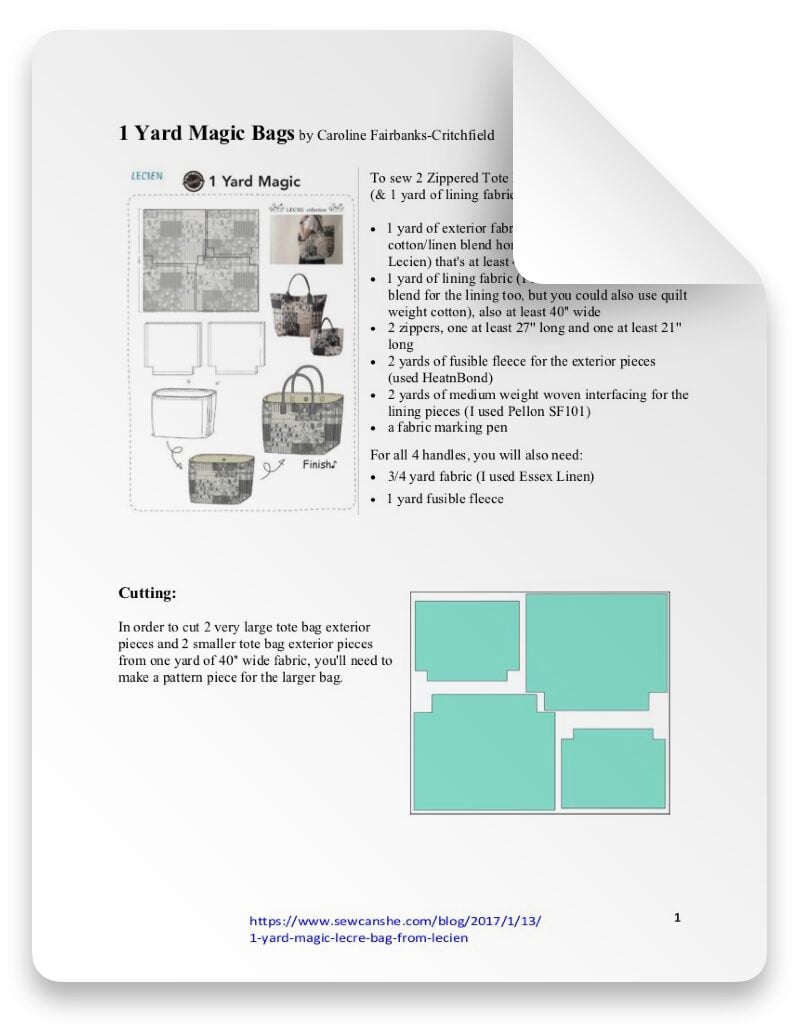
How to sew 2 Zippered Tote Bags from 1 Yard of Fabric (& 1 yard of lining fabric)
You will need:
- 1 yard of exterior fabric (mine was Lecre cotton/linen blend home decor weight fabric from Lecien) that’s at least 40” wide
- 1 yard of lining fabric (I used Lecre cotton/linen blend for the lining too, but you could also use quilt weight cotton), also at least 40” wide
- 2 zippers, one at least 27” long and one at least 21” long
- 2 yards of fusible fleece for the exterior pieces (used HeatnBond)
- 2 yards of medium weight woven interfacing for the lining pieces (I used Pellon SF101)
- a fabric marking pen
For all 4 handles, you will also need:
- 3/4 yard fabric (I used Essex Linen)
- 1 yard fusible fleece

Cutting:
In order to cut 2 very large tote bag exterior pieces and 2 smaller tote bag exterior pieces from one yard of 40” wide fabric, you’ll need to make a pattern piece for the larger bag.

1. Using a large piece of craft paper or tissue paper, cut a 23” x 19” rectangle. Then measure and cut 3” squares from the bottom corners as shown above.

2. Using the pattern piece you made for the larger bag and referring to the cutting layout (3 photos up), cut 2 exterior pieces and 2 lining pieces.
3. From the remaining fabric pieces, cut 13” x 17” rectangles for the smaller tote. You’ll need 2 exterior and 2 lining. Then cut 2” squares from the bottom corners. The rest of this sewing tutorial shows how to make the larger bag – just follow the same steps to make the smaller bag.
4. Cut pieces of fusible fleece to match the bag exterior and medium weight woven interfacing to match the lining pieces. Fuse them to the wrong sides of these pieces.
Note: If you don’t want a zipper closure on this bag, you can add a magnetic snap instead right now. Just install the snap pieces 1 1/2” from the top edges of the lining pieces (centered). Then finish the tote in the same way as my Sweet Quilted Tote.

How to Attach the Zipper:
1. Lay the zipper along the top edge of a bag exterior piece (right side down) and pin it in place.
2. Place the top (opening edge) of the zipper on the left side with the zipper teeth about 3/4” away from the edge.
3. Use the fabric pen to make a mark at the end of the zipper 1” away from the right edge.
My zipper was really super long, but that’s ok. 🙂


4. Attach the zipper foot to your sewing machine if necessary to sew a 1/4” seam. Baste the zipper to the top of the exterior piece with a 1/4” seam allowance. As you approach the right side of the piece, curve the zipper downward so that it is not sewn to the top of the bag starting at the mark that you made 1” from the end of the bag.


5. Pin the end of the zipper down, away from the top seam. Then pin a lining piece on top.


6. Stitch the lining to the exterior along the top edge with the zipper sandwiched in between (1/4” seam allowance). You should not catch the zipper in the seam for the last inch, since it is pinned out of the way.

7. Place the exterior and lining wrong sides together. Press them away from the zipper. Topstitch on the exterior, 1/8” away from the edge.

8. Place the top edge of the zipper against the top edge of the other bag exterior piece., right sides together. Pin. Baste in place, starting 1” from the edge (at the same place where the zipper curves away).

9. Place the remaining lining piece on top (the lining pieces will be right sides together at this point), and pin along the top edge. Make sure to pin the longer end of the zipper away, out of the seam.
10. Stitch along the top edge with a 1/4” seam allowance.
11. Place this exterior and lining wrong sides together and press them away from the zipper. Topstitch 1/8” from the edge.

How to Finish Sewing the Tote:
1. Open the zipper half way. Place the exterior pieces right sides together and the lining pieces right sides together with the zipper down the middle. Pin all around the tote (except the cut-outs at the corners). Push the end of the zipper inside so you don’t catch it in the seam.

2. Using a 1/2” seam allowance, sew the 4 straight edges. (not the corner cut-outs). Leave a 5” opening at the bottom of the lining.

3. Box the corners by placing the side and bottom seams together. Stitch with a 1/2” seam allowance.

4. Turn the bag right side out through the opening in the lining. Press the edges to the inside at the opening, and sew the opening shut.


5. Stuff the lining inside the bag and zip it closed.
6. Use old scissors to cut off the end of the zipper about 4” from the edge of the bag.


7. Measure how wide the end of the zipper is. They are usually 1” wide. Cut a piece of fabric that is 3” long by twice the width of the zipper.
8. Press the long edges of the fabric to the center. Then press the ends over 1/2”. Fold it in half and press.

9. Fold the tab over the end of the zipper and pin.

10. Sew around the tab 1/8” from the edge. If you used a metal zipper like me, take care to go slowly and not break your needle on the zipper teeth.

Your tote is almost done! Read how to make the pretty Japanese-style handles in the next post.
Happy Sewing!

ONE YARD MAGIC BAGS SEWING PATTERN
Purchase this pattern in PDF format! The PDF file contains all of the instructions, plus the step by step photos that have been reduced to fit the page nicely with no ads.
Download the file immediately and keep your confirmation email so you can download it again later. Unlimited downloads are available from the confirmation email. Free patterns must be downloaded within 30 days.
Disclosure: some of my posts contain affiliate links. If you purchase something through one of those links I may receive a small commission, so thank you for supporting SewCanShe when you shop! All of the opinions are my own and I only suggest products that I actually use. 🙂