Easy Peasy Lunch Bag Sewing Pattern – Free
Make back to school (or back to work) easy with this pretty and compact lunch bag sewing pattern. It’s not too big to throw in your a tote or a backpack and go.

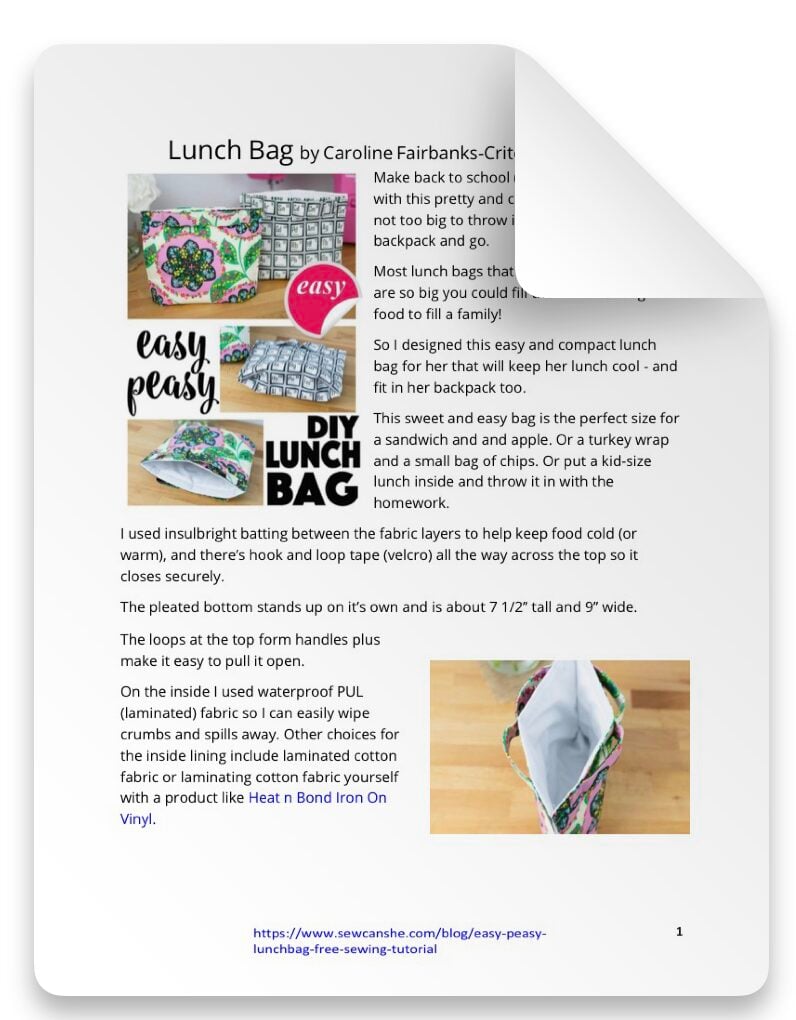
Most lunch bags that you can buy these days are so big you could fill them with enough food to fill a family! So I designed this easy and compact lunch bag for her that will keep your lunch cool – and fit in a backpack too. This sweet and easy bag is the perfect size for a sandwich and and apple. Or a turkey wrap and a small bag of chips. Or put a kid-size lunch inside and throw it in with the homework.
The blog post below is totally free to read, print, and sew! Just hit CTRL +P on your computer to print. There is an optional PDF download offered at the end of the post. Join our Sewing Bee Community for access to over 300 PDF patterns (including this one), live workshops, premium video courses, and more.

Materials Needed for the Lunch Bag Sewing Pattern
I used insulbright batting between the fabric layers to help keep food cold (or warm), and there’s hook and loop tape (velcro) all the way across the top so it closes securely.
The pleated bottom stands up on it’s own and is about 7 1/2’’ tall and 9’’ wide.

The loops at the top form handles plus make it easy to pull it open.
On the inside I used waterproof PUL (laminated) fabric so I can easily wipe crumbs and spills away. Other choices for the inside lining include laminated cotton fabric or laminating cotton fabric yourself with a product like Heat n Bond Iron On Vinyl.

Take note – this easy lunch bag sewing pattern works best if your exterior fabric is non-directional. The periodic table fabric that I used above (only the colored version is still available) is directional, so as you can see, the print is upside down on the back of the lunch bag. That doesn’t really bothered me, but you should know before starting.
Sew the Easy Lunch Bag Sewing Pattern
You will need:
- 1 fat quarter (or half yard) of fabric for the exterior
- 1 fat quarter (or half yard) of PUL fabric, laminated fabric, or regular cotton fabric for the lining
- a 9’’ x 17’’ piece of insulbright insulated batting
- basting spray (such as SpraynBond)
- 9’’ of hook and loop tape (velcro), 3/4’’ to 1’’ wide
- Wonderclips

Cutting:
From the exterior fabric, cut:
- 1 rectangle 18’’ x 10’’
- 2 rectangles 4’’ x 9’’
From the PUL or other lining fabric, cut:
- 1 rectangle 18’’ x 10’’
From the Insulbright insulated batting, cut:
- 1 rectangle 17’’ x 9’’
From the hook and loop tape, cut:
- a 9’’ strip of both sides


Sew the Lunch Bag Body:
1. Use basting spray to adhere the insulbright batting piece to the wrong side of the exterior fabric rectangle, centered. It doesn’t matter which side of the batting is against the wrong side of the fabric, both sides work to keep hot or cold in.
2. Place the exterior and lining pieces right sides together and pin or clip all the way around. I used wonderclips because pins will leave holes in the PUL.

3. Sew all the way around the rectangle with a 1/4’’ seam allowance, removing clips as you go and leaving about 4’’ open on one short end for turning.

4. Clip the corners and turn the piece right side out through the opening. Press carefully on the fabric side only. Do not let your iron touch the PUL or laminated fabric.

At the opening, carefully press the fabric edge to the inside by 1/4’’. You won’t be able to press PUL without damaging it.

5. Topstitch across the top edge of the side with the opening, sewing 1/8’’ away from the edge and turning the edges of the opening to the inside so the opening will be sewn closed.

Attach the Hook and Loop Tape:
1. Clip the 9’’ strips of hook and loop tape to the short ends of the piece (lining side). Place them as close to the edges as you can..

2. Make sure your bobbin thread matches the exterior of your lunch bag, and sew around both hook and loop tapes to secure.

Make the Handle Loops:
1. Press the short ends of the 4’’ x 9’’ strips to the wrong side by 1/4’’. Fold the piece in half lengthwise and press. Open and fold the long edges to the center, press.

2. Fold in half again and press to make a strip that is approximately 8 1/2’’ long and 1’’ tall. Make 2.


3. Topstitch all the way around both handle pieces.
Fold them in half with the short ends together and press the fold – this is to mark the center.

Attach the Handle Loops:
1. Center each handle loop along one short edge of the bag body piece – as close to the edge as you can get it.
Sew a vertical line down the center – back and forth to make it secure.


2. Pull back the end of each handle piece so it is 1’’ away from the side of the bag. Attach the end by sewing a rectangle or square with an ‘X’ in the center.
Repeat 3 more times so the ends of both handles are attached and each handle has 2 small ‘bumps’ sticking up.

Finish Sewing the Lunch Bag:
1. Fold the bag in half, placing the hook and loop strips together. Line up the top edges as closely as you can so the top sides will be even.


2. At the bottom of the bag, make a pleat by folding the bottom edge up and in between the sides by 1’’. Attach 2 or three clips along the bottom to hold it in place.

The bag should now measure about 7 1/2’’ – 8’’ tall and 9 1/2’’ wide.

3. Starting at the top, sew the sides of the bag together, sewing 1/8’’ from the edge. When you reach the bottom, sew slowly through all the layers of the pleat. Make sure to backstitch at the top and bottom to ensure that your stitches are secure.

All done! If you make one (or 10!) make sure you show me. Post a picture of the lunch bag you made and tag me on Instagram @sewcanshe so I can take a look!

You might also like my collection of 25 Sewing Gift Ideas so you can always give handmade gifts. Enjoy!
xoxo,

EASY PEASY LUNCH BAG SEWING PATTERN
Purchase this pattern in PDF format! The PDF file contains all of the instructions, plus the step by step photos that have been reduced to fit the page nicely with no ads.
Download the file immediately and keep your confirmation email so you can download it again later. Unlimited downloads are available from the confirmation email.
Disclosure: some of my posts contain affiliate links. If you purchase something through one of those links I may receive a small commission, so thank you for supporting SewCanShe when you shop! All of the opinions are my own and I only suggest products that I actually use. 🙂