Fold-Up Baskets From a Fat Quarter: Free Sewing Tutorial
Organize your home with easy to sew fold-up baskets that can be sewn from a fat quarter! This fast and easy project makes a great gift.
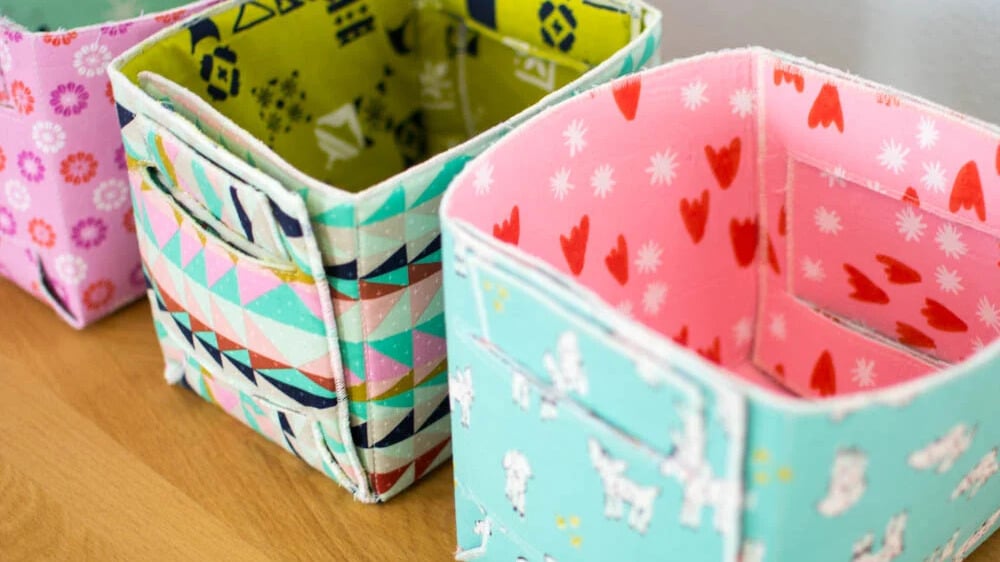
These baskets are totally reversible, so you can change the look any time you want.
Don’t miss my other free sewing tutorials for:
- Mini fold up baskets (3’’ tall x 4’’ wide and x 6’’ long)
- Large (cubby sized) fold up baskets (10’’ tall x 10’’ wide and 12’’ long)
The blog post below is totally free to read, print, and sew! Just hit CTRL +P on your computer to print. There is an optional PDF download offered at the end of the post. Or join our Sewing Bee Community for access to over 300 PDF patterns (including this one), live workshops, premium video courses, and more.

These fold-together baskets are easy to handle, fast to make, and don’t waste fabric… each one uses 2 fat quarterst!
And look… they are perfect for holding patterns, pieces of a project in progress, and pom-poms too!

I made these same baskets using whale fabric and gave them away at a baby shower. They are perfect for holding diapers and baby care items.
The finished dimensions are approximately 5 3/4” tall, 5 3/4” wide, and 7” long.
To make things easier for you, I tested 2 different kinds of stabilizer (Peltex 72F and Soft & Stable), plus I tried out 3 different methods for finishing the edges. Every basket turned out cute, so I’ll just show you what I think of each, and you can sew yours the way that you want!

This basket was sewn with Peltex 72F (ultra-firm, double sided fusible stablizer). I finished the edges with a zig-zag stitch on my sewing machine. It’s firm and sturdy, and the edges fray less than the one with straight-stitched edges.

This basket was sewn with Soft & Stable stabilizer from ByAnnie’s. If you love that stabilizer, then I suggest substituting the Pellon version, Flex Foam 2 sided fusible, because unfortunately Soft & Stable doesn’t come in fusible varieties. This basket is soft but still plenty sturdy enough to stand up.
I finished the edges on this one with a 3-thread balanced stitch on my serger (only one needle so I could turn the inner corners). It was tricky to serge the inner edges of the flaps. I had to raise my knife 4 times so I wouldn’t cut into the bottom of the basket. My Juki MO-1000 serger lets me raise and lower the knife easily mid-project, so that wasn’t a problem. I’d only recommend finishing the edges this way if you are comfortable with your serger.

This one also has the Peltex 72F (because I liked the double sided fusible stabilizer better), and I finished the edges with a straight stitch. It looks really cute, but it frays quite a bit. If you don’t mind the fraying, the straight stitch finish is the fastest and easiest.
Are you ready to sew an adorable basket? Grab 2 fat quarters and let’s go!

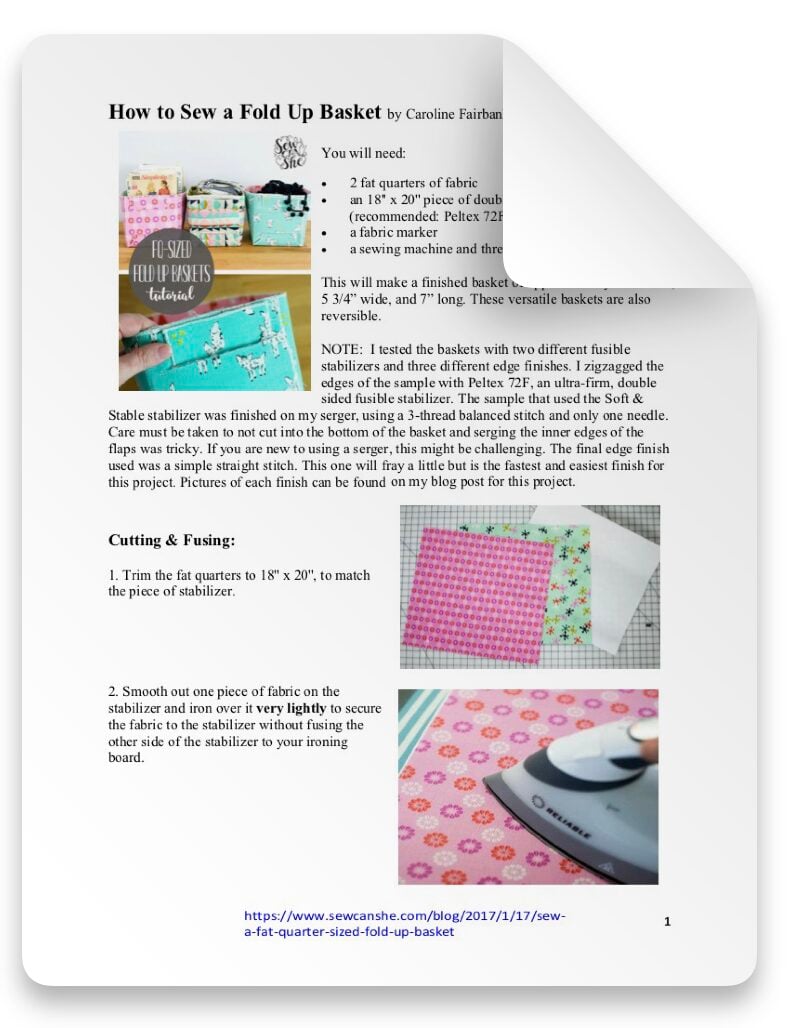
How to Sew a Fold Up Basket
You will need:
- 2 fat quarters of fabric
- an 18” x 20” piece of double sided fusible stabilizer (recommended: Peltex 72F or Flex Foam 2 Sided fusible)
- a fabric marker
- a sewing machine and thread (serger optional)

Cutting & Fusing:
1. Trim the fat quarters to 18” x 20”, to match the piece of stabilizer.


2. Smooth out one piece of fabric on the stabilizer and iron over it very lightly to secure the fabric to the stabilizer without fusing the other side of the stabilizer to your ironing board.
3. Smooth the other piece of fabric over the opposite side of the stabilizer. This time press slowly, with lots of heat and steam until the fabric is completely fused to the stabilizer.
4. Now turn back to the first side and press slowly and with lots of heat and steam until it is completely fused too.
Don’t worry if all 3 pieces (the 2 fabrics and stabilizer) are perfectly aligned at this stage. if they are off by 1/4” or less on any side, you will be able to trim everything to look right in the next step.

Trimming, Marking, & Sewing the Basket:
1. Trim your fused piece down to 17 1/4” x 19 1/2”. Cut away the side(s) that are unevenly fused first, and then trim it to the right size.


2. Using the fabric pen or marker (make sure the ink will disappear later), draw a line 5 3/4” away from each edge.

3. Sew straight lines along all 4 lines that you drew.


4. At the sides, cut right over your horizontal stitching lines until you reach the vertical lines. Stop cutting before you cut into the vertical lines.
This will make 3 flaps on each side.


5. Using the fabric marker again, draw horizontal lines on each of the 4 corner flaps. These lines should be 1 1/2” from the top and bottom edges of each flap and 1/2” from the sides.

6. These lines are cutting lines, so stitch around each one of them about 1/8” away from the line. Backstitch over your starting point to secure the stitching.


7. After sewing around each of the short horizontal lines, cut them open without cutting into the stitching. I like to start with my rotary cutter and then carefully finish with my scissors.


8. Referring to the white dashed lines in the photo above left, trim the center side flaps.

Cut in about 3/4” away from the edge on either side, and then angle in to the corner. Do not cut the stitching.

9. Finally, finish the all the edges on the basket, including around the flaps. You can choose a straight stitch 1/8” from the edges as seen here, or you can zig zag over the edge.

Here you can see my short zig zag stitch that was very close together. This is also called a satin stitch. I also used a zig zag stitch around the slashed opening here, but I didn’t like that very much.

Or you could serge around the edges. As I mentioned, that’s the trickiest finish. I recommend using only 1 needle (3 threads) and you must be able to lower the knife as you approach the inner corners.


To use the basket, fold two corner flaps together, and weave the trimmed flap up through the slots on both at the same time. Repeat on the other side.

If you make some, I’d love to hear which stabilizers and techniques you used, and what you use them for. Please post a picture to Instagram and tag me @sewcanshe so I can take a look.
Happy basket sewing!

FAT QUARTER SIZED FOLD UP BASKET SEWING PATTERN
Purchase this pattern in PDF format! The PDF file contains all of the instructions, plus the step by step photos that have been reduced to fit the page nicely with no ads.
Download the file immediately and keep your confirmation email so you can download it again later. Unlimited downloads are available from the confirmation email.
Disclosure: some of my posts contain affiliate links. If you purchase something through one of those links I may receive a small commission, so thank you for supporting SewCanShe when you shop! All of the opinions are my own and I only suggest products that I actually use. 🙂