DIY Phone Case and Wallet with Card Pockets: free sewing pattern!
Sew an easy DIY phone case that is also a wallet! Sometimes you want to carry a purse – when you think you might need all that stuff you’ve got saved in there – and sometimes all you need is your phone and a couple of cards.

For those times when all you want to take with you is your phone and a couple cards, I designed a DIY phone case and wallet!
The design is pretty basic from the front, with a magnetic snap closure on the flap.
The blog post below is totally free to read, print, and sew! Just hit CTRL +P on your computer to print. There is an optional PDF download offered at the end of the post. Join our Sewing Bee Community for access to over 300 PDF patterns (including this one), live workshops, premium video courses, and more.

But the back is full of surprises, like a zippered coin pocket and 2 hidden card slots. Can you see them?

They are under the flap!
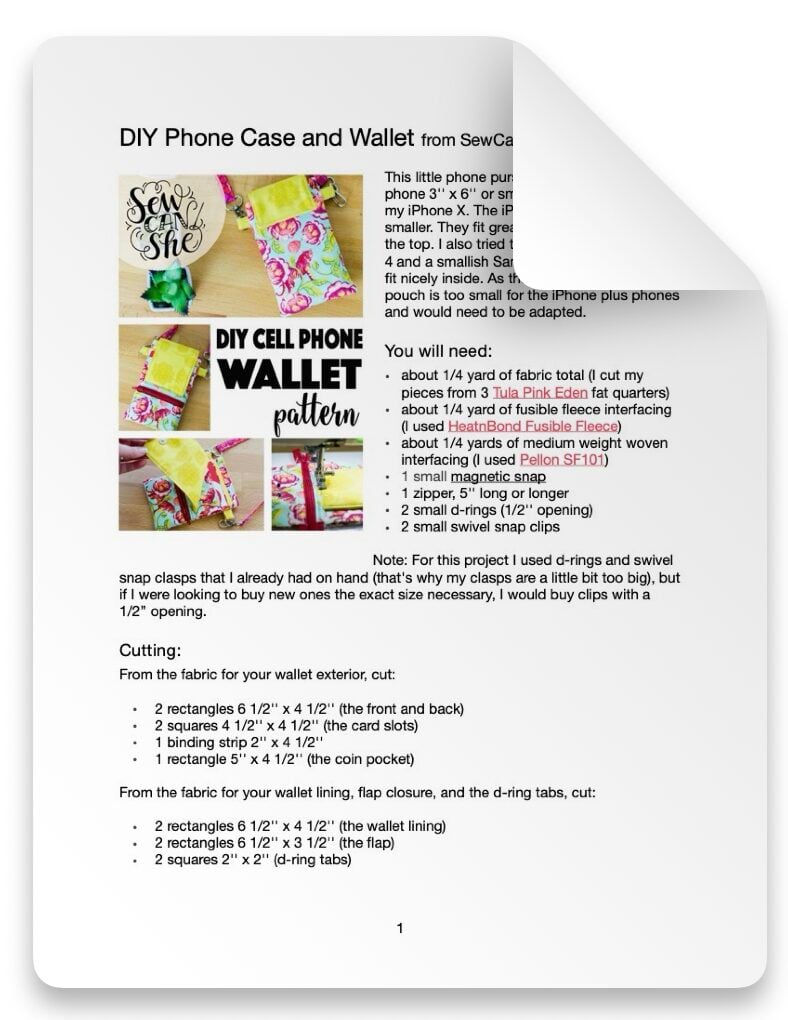
This little phone case and purse is perfect for any phone 3” x 6” or smaller. The one shown above is my iPhone X. The iPhone 7 or 8 is a little smaller. They fit great and don’t peek out at the top. I also tried this case with an iPhone 4 and a smallish Samsung smartphone. Both fit nicely inside. As the pattern is written, this pouch is too small for the iPhone plus phones and would need to be adapted.
So are you ready to make a Cell Phone Case and Wallet? Let’s go sew!
You will need:
- about 1/4 yard of fabric total (I cut my pieces from 3 Tula Pink Eden fat quarters)
- about 1/4 yard of fusible fleece interfacing (I used HeatnBond Fusible Fleece)
- about 1/4 yards of medium weight woven interfacing (I used Pellon SF101)
- 1 small magnetic snap
- 1 zipper, 5” long or longer
- 2 small d-rings (1/2” opening)
- 2 small swivel snap clips (mine have 3/4” opening, but who’s looking?)
Note: For this project I used d-rings and swivel snap clasps that I already had on hand (that’s why my clasps are a little bit too big), but if I were looking to buy new ones the exact size necessary, I would buy 2 of these sets.

Cutting:
From the fabric for your wallet exterior, cut:
- 2 rectangles 6 1/2” x 4 1/2” (the front and back)
- 2 squares 4 1/2” x 4 1/2” (the card slots)
- 1 binding strip 2” x 4 1/2”
- 1 rectangle 5” x 4 1/2” (the coin pocket)
From the fabric for your wallet lining, flap closure, and the d-ring tabs, cut:
- 2 rectangles 6 1/2” x 4 1/2” (the wallet lining)
- 2 rectangles 6 1/2” x 3 1/2” (the flap)
- 2 squares 2” x 2” (d-ring tabs)
From the fabric for your cross-body strap, cut (or piece together) 1 strip 2” x 40” – 50”, according to your preference. Note: You could apply fusible interfacing (such as Pellon SF101) to this strip if you would like it to be more sturdy. The strap instructions can be found here.
From the fusible fleece interfacing, cut:
- 2 rectangles 6 1/2” x 4 1/2”
- 1 rectangle 6 1/2” x 3 1/2”
From the medium weight woven interfacing, cut:
- 2 rectangles 6 1/2” x 4 1/2”
- 1 rectangle 6 1/2” x 3 1/2”

Preparation:
(apply all interfacing following the manufacturer’s instructions)
1. Press to fuse the 6 1/2” x 4 1/2” fusible fleece interfacing rectangles to the wrong side of the wallet exterior pieces.
2. Press to fuse the 6 1/2” x 4 1/2” medium weight woven interfacing rectangles to the wrong side of the wallet lining pieces.
3. Press to fuse the remaining 6 1/2” x 3 1/2” fusible fleece and woven interfacing rectangles to the wallet flap pieces (one pieces will have fusible fleece, the other piece will have medium weight interfacing).

Make the Flap:
1/4” seam allowance allowed.
1. Working with the flap piece that has regular interfacing on it (not fusible fleece), make a pencil or pen mark at one end, centered and 1” from the edge. Install the male side of the magnetic snap over this mark, using the manufacturer’s instructions (or my instructions with this cross body tote).


2. Place the two flap pieces right sides together and sew around 3 sides, leaving the end furthest away from the magnetic snap open.
3. Clip the corners. Turn the flap right side out and press. Topstitch around, close to the edges. Set the flap aside for now.

Make the Back of the Wallet:
1. Fold each 4 1/2” square card slot piece in half (right sides together) and sew across the edge with a 1/4” seam allowance. Turn the piece right side out and press.
2. Choose which side will be the top of the card slot. Topstitch across the top edge to prevent the slot piece from stretching out.


3. Choose one wallet exterior piece to be the back. Place the first card slot piece 1” below the top edge. Pin in place. Stitch across the bottom edge.


4. Lay the second card slot piece on top, 1/2” below the top edge of the first slot. Pin. Stitch across the bottom edge of the piece in the same way.


5. Fold the 2” x 4 1/2” zipper binding piece in half, wrong sides together. Center the raw edges along the top edge of the zipper and pin. Use your sewing machine’s zipper foot, and sew the binding to the zipper with a 1/4” seam allowance.
6. Wrap the binding around the the top edge of the zipper and pin or clip in place. Don’t wrap it around too tightly so that the binding interferes with the zipper opening or closing on the other side, but the fold of the binding should cover the stitching on the back of the zipper.

7. Sew the binding in place by stitching close to the edge on the front side.


8. Slide the raw edge on the flap under the zipper binding by about 1/4” and pin in place. The flap should be centered in relation to the zipper binding. As you can see from the ‘back view’ above, the flap doesn’t extend far enough down to go past the binding on the back.


9. Sew across the top edge of the binding, which will secure the flap to the zipper binding. Turn the piece over and trim the raw edge of the flap 1/8” from the stitching.


10. Fold the 5” x 4 1/2” coin pocket piece in half, wrong sides together and press. Place the folded edge over the lower zipper tape and pin in place (as seen above left).
Stitch across the coin pocket piece, once close to the fold, and again about 1/4” away so that it matches the topstitching on the binding above it.


11. Now place the flap/zipper/coin pocket piece on top of the wallet back. Arrange it so that the zipper binding lays just over the stitching at the bottom of the second card slot. The bottom raw edges of the coin pocket should be aligned with or slightly hang over the bottom edge of the wallet exterior piece. Pin in place.
Stitch over BOTH lines of topstitching on the zipper binding once more to secure the flap and the top edge of the zipper pocket.
Trim away extra coin pocket fabric if any hangs over the bottom edge of the wallet exterior piece.

12. Place the zipper slider in the middle of the pocket. Baste the sides of the piece from the top to the bottom within the 1/4” seam allowance. Trim away the extra zipper tapes on either side of the piece.

Make the Front of the Wallet:
1. Make a mark that is centered and 1 1/2” below the top edge of the wallet front piece. Install the female side of the magnetic snap over this mark.


2. To make the d-ring tabs, fold each 2” square in half, press. Open and fold the raw edges to the center, press. Then fold in half again and press.
Topstitch close to both long edges.
3. Fold each tab through a small d-ring and pin or clip the raw edges to the sides of the pouch front piece, about 1” below the top edge. Stitch in place within the 1/4” seam allowance.


Finish Sewing the Case:
1/4” seam allowance allowed.
1. Fold the flap down on the back wallet piece and pin it out of the way of the top edge.
2. Place a matching wallet lining piece face down against the back of the wallet and pin the top edges. Stitch the top edges together with a 1/4” seam allowance. Press the seam open.
Repeat step 2 to sew the remaining lining piece to the top edge of the wallet front. Press the seam open.


3. Place the wallet front and back pieces together, right sides facing. Make sure that the seams between the lining and the exteriors are on top of eachother. Pin all around the edges.
Stitch all the way around, leaving a 3” opening at the bottom of the lining for turning.


4. Clip the corners. Trim the raw edges to 1/8”. Turn the wallet right side out through the opening in the lining. Press the edges of the opening inside. Sew the opening closed close to the edge.
5. Use a chopstick or turning tool to push the lining down inside the wallet.
All that is left is the cross body strap! Since this sewing tutorial post is getting too long to load quickly, click here for the cross body strap tutorial.
If you love your new cell phone case and wallet, make sure you post a picture on Instagram and tag me (@sewcanshe). I can’t wait to see it!!
XOXO,

p.s. This free pattern is included in my Ultimate List of Fast and Easy Tote Bags to Sew and Fast & Easy Cross Body Bag Patterns. Check them out!

DIY PHONE CASE AND WALLET SEWING PATTERN
Purchase this pattern in PDF format! The PDF file contains all of the instructions, plus the step by step photos that have been reduced to fit the page nicely with no ads.
Download the file immediately and keep your confirmation email so you can download it again later. Unlimited downloads are available from the confirmation email. Free patterns must be downloaded within 30 days.
Disclosure: some of my posts contain affiliate links. If you purchase something through one of those links I may receive a small commission, so thank you for supporting SewCanShe when you shop! All of the opinions are my own and I only suggest products that I actually use. 🙂