How to Sew a See-Through Tote: Free Fabric and Vinyl Bag Pattern
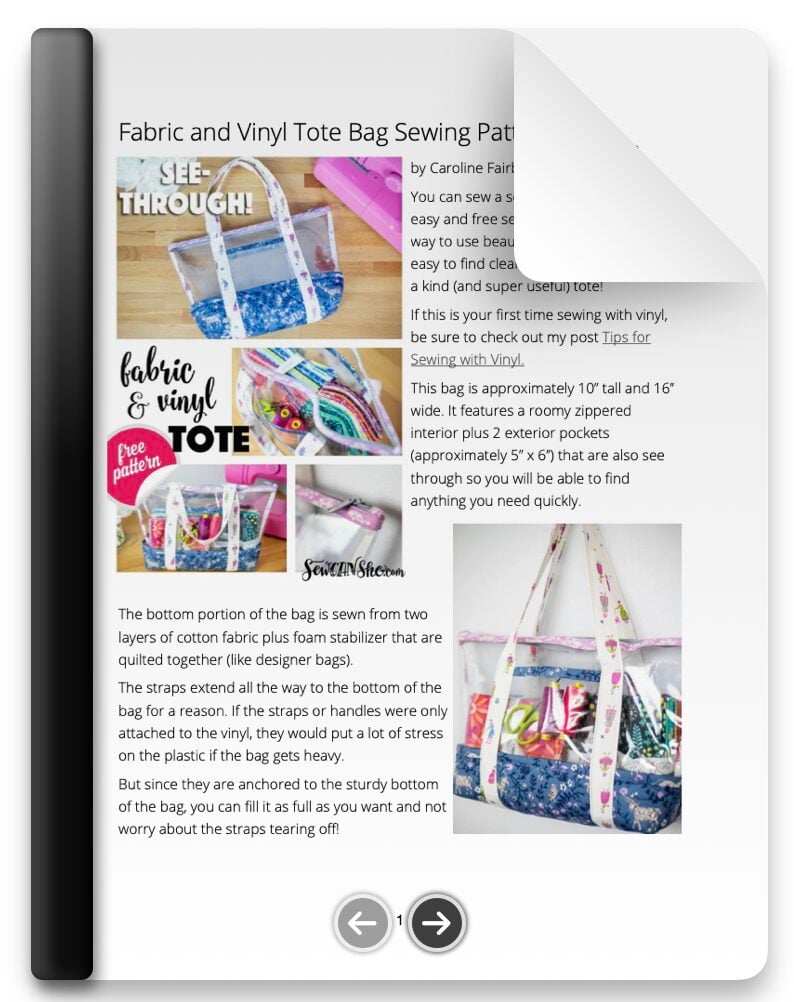
You can sew a see though bag with this easy and free sewing pattern. It’s a great way to use beautiful cotton fabric plus easy to find clear vinyl and make a one of a kind (and super useful) tote!

If this is your first time sewing with vinyl, be sure to check out my post Tips for Sewing with Vinyl.
The blog post below is totally free to read, print, and sew! Just hit CTRL +P on your computer to print. There is an optional PDF download offered at the end of the post.

This bag is approximately 10’’ tall and 16’’ wide. It features a roomy zippered interior plus 2 exterior pockets (approximately 5’’ x 6’’) that are also see through so you will be able to find anything you need quickly.

The bottom portion of the bag is sewn from two layers of cotton fabric plus foam stabilizer that are quilted together (like designer bags).
The straps extend all the way to the bottom of the bag for a reason. If the straps or handles were only attached to the vinyl, they would put a lot of stress on the plastic if the bag gets heavy.
But since they are anchored to the sturdy bottom of the bag, you can fill it as full as you want and not worry about the straps tearing off!

This bag pattern is fat quarter friendly! I used fat quarters from the beautiful Promenade collection from FIGO Fabrics. Ask for it at your local quilt shop or use their product finder to find a shop that carries it near you.

In this picture, the bag is stuffed with even more fat quarters from FIGO Fabrics. Expect to see these beauties in projects coming up!
I used all fat quarters for my bag (including a FQ for the straps), but I think the straps on this other bag are more professional looking. Those straps required almost 1/3 yard of fabric so I used a different technique on my fat quarter friendly bag here. I’ll share a link showing how to make the other straps below.
So let’s get started!
Fabric and Vinyl Tote Free Sewing Pattern
You will need:
- 1/4 yard cotton fabric for the bag bottom exterior
- 1/4 yard cotton fabric for the bag bottom lining
- 1/4 yard cotton fabric for the straps*
- 1/4 yard cotton fabric for the binding pieces (or use scraps leftover from the other fat quarters as I did)
- 1/2 yard medium weight woven interfacing (such as Pellon SF101)
- 1/4 yard sew-in foam interfacing (such as ByAnnie Soft and Stable)
- 1/4 – 1/2 yard 12-16 gauge vinyl (depending on the width of the vinyl at your store)
- 1 zipper at least 16’’ long (recommended: YKK size 4.5 handbag zippers)
- blue masking tape (or other tape that will not leave a sticky residue on the vinyl)
- Wondertape double sided sewing adhesive
- Wonderclips sewing clips
*If you would like to make the the other, more professional looking straps, you will need 1/3 yard of cotton fabric. Cut 2 strips 5’’ x 41’’ and use this tutorial for making 41’’ long bag straps but do not add clips to the ends. Sew these straps to the bag in the section ‘Attach the Bag Straps.’

Cutting Instructions
From cotton fabric, cut:
- 2 rectangles 5 1/4’’ x 17’’ for the bag bottom exterior
- 2 rectangles 5 1/4’’ x 17’’ for the bag lining exterior
- 2 strips 2 1/2’’ x 17’’ for joining the bag bottom and vinyl together
- 2 strips 2’’ x 6 1/2’’ for binding the top edge of the exterior pockets
- 2 strips 2’’ x 17’’ for binding the top edge of the vinyl bag sides
- 2 strips 2 1/2’’ x 11’’ for binding the inside side seams
- 1 strip 2 1/2’’ x 13’’ for binding the bottom seam
- 2 strips 2 1/2’’ x 5’’ for binding the bottom corners
- 2 strips 2’’ x 2 1/2’’ for binding the zipper ends
Also:
Cut and piece together 2 strips that are 3’’ x 42’’ for the straps. Cut 3’’ strips of interfacing and fuse to the back of these pieces until the entire pieces are stabilized with interfacing on the back.
From the vinyl, cut:
- 2 rectangles 7 1/2’’ x 17’’ (bag sides)
- 2 rectangles 5’’ x 6 1/2’’ (exterior pockets)
From the foam interfacing, cut:
- 2 rectangles 5 1/4’’ x 17’’

Sew Binding to the Top Edges of the Vinyl Pieces
1. Fold the 2’’ x 17’’ and the 2’’ x 6 1/2’’ binding pieces in half lengthwise, press. Then fold the long edges to the center and press. Finally press in half to make 1/2’’ wide strips and press.


2. Wrap the long binding strips around the top (long) edges of the larger vinyl pieces. Secure with clips.
Topstitch on the binding close to the fold.

3. Wrap the long binding strips around the top (long) edges of the smaller vinyl pieces. Secure with clips.
Topstitch on the binding close to the fold and then topstitch again 1/8’’ away from the top edge..


Quilt the Bag Bottom Pieces Together
Watch me demonstrate this technique in a video here.
1. Baste a 5 1/4’’ x 17’’ fabric rectangle for the bag bottom exterior to one side of a 5 1/4’’ x 17’’ foam stabilizer piece, sewing all the way around it 1/8’’ from the edge.
2. Flip the piece over and baste a 5 1/4’’ x 17’’ lining rectangle to the other side.

3. This step is optional, but I love to add quilting to my bags! For this one, I drew diagonal lines 2’’ apart with a hera marker and then quilted over them. Feel free to add any quilting you like or none at all.

Repeat this step one more time to make 2 bag bottom pieces.


Sew the Vinyl to the Bag Bottom
1. Lay a bag bottom piece on your workspace with the lining side up. Then place one of the larger vinyl pieces on top, matching up the edge of the vinyl that doesn’t have binding with the top raw edge of the quilted bag bottom piece (first photo above).
2. Press one of the 2’’ x 17’’ binding strips in half lengthwise, wrong sides together. Lay it across the top edge on top of the bag bottom piece and the vinyl piece with all the raw edges lined up. Clip in place (second photo above).

3. Sew across the top edge with a 1/4’’ seam allowance.

4. Open up the piece so that the vinyl is on the top now and finger press along the seam (from the lining side) to help crease the vinyl (an iron would melt the vinyl so just use your fingers).

Flip the piece over and finger press the seam toward the binding.
Note: when I used thicker (16 gauge) vinyl, I found the seam to be stiff, so pressed the seam toward the binding, being very careful not to touch the vinyl with my iron.

5. With the vinyl still folded away from the bag bottom (so it won’t get caught in the seam), wrap the binding around the seam (which is pressed or finger pressed toward the vinyl) and stitch the binding down close to the folded edge.
This step was tricky when I used 16 gauge vinyl, but when I used the thinner 12 gauge vinyl I didn’t have any problem at all.
Repeat this step for the other side of the bag.

Attach the Exterior Pockets to the Bag Sides
1. Center one of the exterior pockets on one of the bag sides, tucking the bottom (unbound) edge of the vinyl pocket underneath the binding that you just sewed.
The pocket should be 5 1/4’’ from either side and about 2’’ below the top bound edge of the bag side piece.
Make sure you tuck the bottom edge of the pocket under the binding! Secure the pocket in place with a piece of masking tape, if desired.

2. Stitch across the top edge of the binding which will sew the bound seam allowance onto the vinyl and enclose the bottom edge of the pocket at the same time.
Repeat to add a pocket to the other bag side piece.

Make the Bag Straps
If you made better straps using 5’’ x 41’’ strips and my sturdier bag strap tutorial, skip to the next step: Attach the Bag Straps. Below are instructions for making fat quarter friendly straps.
1. Fold each 3’’ x 41’’ strip (with interfacing) in half and sew the long edge with a 1/4’’ seam allowance.
2. Turn each strap right side out using a safety pin or turning tool.
3. Topstitch along both long edges of each strap, 1/8’’ from the edge.

Attach the Bag Straps
1. Arrange a bag strap on each bag side piece as seen above.
The ends of the strap are lined up with the bottom of the bag. The strap covers the side edges of the vinyl pocket so that when sewn, the pocket will be complete. Each side of the strap is approximately 4’’ away from the side of the bag.
Secure the strap in place with masking tape.


2. Sew the straps to the bag sides by sewing from the bottom up (on top of the previous topstitching), sewing across the strap just above the pocket binding, and then sewing back down to the bottom of the bag. Refer to the second photo above.

3. In order to easily box the corners later, mark and cut 2’’ squares from the bottom corners of each side piece.

Sew in the Zipper
1. Prepare the zipper by trimming it down to exactly 16’’ long. If possible, cut off both metal stoppers so you won’t break your needle on them.
Since my zipper was already 16’’ long, I was only able to cut off the bottom stopper.
2. Fold and press the 2’’ x 2 1/2’’ zipper binding pieces in half with the shorter 2’’ edges together.


3. Place one of the binding pieces against the back of the zipper at the closed end, with the raw edges together. Stitch with a 1/4’’ seam allowance.
Turn the binding over to the other side and stitch it down close to the fold.

4. Bind the other end of the same way, except at the open end I find it easier to sew with the zipper face up so I can pinch the two tapes together when I sew across them. The binding piece is still sewn against the back of the zipper with the raw edges together.

5. Cut a 16’’ long piece of Wondertape double sided sewing adhesive and apply it along the one if the zipper tapes.
Tip: To help stick the Wondertape on straight, start with the zipper pull all the way at one end. Apply the tape across 3/4 of the zipper, but not the part with the slide. Then move the slide to the other side and finish applying the tape.

6. Center a bag side over the zipper and press it down as straight as you can with the top bound edge about 1/8’’ away from the zipper teeth. The bag side piece should extend pas the zipper 1/2’’ on either side. Press the bag down securely all the way across the zipper.
Also tape or pin the strap to the bottom of the bag to keep it out of the way.

7. Sew across the binding on the top edge of the bag close to the fold.

Repeat Steps 5-7 to sew the other bag side piece on the opposite side of the zipper.

Finish Sewing the Bag
1. Fold the bag with the two sides right sides together (the lining showing) and clip together the sides and bottom.

2. Sew the two sides and the bottom edge separately with a 1/4’’ seam allowance.


3. Fold the 2 1/2’’ x 13’’ binding strip in half and press. Sew it along the bottom edge of the bag (1/4’’ seam allowance).
Turn the binding over to the other side and sew it down close to the fold.


4. Now fold and press the 2 1/2’’ x 11’’ strips in half lengthwise. Sew each to a side of the bag with the extra binding extending past the top edge.
Then trim away the extra binding at the top to only 1/2’’. Fold the raw edge around the top and then wrap the binding around to the other side so the top end is nice and neat. Stitch in place.


5. To box the corners, flatten the side of the bag against the bottom, lining up the seams and making the seam allowances lay in opposite directions to reduce bulk. Pin or clip.
Stitch with a 1/4’’ seam allowance.
Repeat on both corners.


6. Sew the last two pieces of 2 1/2’’ x 5’’ binding in the same way, except this time center the binding so it extends past both ends.
Trim the ends to 1/2’’ on both sides and wrap and tuck them in for a nice neat corner.

Turn your beautiful Fabric and Vinyl Tote right side out and fill it with all your favorite things that you want people to get jealous of!
Just kidding – but what will you use it for? Tell me in the comments.
As always, I’d love you to show me what you make with my patterns and tutorials by uploading a picture to Instagram and tagging me @sewcanshe.
Happy bag making,

FABRIC AND VINYL TOTE SEWING PATTERN
Purchase this pattern in PDF format! The PDF file contains all of the instructions, plus the step by step photos that have been reduced to fit the page nicely with no ads.
Download the file immediately and keep your confirmation email so you can download it again later. Unlimited downloads are available from the confirmation email.
Disclosure: some of my posts contain affiliate links. If you purchase something through one of those links I may receive a small commission, so thank you for supporting SewCanShe when you shop! All of the opinions are my own and I only suggest products that I actually use. 🙂