Guest Post: Bow Clutch by Rebecca from Rock the Stitch

Hi, my name is Rebecca and I am a sewing addict.
What’s that? Wrong group you say?
I think not. If you have spent any time searching through all the free crafty goodness here on Sew Can She than you will know that we are in the right place! It is like a feeding ground for sewing addicts like us ;). That is why when I was asked to be a guest blogger here I was literally jumping up and down!
Though there is a plethora of sewing tutorials here on Sew Can She I knew right away what I was going to make. I fell in love with the DIY Bow Clutch from Elm Street Life the moment I saw it. I made a few as gifts and, let me tell you, they were very hard to giveaway! I rarely sew for myself but this tasty tutorial was calling me.
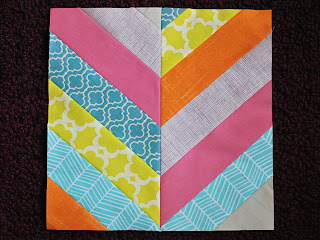
I am not very good at following rules I think. Over on my blog Rock the Stitch I have started a self-challenge to create and design with chevrons. My series is called “Inspired by Chevrons”. With that in mind, I kinda mixed two tutorials here instead of just one. As if the bow clutch wasn’t cute enough by itself, right? I also used the Herringbone Block Tutorial found here on Sew Can She.
And here is my creation!
Swoon!
To make my chevron strips I followed the technique shown in the Herringbone Block tutorial but made mine a bit smaller. I cut 6 strips of each coordinating fabric at 1.75″x5″. Then I sewed half my strips together; staggering 1″ to left each time I sewed a new strip on. The other half was sewn together the same way except staggered to the right.
Then I trimmed my strips to 2.5″ wide at a 45 degree angle.
From each strip I cut one piece 6″ long and two pieces 3″ long.
Here’s my pieces all ready to be sewn up. The rest of the clutch was sewn according to the tutorial.
This mustard Colored zipper is a little vintage number I found in my stash 🙂 I cut it to 9″ for this clutch.
I might have let out a little squee when I attached the bow!
The only other part I did differently was hand sew the opening closed (where the bamboo chopstick is).
I know there are lots of sewists out there who can’t stand hand sewing, but I highly reccomend you make friends with your hand needle. This slip stitch can’t be done by machine. You can barely tell where the opening was when its all finished. Here is the completed closure from the side…invisible.
My daughter already tried to claim this clutch. LOL. I was shamelessy photographing this clutch like it was a runway model at a fashion show. I think I am in love!
Thank you so much for inviting me as a guest blogger! It is honor to be here.
Don’t forget to come visit me at Rock the Stitch for more rockin’ sewing projects!
~Rebecca~
Disclosure: some of my posts contain affiliate links. If you purchase something through one of those links I may receive a small commission, so thank you for supporting SewCanShe when you shop! All of the opinions are my own and I only suggest products that I actually use. 🙂


