How to Sew Bedside Pockets Organizer – free sewing Pattern
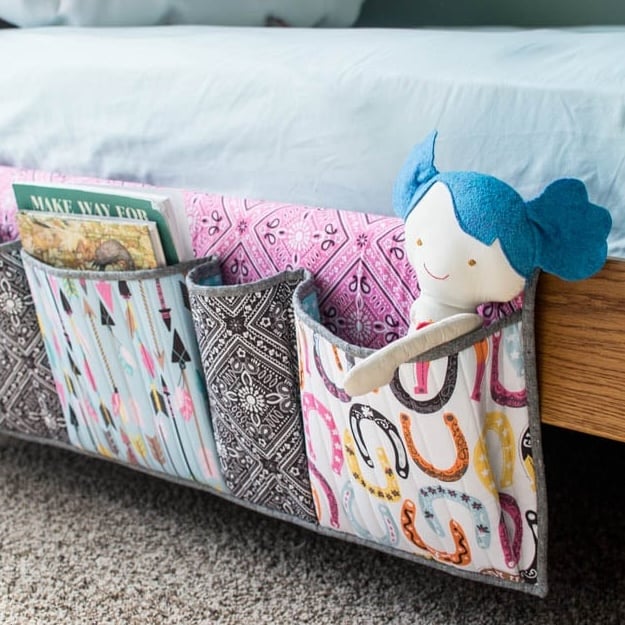
Sew a row of pockets to keep extra things off your nightstand and organize your bedside! This organizer is easy to sew and can help kids or adults control the clutter.

In my kids’ bedroom, we used this easy organizer to hold bedtime toys, a few books, and other items I want to keep off the floor.
The blog post below is totally free to read, print, and sew! Just hit CTRL +P on your computer to print. There is an optional PDF download offered at the end of the post. Join our Sewing Bee Community for access to over 300 PDF patterns (including this one), live workshops, premium video courses, and more.

This organizer is 41” wide and has 5 pockets. The pockets are all 10” tall – 3 of them are 10” wide and 2 are 5” wide. You can sew it with all one fabric or mix it up with different fabrics for each pocket.

The inside of the organizer has Soft and Stable from ByAnnie’s, which is the perfect stabilizer for something like this. It is soft but totally holds it shape and looks great. The Soft and Stable that I used is 58” wide.
The Soft and Stable holds it’s shape so well in fact, that I used it to pin out and plan the pockets beforehand. I was able to determine what size pleats I needed before I ever started sewing.

I followed my reader’s advice and used non-slip shelf liner to help hold the organizer under the bed mattress. It works amazingly well and was surprisingly easy to sew. I’ll give some tips in case you have trouble, but I did not experience any.
So let’s get started with the sewing tutorial!
You will need:
- 1 yard of Soft & Stable from ByAnnie’s
- 1 pkg or 40” of non slip shelf liner (I used Con-Tact brand)
- 1/2 yard fabric for the back of the organizer
- 1/2 yard fabric for the front of the organizer
- 1/2 yard fabric for the pocket back
- 1/2 yard or 5 pieces of fabric for the pocket front
- 1/2 yard of fabric for the binding
Cutting:
For the binding, cut:
- 5 strips 2 1/2” x width of fabric
For the organizer front and back, cut:
- 2 rectangles 16 1/2” x 41”
For the back of the pockets:
- 1 rectangle 10” x 61” (you’ll probably have to piece this together since it’s so long
For the front of the pockets, cut:
- 2 rectangles 10” x 14 3/4” (for the first and last pockets)
- 1 rectangle 10” x 14 1/2” (for the middle pocket)
- 2 rectangles 10” x 9 1/2” (for the 2 smaller pockets)
From the Soft and Stable, cut:
- 1 rectangle 16 1/2” x 41” (for the back)
- 1 rectangle 10” x 61” (see below for how to piece this together)


The Soft and Stable is a nice 58” wide, but that’s still just a little bit short of what we need for the pocket strip. You can sew two pieces together the same way that you would quilt batting. Just set your sewing machine to a wide zig zag and sew the two edges right next to each other. No one will ever know. 🙂


Preparation – make the binding:
Unless I’m not sure which fabric I’ll use, I like to make my binding first so it’s ready when I need it.
Sew the 5 strips together at a right angle and trim away the ends with a 1/4” seam allowance. Press the long strip in half lengthwise.

Sewing:
Sandwich the larger piece of Soft and Stable (16 1/2” x 41”) in between the matching front and back pieces of fabric and pin the edges all around.
Baste the pieces together around all edges 1/8” from the edge. Here’s a video how-to.
Tip: I used my walking foot for this step and for the entire project. If you have one, it is great when working with lots of layers.

Make 4 marks on the front of this piece along the bottom as shown in the diagram above. Feel free to use a sharpie or other marker if you need to since these marks will be hidden deep in the pockets.

Pin and sew the 10” x 61” piece of fabric for the back (inside) of the pockets to the matching piece of Soft and Stable in the same way.

Next we’ll use Quilt-As-You-Go to sew the front of the pockets.
Place the fabric for the first pocket (10” x 14 3/4”) on the end of the Soft and Stable and baste in place 1/8” from the short edge.
Set your stitch length for quilting (I like about 2.5) and sew a straight line about 1” from the edge. Continue quilting in straight lines about 1” apart (or your preference) until the first pocket is quilted.

Pin the second pocket piece (10” x 9 1/2”) on top, right side down, with the raw edge aligned with the first pocket.

Stitch with a 1/4” seam allowance.

Smooth the second pocket back along the Soft and Stable and sew close to the seam. Continue sewing lines of quilting on the second pocket.
Repeat these steps with the middle pocket (10” x 14 1/2”), the next small pocket, and the last pocket. Trim away any fabric at the end if need be.

Cut a piece of binding to fit the top of the pocket piece. With the raw edges all aligned, pin and sew the binding to the top of the pockets with a 1/4” seam allowance.

Flip the binding around to the back and pin from the front. Stitch ‘in the ditch’ along the fold from the front, checking to make sure that the binding is caught on the back.

Pin the pocket piece to the front side of the backing. Match the markings that you made along the bottom to the seams in the front of the pockets.

Baste the sides of the pocket piece along the edge with a scant 1/4” seam allowance. Pin at the top and the bottom of each pocket seam on the front.

Using a regular stitch length, sew along the pocket seams to divide each pocket. Make sure to backstitch securely at the top of each pocket.

Make approximately 1” pleats at the bottom of each pocket dividing seam. You don’t need to measure, just make sure that the bottom of each pocket lies flat against the backing and that the pleats on either side are the same size.

At each end make a pleat that is approximately 1” wide and 1/2” away from the edge. This leaves plenty of room for binding.

Baste the bottom of the pockets in place a scant 1/4” from the edge.


Pin and baste (with a scant 1/4” seam allowance) the 41” long piece of shelf liner to the back of the organizer along the top.
This is where I was shocked to have no trouble at all sewing on non-slip shelf liner. If you do have problems, try placing a long strip of tissue paper in between the shelf liner and your sewing machine foot. Sew slowly and remember you won’t have to do this for long.
If it won’t work on your machine at all, you can always hand sew the shelf liner on after the binding is in place. This part will be hidden under the bed anyway and won’t show.
Now it’s time for the rest of the binding!

Sew the binding around the organizer in the same manner as on the top of the pockets. Start by sewing it to the front with a 1/4” seam allowance.
I started at the top to see how it would work with the shelf liner against my machine. No problems. If you do have problems, try placing a strip of tissue paper between the shelf liner and the bed of your sewing machine.


#block-yui_3_17_2_1_1453735330554_392687 .sqs-gallery-block-grid .sqs-gallery-design-grid { margin-right: -10px; }
#block-yui_3_17_2_1_1453735330554_392687 .sqs-gallery-block-grid .sqs-gallery-design-grid-slide .margin-wrapper { margin-right: 10px; margin-bottom: 10px; }
To miter the corners of your binding, sew until you are 1/4” away from the edge. Backstitch and cut the threads.
Fold the binding back at a right angle, straight with the next side of your project.
Then fold the binding back on top of itself and pin or clip it in place while you put it under your sewing machine.

Backstitch at the edge and continue sewing on the binding.
Stop when you are 8-10” away from the place where you started.

Fold back the ends of the binding and make a crease in the place where they should meet. Mark this place with a fabric pencil or pen.


Match the markings and pin the binding right sides together. Stitch along the marked lines.

Finish sewing the binding to the organizer.

Flip the binding around to the back and pin in place. Sew from the front again (stitching in the ditch).
Fold the corners tightly as you come to them, and pivot your needle to turn.

And that’s it!

Place the shelf liner and top of the organizer under the bed as far as you need to so the pockets will be the correct height.

And how awesome is that?

This project is included in my list of 11 Sewing Projects to Make You More Organized. 🙂
xoxo,

BEDSIDE POCKETS ORGANIZER SEWING PATTERN
Purchase this pattern in PDF format! The PDF file contains all of the instructions, plus the step by step photos that have been reduced to fit the page nicely with no ads.
Download the file immediately and keep your confirmation email so you can download it again later. Unlimited downloads are available from the confirmation email.
Disclosure: some of my posts contain affiliate links. If you purchase something through one of those links I may receive a small commission, so thank you for supporting SewCanShe when you shop! All of the opinions are my own and I only suggest products that I actually use. 🙂