How to Sew a Fabric Basket Tote: free sewing pattern
Use this step-by-step free sewing pattern to sew a beautiful Basket Tote that makes a great purse too. It has two interior pockets, just right handles that aren’t super long like shoulder straps, and lots of style!

This large purse pattern has a bound top edge that matches the handles (if you want), and it is nice and roomy on the inside. The center panel is quilted, and there is piping that separates the middle from the sides. Don’t leave off the piping… It adds a professional touch and hides mistakes, I promise!
The blog post below is totally free to read, print, and sew! Just hit CTRL +P on your computer to print. There is an optional PDF download offered at the end of the post. Join our Sewing Bee Community for access to over 300 PDF patterns (including this one), live workshops, premium video courses, and more.

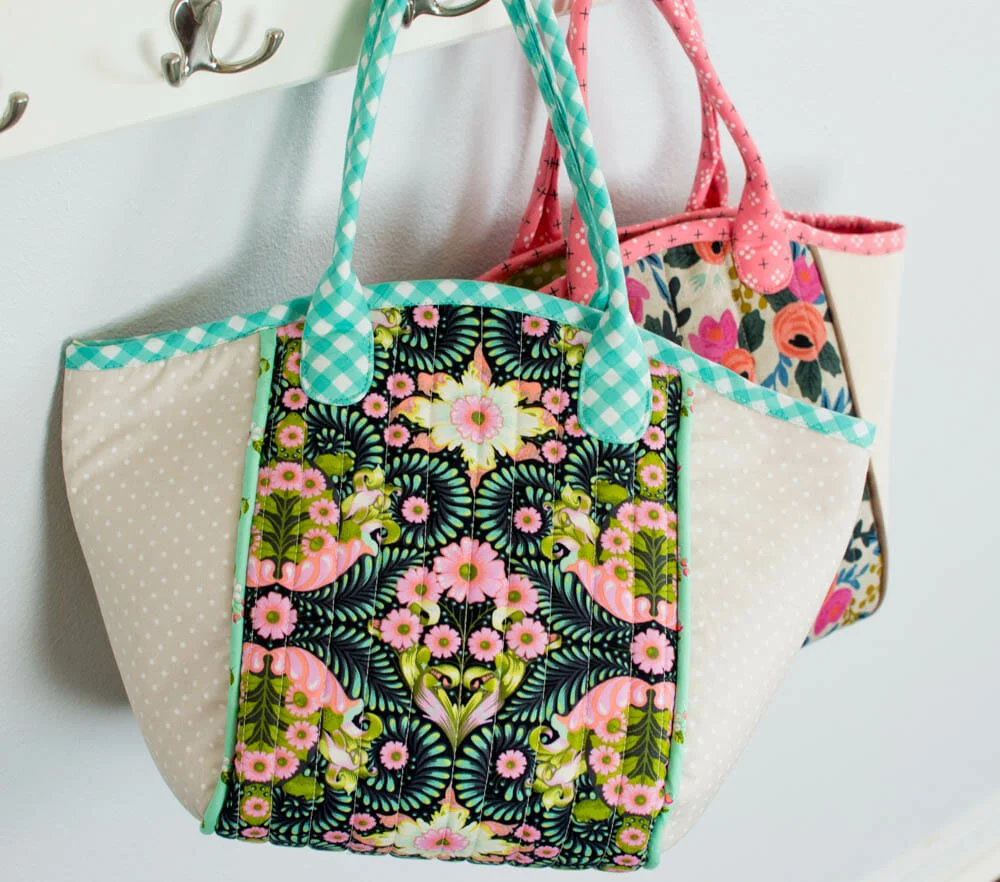
I sewed this version using lovely Rifle Paper Co. canvas and Cotton + Steel quilting cotton). It has a magnetic snap closure

This lovely bag (in Tula Pink’s Slow & Steady plus other fabrics from my stash) has a zipper at the top, which is also a great way to close your bag.
Details: Finished dimensions: approximately 16” wide at the top and 11” tall (not including the handles).
Now I can’t wait to show you how to make your own. Let me point a few things out beforehand, though:
- This is a long tutorial! Most bag patterns have a lot of steps, so no surprise there. I am going to link you to other blog posts for a couple of details so this one won’t get too long (like how to sew the fabric handles and how to cut bias strips and binding).
- I used Soft & Stable to give this bag a beautiful and professional feel. Pellon’s Flex Foam Stabilizer is similar, and I’ve seen but not tried the one made by Bosal. I recommend using one of these stabilizers to get the same look, although you could use fusible fleece in a pinch.
- You have 2 closure options: magnetic snap or zipper. I think both options are great, although the snap is a little bit easier to install, of course. If you choose the zipper, you must use a #4.5 handbag or upholstery zipper with a wide (1.25”) zipper tape. You can get them in multiple colors here, or see the one I bought at Joanns below.
Basket Tote free sewing pattern – detailed instructions
You will need:
- 1/3 yard main exterior fabric
- 1/3 yard coordinating exterior fabric
- 1/2 yard fabric + 2 yards 3/16” cording to make piping (or 2 yards pre-made piping)
- 1/2 yard fabric for the handles and binding
- 1/2 yard main lining fabric
- 1/3 yard coordinating lining fabric
- 1 magnetic snap closure or handbag zipper 20” or longer
- 1/2 to 1 yard flexible foam stabilizer or fusible fleece (1/2 yard if 60” wide, 1 yard if only 20” wide)
- fabric marking pen
- sewing pins and clips
Make sure to print at 100% scale. Match up the lines on the templates and tape the pieces of paper together without cutting off the margins.

You can use pre-made piping if you want, but I think it’s more fun to make my own using 3/16” cording and bias-cut strips of fabric. Here is the cording and 1.25” wide zipper that I bought at Joann’s so I could sew this project. I didn’t have any choice in zipper colors. I need to stock up on #4.5 zippers so I have more color choices next time. 🙂

Cutting:
From the main exterior fabric, cut:
- 1 on the fold from the Basket Tote Body pattern piece (as marked)
From the coordinating exterior fabric, cut:
- 2 from the Basket Tote Side pattern piece
From the main lining fabric, cut:
- 2 from the Basket Tote Body pattern piece (as marked)
- 1 rectangle 9 1/2” x 13”
From the coordinating lining fabric, cut:
- 2 from the Basket Tote Side pattern piece
Cut (and piece together, if necessary) the following strips on the bias (here’s a video how-to):
- 1 strip 2” x 40” for binding the top of the bag
- 4 strips 2” x 22” long for the handles
- 2 strips 1 1/2” x 28” long for making the piping
Note: the handle strips do not need to be cut on the bias, but it’s easy to cut them at the same time that you cut the binding strips if you are using the same fabric. The binding and piping strips must be cut on the bias because of all the curves on this bag.
From the flexible foam stabilizer, cut:
- 1 on the fold from the Basket Tote Body pattern piece (as marked)
- 2 from the Basket Tote Side pattern piece
- 2 strips 2” x 22” long for the handles

Preparation:
1. Make the handles. Refer to the Beautiful Fabric Bag Handles tutorial (these instructions are also included in the PDF file available for sale below). My Japanese Style Fabric Bag Handles tutorial would work great too. Or you can use thrifted handles!

2. Pin and sew the exterior fabric pieces to the matching pieces of stabilizer. I like to baste them around all sides, about 1/8 – 1/4” from the edge.

3. After attaching the stabilizer, quilt the exterior body piece. I quilted by sewing straight lines (with my walking foot) about 1” apart on this tote. The lines were about 2” apart on the other tote. I love both looks.


4. Make and attach the piping to the side pieces: Wrap a 1 1/2” bias cut strip around the piping cord and baste close to the cord using your sewing machine’s zipper foot. Then attach a piece of piping around the sides and bottom of each side piece, sewing right on top of the previous basting (still using the zipper foot).
As you can see in the third picture above, you can make and attach the piping at the same time if you feel comfortable doing so.


As you attach the piping, you should be sewing about 3/8” from the edge. Make clips into the piping seam allowance to help it curve nicely around the corners.
Repeat to sew piping on the other curved side piece.

5. Trim the piping even with the top of the side pieces. Then use your fingers or some tweezers to pull some of the cording out and trim away 1/2”. Smooth the piping out again so that the end of the cording is about 1/2” lower than the top edge. Repeat this at both ends and again on the other side piece. This will help you to have less bulk to sew over when attaching the binding in the very last step.

Assemble the tote exterior:
1. Fold the main body piece in half to find the center. Use the fabric marking pen to mark the center on both sides. This will be the bottom of the bag.
2. Fold the side pieces in half lengthwise and mark the center at the bottom of each.

3. Match the center of one side with the center of the tote body piece, right sides together. Starting at the bottom center marks, clip the bag side and body together. Cut small clips into the bag body piece to help it curve around the side piece.

I think clips are easier to use on the bag exterior – use lots!

4. Sew the body and side together with the side piece on top and sewing on the previous basting line that attached the piping to the side piece. Go slowly, easing the two pieces together.
Tip: Use your zipper foot again so you can sew close to the piping. After sewing these two together, if you can see the piping basting stitches from the right side, it’s okay to sew the seam again, trying to get even closer to the cording.
Repeat steps 3-4 to attach the other side to the bag. Press the seams open as much as you can.

5. Pin a handle to one side of the bag with the ends of the handle about 3” below the top edge. I placed my handles about 3/4” inside the piping.


6. Sew the handle to the tote bag by topstitching around the bottom of the handle. Make sure that your stitching begins and ends at least 1” away from the top edge of the bag. This is so the handle will fold away from the top edge when you attach the binding.
Repeat to sew the other handle to the other side of the bag.

Assemble the lining:
1. Sew the lining pieces with a curved edge and the 9 1/2” x 13” rectangle together with the rectangle in the middle to make a long strip with curved ends. Use a 3/8” seam allowance. Press the seams open.

2. Fold the lining piece back (wrong sides together) along one of the seams – either one, it doesn’t matter which. Press and then topstitch 1/8” from the edge.
This will be the top edge of the pocket.


3. Place the topstitched edge of the pocket about 1” below the curved edge that it is closest to. This makes a pleat that is about 6” deep. Pin the sides of the pleat.
The actual depth of the pocket may vary a little bit. Check to make sure it is correct by folding the piece in half with the curved edges together. Both sides should be the same size, with the remaining seam at the bottom.

4. Baste the sides of the pleat together about 1/4” from the edge.

5. Divide the big pleat into two pockets by folding it in half lengthwise and making a crease. Then stitch along the crease from the topstitched edge down to the bottom of the pleat (make sure to backstitch at the start and end).


6. Mark the bottom center of the lining side pieces. Pin and stitch the sides of the lining to the pocket piece the same way as the exterior, using a 3/8” seam allowance. The marking at the bottom center of the side should match the seam at the bottom of the pocket piece.
For this step, I like to use pins placed right along the seam line (not perpendicular to it). This helps to make it fit. Don’t forget to clip the straight edge of the pocket piece as you pin it around the corners.

Stop: If you are using a magnetic snap closure, attach the snap pieces to the lining now, centered on either side of the lining pocket panel, 1 1/4” below the top edge. See how I attach magnetic snap pieces (including how to use interfacing to make them sturdy) in this tutorial.


Finish sewing the Basket Tote:
1. Place the lining inside the exterior, wrong sides together. Match up the seams and pin around the top. Baste the lining to the exterior, sewing 1/4” from the top edge all the way around.
(If you are not using a zipper, skip to the binding in Step 8 below.)


2. Prepare the zipper:
- If your zipper is longer than 20”, cut the end off to make it exactly 20” long.
- Cut a scrap of fabric 2 1/2” x 3”. Press the long 3” edges to the center. Press the short ends under about 1/2”.
- Wrap this tab around the cut end of the zipper. Stitch in a square around the tab, 1/8” from the edge.

3. Flatten the bag and crease to find the center of each side.


4. Use the fabric marking pen to make a mark at the center of each side of the bag on the inside. On the left side (where the open end of the zipper will be sewn), you just need one mark.
On the right side of the bag (where the tab end of the zipper will be sewn) make two more marks, an inch away from the center mark on either side.


5. Open the zipper and clip or pin the wrong side of the zipper against the top inside edge of the bag. Place the top (open) end of the zipper against the single mark on the left side of the bag. Continue to clip or pin the zipper tape to the bag. At the right side, angle the tab end of the zipper down into the bag at the first mark that is 1” away from the center.

This is how the zipper tape should look from edge to edge.

6. Baste the zipper tape in place 1/4” from the edge. Switch to your zipper foot if it’s easier.

7. Pin or clip the other zipper tape to the opposite edge of the bag in the same way. Make sure the tab end is not twisted.

The open ends should meet on the left side at the single mark. Baste it in place.

8. Fold the 2” x 40” bias strip in half lengthwise and press. Press the long edges almost to the center – about 1/8” away from it.


9. Pin or clip the right side of the bias strip against the top inside edge of the bag. Leave about 6” open with long ends of binding free at either end.
Stitch the binding to the bag with a 3/8” seam allowance. Use your zipper foot if there is a zipper. If you used a snap instead, you can use your regular sewing machine foot.

After sewing most of the binding on, pin or clip the free ends until they meet. Place a pin at the point where they should be sewn together.

Unclip the binding and seam the ends together where you marked them with a pin. (I didn’t take off my zipper foot, since I’d need it again in a minute.)

Trim away the extra binding, finger-press the seam open, and then pin and sew it in place.

10. Wrap the binding around to the outside of the bag, folding the raw edge under. Pin or clip it in place about every 2” all the way around.
Tip: On the bag without a zipper, the sides of my lining wanted to creep up when I topstitched the binding. I suggest pinning the sides through all layers about 2” below the edge to prevent the lining from creeping up.

11. Topstitch the binding down close to the folded edge.

All done! I would love to see your bags so upload a picture into the next Show Off Saturday Picture Party!

Now that I have these two beautiful bags, it’s hard for me to decide which one to use! I’m so glad I have my Handy Purse Organizer (free pattern) to help me quickly move all my things back and forth.
Don’t forget to Pin this free sewing pattern for later… and follow my Sewing Purses and Totes Pinboard for lots more inspiration!
BASKET TOTE SEWING PATTERN FROM SEWCANSHE
Purchase this pattern in PDF format! The PDF file contains all of the instructions, plus the step by step photos that have been reduced to fit the page nicely with no ads.
Download the file immediately and keep your confirmation email so you can download it again later. Free patterns must be downloaded within 30 days.
Disclosure: some of my posts contain affiliate links. If you purchase something through one of those links I may receive a small commission, so thank you for supporting SewCanShe when you shop! All of the opinions are my own and I only suggest products that I actually use. 🙂