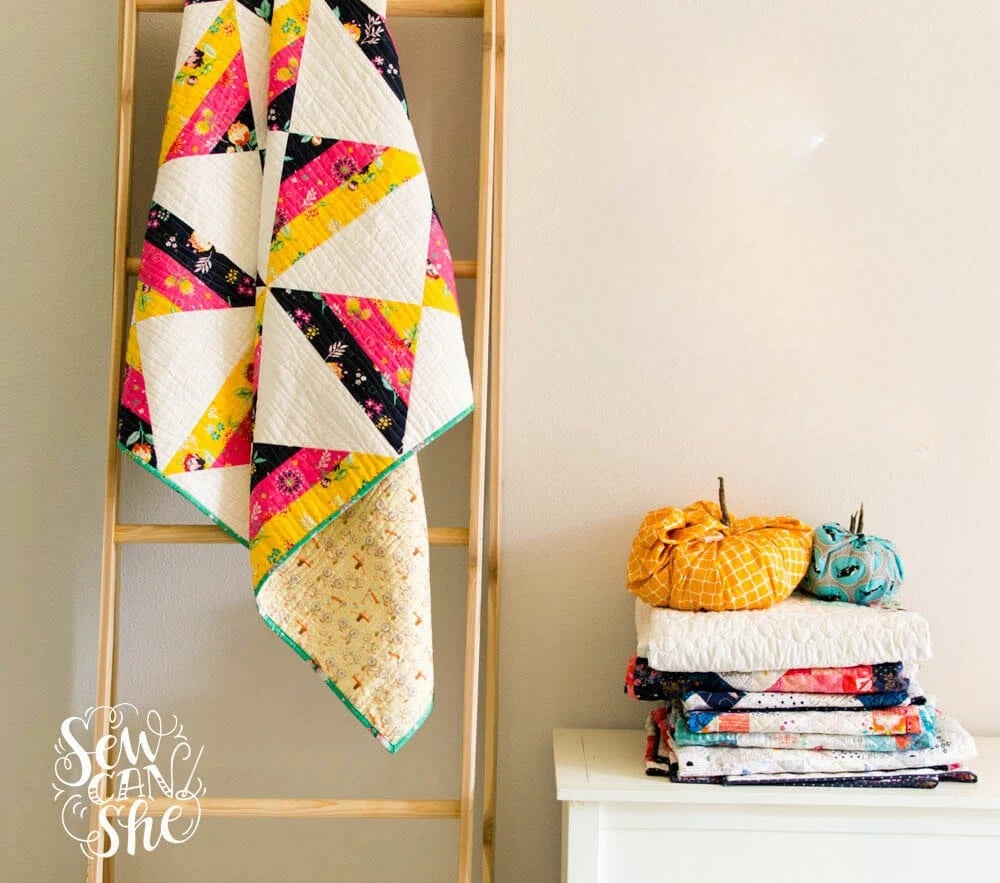
The Candy Corn Quilt: free quilt pattern
On the day I made this quilt, the design reminded me of Candy Corn! It’s a fall quilt for me, but it doesn’t have to be. I’m sure it would make a fabulous Christmas quilt too.
This Candy Corn Quilt post was sponsored by Electric Quilt Company. I’m going to share a couple of my favorite EQ8 features and then give you the pattern for free!
The blog post below is totally free to read, print, and sew! Just hit CTRL +P on your computer to print. There is an optional PDF download offered at the end of the post. Join our Sewing Bee Community for access to over 300 PDF patterns (including this one), live workshops, premium video courses, and more.

Let me see how it would look with different fabrics using EQ8…

Yup! It would look adorable using Vintage Holiday from Bonnie and Camille.

Want to know how I did that? I followed the instructions here for downloading the images from the Moda website and importing them into EQ8. It took less than 5 minutes and it was free!
Since this is a strip quilt (the hourglass blocks are sewn using fabric strips) I also used EQ8 to explore what size the quilt would be using different size strips.
I knew that with 3’’ strips, my blocks would turn out 15’’ finished. So I decided on this layout to make a 60’’ square quilt.
2 1/2’’ jelly roll strips would make a 12’’ block, so I could make a smaller quilt that way if I wanted. Tips for making this design using a jelly roll are included at the end of this post. 😉

Are you ready to make a Candy Corn Quilt (or Christmas Candy Corn Quilt, lol)? Let’s do it!

As I mentioned above, this is a strip quilt, meaning it is sewn together by cutting and sewing strips together first (or using pre-cut strips). Instructions and fabric requirements below are for the 60’’ quilt.
Fabric requirements:
- 2/3 yd each of 3 different fabrics for the hourglass shapes (my print fabrics are from the Jubilee collection from Riley Blake)
- 2 yards of background fabric
- 1/2 yard for binding
- 4 yards backing fabric
You will also need a piece of batting at least 64’’ square.
Cutting Instructions:
From each of the 3 different print fabrics, cut:
- 8 strips, 3’’ x WOF (the entire width of fabric)
For more accurate sewing, wait to cut the background fabric into wide strips as indicated in Step 3 below.

Candy Corn Block Sewing Instructions:
1/4’’ seam allowance allowed.
1. Sew the strips together in sets of 3 (one of each color).
Make 8 strip sets, all the same. Press the seams to one side.

2. Measure the height of your strip sets.
In a perfect world, they would be 8’’ tall. Mine were 7 7/8’’ tall.
If you cut your background fabric strips the same height as your sewn strip sets, the triangles will fit much better!
3. Cut 8 strips of background fabric the same height as your sewn strip sets (I cut 8 strips 7 7/8’’ x width of fabric).

4. Use the 45 degree on your ruler to help you cut off the right hand corner:
Place the 45 degree line against the bottom edge of a strip set. Cut off the right corner, including the selvages (if needed)

5. Turn the ruler around and now place the 45 degree angle line at the top of the strip.
Move the ruler to the left until the tip of the triangle will be 3/16’’ wide (slightly larger than 1/4’’). Cut the triangle.

6. Turn the ruler around again, so that the 45 degree angle line is at the bottom of the strip set and the tip of the next triangle will be 3/16’’ wide. Cut.
Continue turning the ruler and cutting to cut 4 triangles from the strip set.
Cut 4 triangles from the remaining strips sets to make 32 triangles total.
Half of the triangles will have the darker strip on the bottom, half of them will be a reverse pattern.

7. Using the same method that you used to cut the strip sets, cut the background strips into 32 triangles also.

8. Place a strippy triangle on top of a background triangle and pin along the right edge. Stitch.
Repeat 32 times to make 32 strippy/background triangle units.


9. Arrange 2 similar units (with the same color pattern) together as seen above. Match the diagonal seams and pin. Stitch.

Repeat to make 16 blocks.

10. Arrange the blocks in an alternating pattern as seen above.
Note that the blocks with one color pattern are sideways, and the blocks with the other color pattern are up and down.
11. Sew the blocks into 4 rows of 4. Then sew the rows together.
12. Sandwich, baste, quilt, and bind as desired.

Enjoy your beautiful quilt!
Tips for using a Jelly roll instead: You could use a jelly roll of 2 1/2’’ fabric strips instead and the quilt would be 48’’ square. Since I recommend cutting the large strips for your background fabric after your smaller strips are sewn together, the instructions for that part won’t change – although the background fabric requirements would differ. You might be able to make more blocks from the same amount of strips, but I haven’t tried, so I don’t know for sure. Let me know if you try it! xoxo
P.S. Did you know that Log Cabin Quilts are strip quilts too??? Check out these 5 Log Cabin Patterns You Have to Try!
CANDY CORN QUILT PATTERN
Purchase this pattern in PDF format! The PDF file contains all of the instructions, plus the step by step photos that have been reduced to fit the page nicely with no ads.
Download the file immediately and keep your confirmation email so you can download it again later. Free patterns must be downloaded within 30 days.
Disclosure: some of my posts contain affiliate links. If you purchase something through one of those links I may receive a small commission, so thank you for supporting SewCanShe when you shop! All of the opinions are my own and I only suggest products that I actually use. 🙂