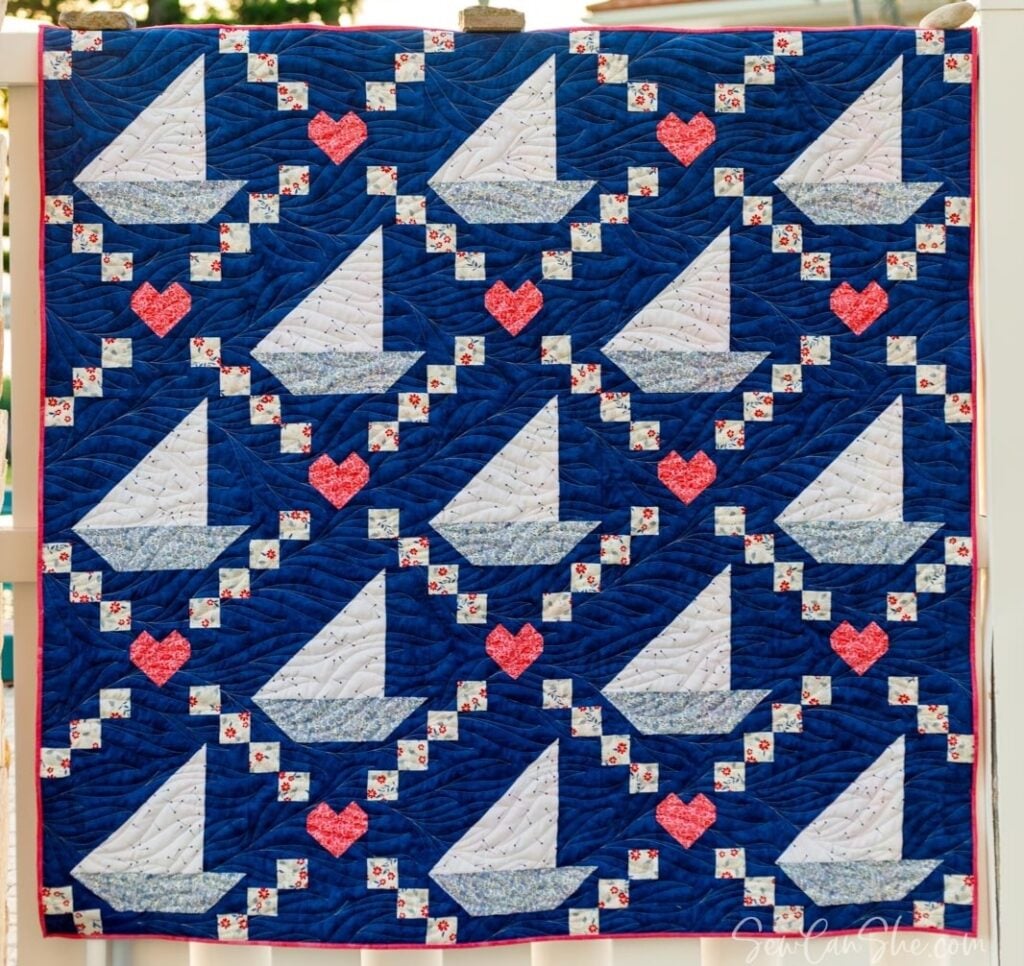
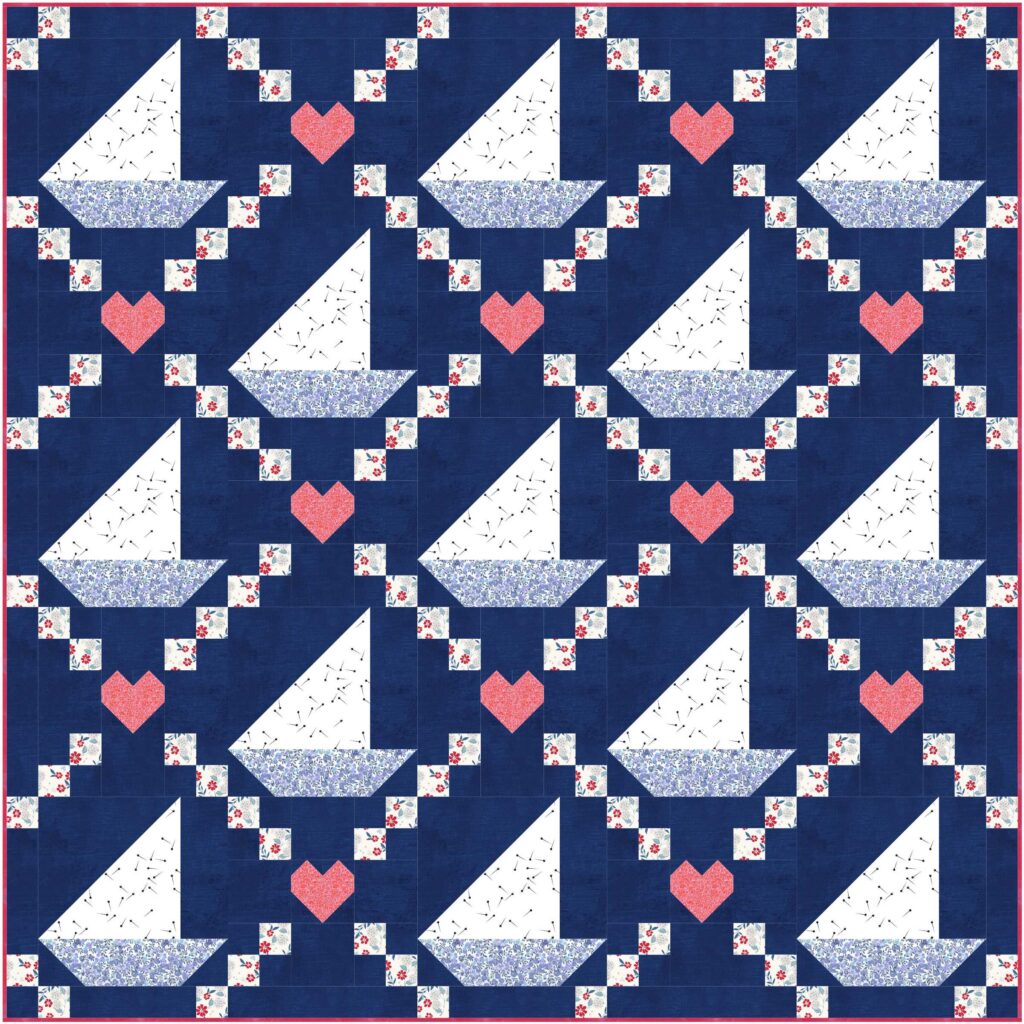
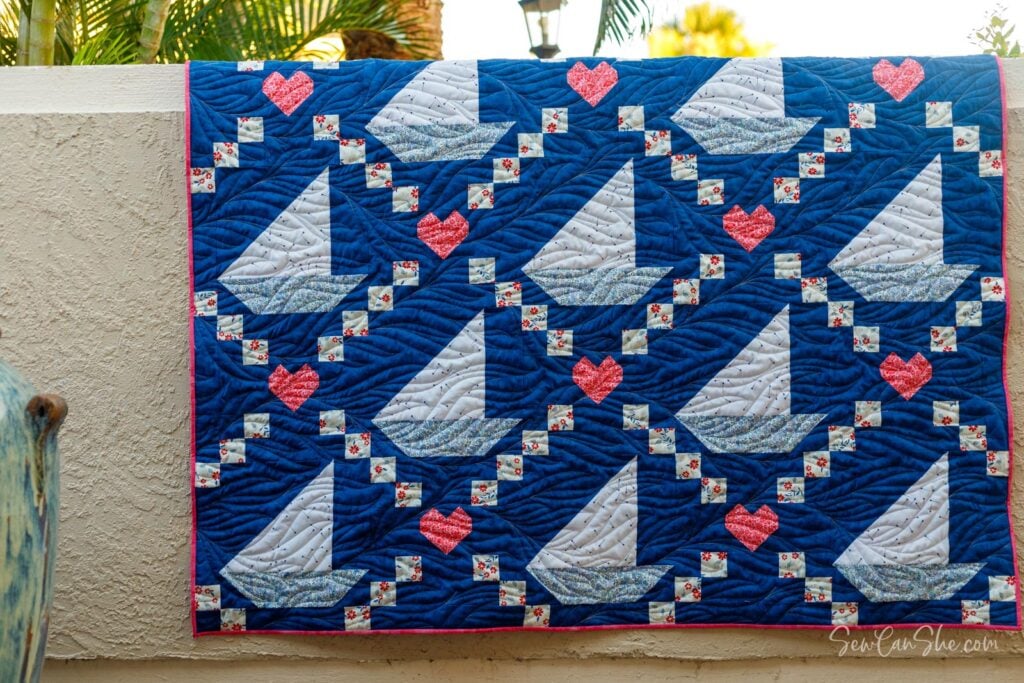
Chesapeake Bay Quilt: A Free Sailboat Quilt Pattern!
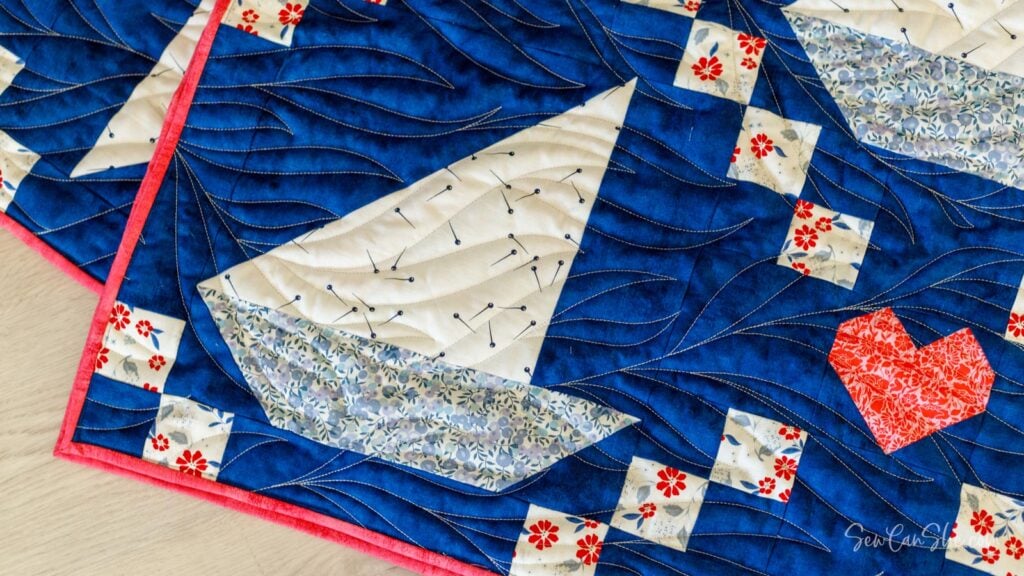
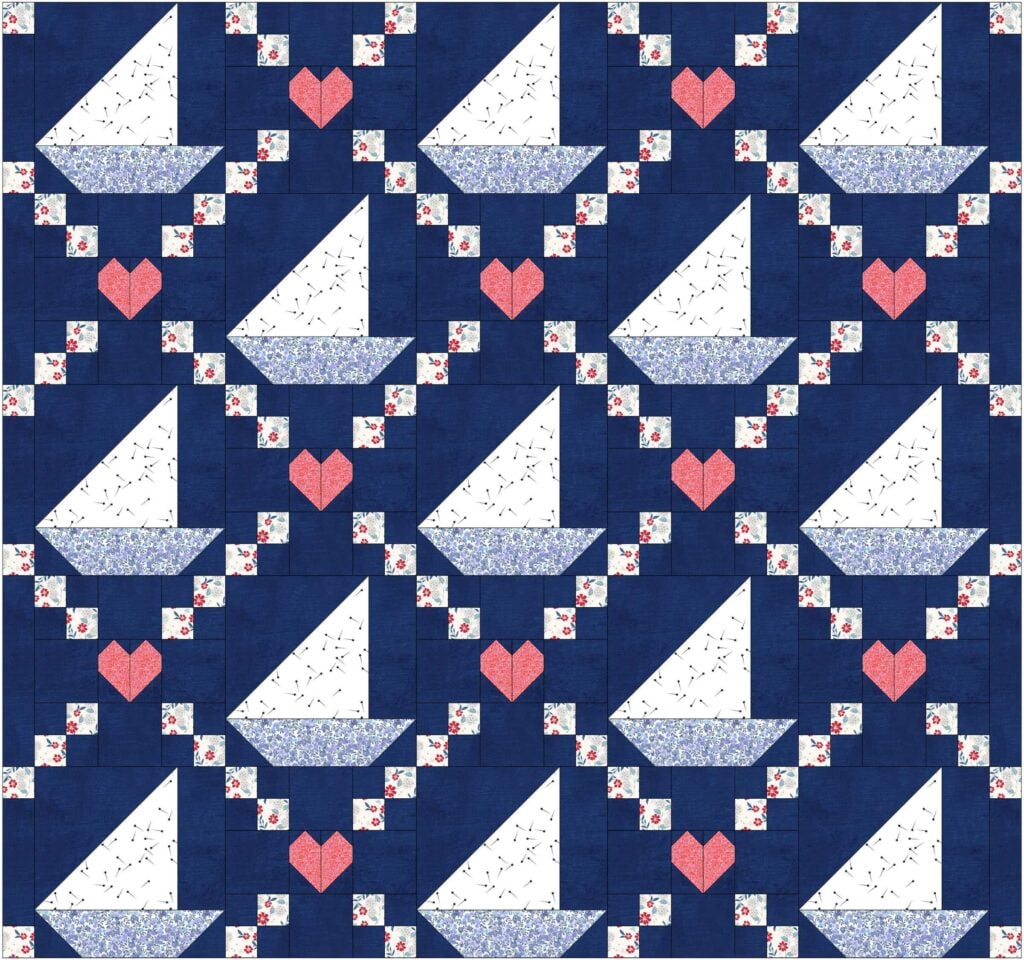
Set sail on a creative journey with the Chesapeake Bay Quilt, a free pattern designed to capture the serene beauty and nautical charm of the iconic Chesapeake Bay. This 64” x 64” throw quilt features an array of sailboats, Irish chains, and hearts. Get ready to navigate through fabric selections and easy piecing to create a beautiful throw quilt that brings the spirit of the bay into your home.
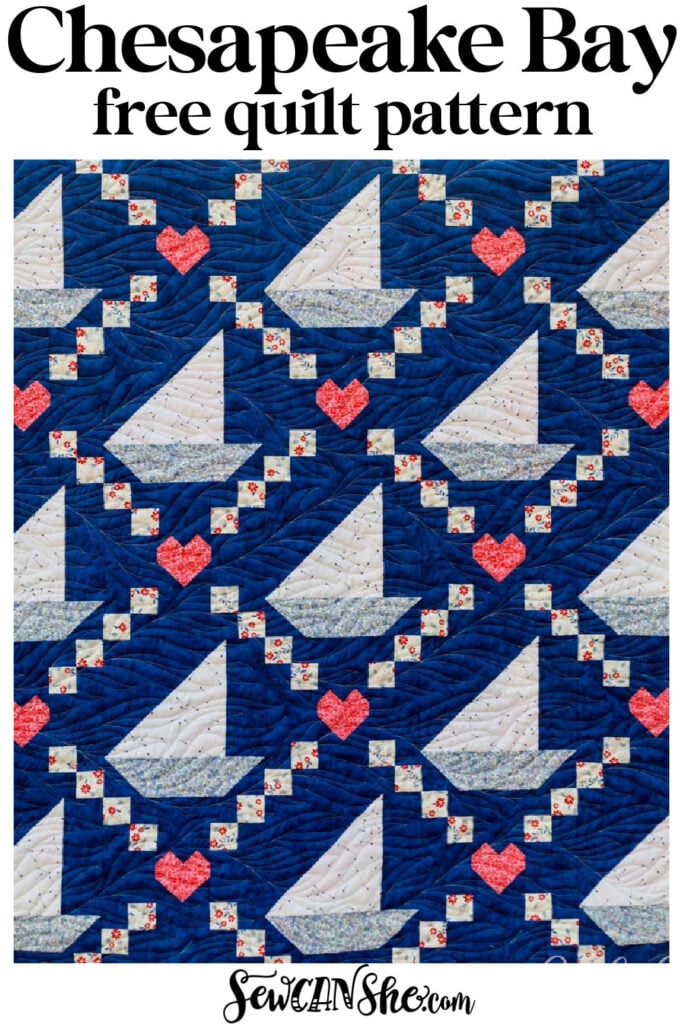
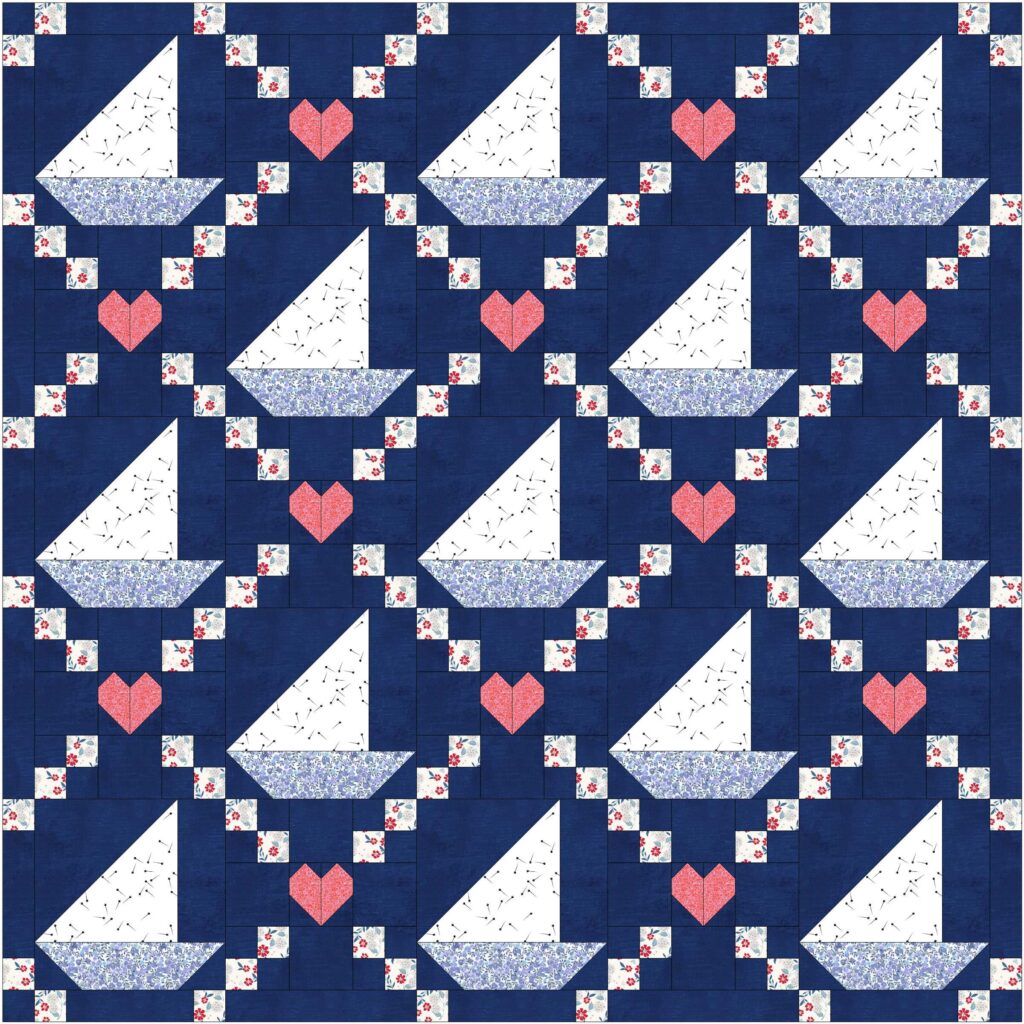
The Chesapeake Bay free sailboat quilt pattern is a throw sized pattern with 2 easy blocks to sew. There are 12 Irish chain blocks with a cute heart in the center and 13 sailboat blocks for a classic looking quilt that’s fresh and modern for summer days at the beach, backyard barbecues, or a lakehouse vacation. The finished quilt is approximately 64” x 64”.
The blog post below is totally free to read, print, and sew! Just hit CTRL +P on your computer to print. There is an optional PDF download offered at the end of the post.
Sew through your fabric stash with all my free quilt patterns.
I was inspired to sew this quilt when some friends invited my son join the crew of their sailboat for the celebrated Annapolis to Newport race. And then they won!
If you love easy quilt patterns, you’ll adore these too:
- 10 Free Patriotic Red, White, and Blue Quilt Patterns
- Fat Quarter Whirlwind Quilt Free Pattern!
- Fat Quarter Fancy – Free Quilt Pattern using 9 Fat Quarters!
Or see all my fat quarter friendly quilt patterns.
The minimalistic design of this quilt means you can easily pick 5 fabrics from your stash or at your local quilt shop and get started right away!
You’ll need just:
- a medium to navy blue fabric for the background (such as Moda grunge)
- a small scale red white and blue floral print with a light background for the Irish chain (I used a Riley Blake print)
- a light blue print for the boat hulls
- a textured white fabric for the sails (I used a Riley Blake print here too)
- and a small scale red print for the hearts and the binding
If you love to use your AccuQuilt fabric cutter like I do, I’ll share some optional cutting die numbers to make this pattern Accuquilt-friendly. Using an Accuquilt is optional, but I love it! See all my Accuquilt-friendly quilts. Look under the cutting dimensions below for a list of fabric-cutting dies you may use for some of the pieces.
Then get ready to chain piece your way on a smooth sailing quilty adventure. This quilt will come together faster than you think, thanks to time-saving strip piecing and half square triangle techniques.
What is this Sailboat Block?
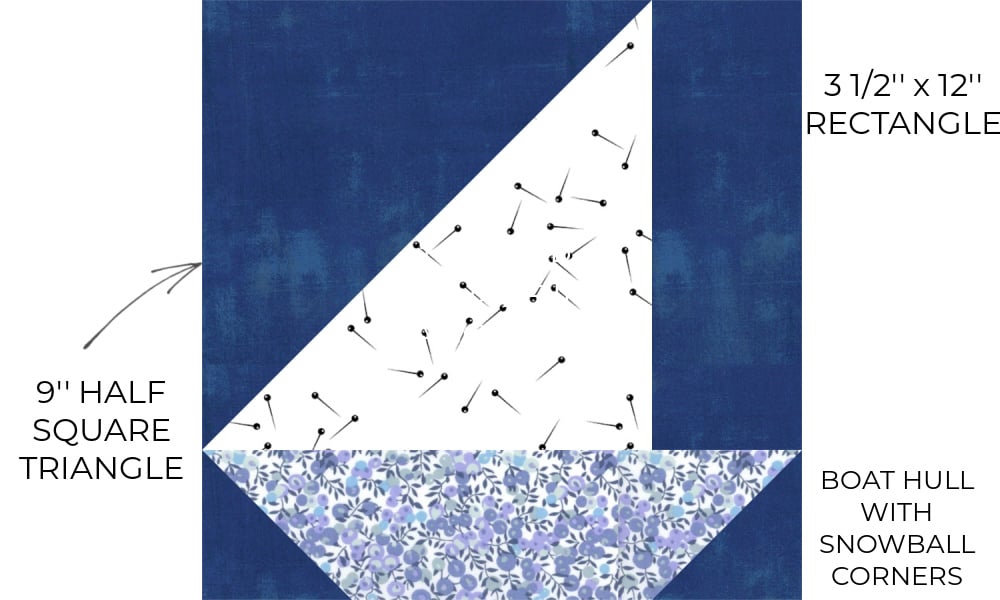
Let’s break it down! This easy sailboat quilt block finishes at 12” x 12”. There are only a few pieces including a 9” half square triangle (HST), a rectangle strip next to the sail, and a medium-blue boat hull with angles created by snowball corners. That means the beautiful fabric you pick for the boat hulls won’t be broken up by seams.
How do you sew an Irish Chain Block with a Heart?
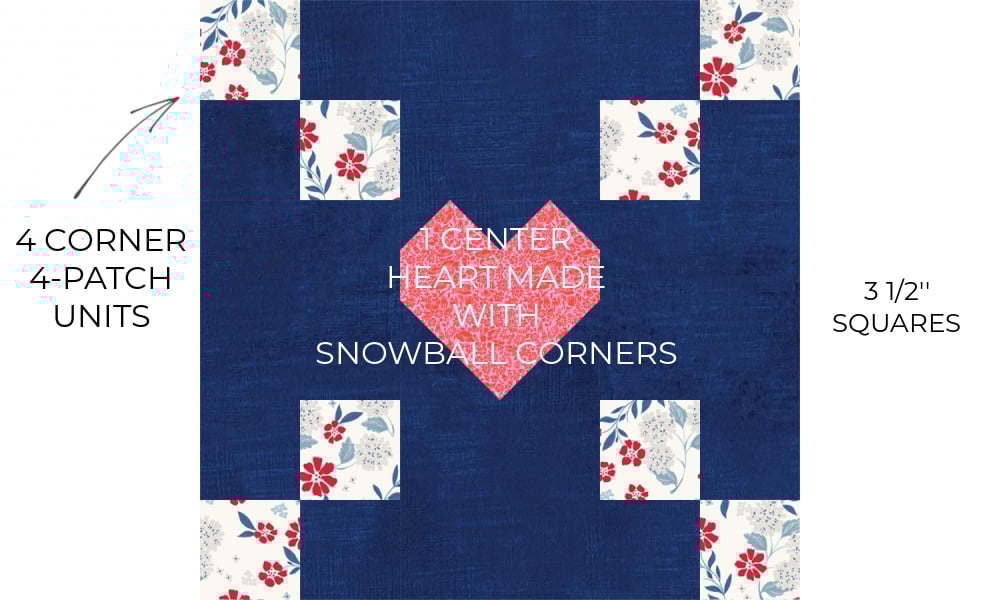
This Irish Chain block is easy to sew with four simple nine patch pieces. I’ll show you how to strip piece them to save time. You’ll sew the center heart with snowball corners for easy angles. Then piece them all together with some background fabric squares.
After all 25 of your blocks are sewn, we’ll put them together with a pieced border that helps move the sailboats away from the edges of the quilt and continues the Irish chain pattern. If you want a larger quilt, just add another border.
So let’s get started!
Chesapeake Bay Sailboat Quilt Pattern
Finished quilt dimensions: 64’’ x 64’’. Finished block size: 12” x 12”.
You will need:
- 2 3/4 yards medium to navy blue fabric for the background
- 5/8 yard small scale floral print with a white background for the Irish chain
- 1/2 yard light blue fabric for the boat hulls
- 5/8 yard white fabric for the sails
- 3/4 yard red fabric (1/4 yard for the hearts and 1/2 yard for the binding)
- 4 yards of backing fabric, or enough to piece together a 69” x 69” square
- a 69” x 69” piece of quilt batting
- a pencil or fabric marking pen
- a rotary cutter, acrylic ruler, and mat
- sewing machine
- thread
Cutting:
From the background fabric, cut:
- 6 strips 2 1/2” x 42” (if your fabric is 40” wide or less, cut 7 strips)
- 48 squares 4 1/2” x 4 1/2”
- 28 squares 2 1/2” x 2 1/2”
- 48 squares 1 1/2” x 1 1/2”
- 7 squares 10” x 10”
- 13 rectangles 3 1/2” x 9 1/2”
- 26 squares 3 1/2” x 3 1/2”
- 12 strips 2 1/2” x 8 1/2”
- 8 strips 2 1/2” x 8 1/2”
From the small scale floral print with a white background, cut:
- 6 strips 2 1/2” x 42” (if your fabric is 40” wide or less, cut 7 strips)
- 24 squares 2 1/2” x 2 1/2”
From the light blue fabric, cut:
- 13 rectangles 3 1/2” x 12 1/2”
From the white fabric for the sails, cut:
- 7 squares 10” x 10”
From the red fabric, cut:
- 24 rectangles 2 1/2” x 4 1/2”
- 6-7 binding strips 2 1/2” x width of fabric (the number of strips you need will depend on the dimensions of your finished quilt and your fabric width)
If you have an Accuquilt cutter, you can quickly cut the 2 1/2” fabric strips and many of the shapes. Extra fabric may be required. Here are some die numbers for easy reference:
- The 2 1/2” strip die 55017 is great for cutting strips, rectangles, border pieces, and bindings
- The 3 1/2” strip die 55032 can help cut the rectangles in the sailboat blocks
- The 1 1/2” squares may be cut using die 55470
- The 2 1/2” squares may be cut using die 55709 (also found in the 8” Qube Mix and Match Set)
- The 3 1/2” squares may be cut using die 55701 (also found in the 12” Qube Mix and Match Set)
- The 4 1/2” squares may be cut using die 55708 (also found in the 8” Qube Mix and Match Set)
- The 2 1/2” x 4 1/2” rectangles may be cut using die 55715 (also found in the 8” Qube Mix and Match Set)
Sewing instructions:
Use a 1/4” seam allowance unless otherwise noted.
Easy Sailboat Quilt Block Tutorial
Make 13 Half Square Triangle Units
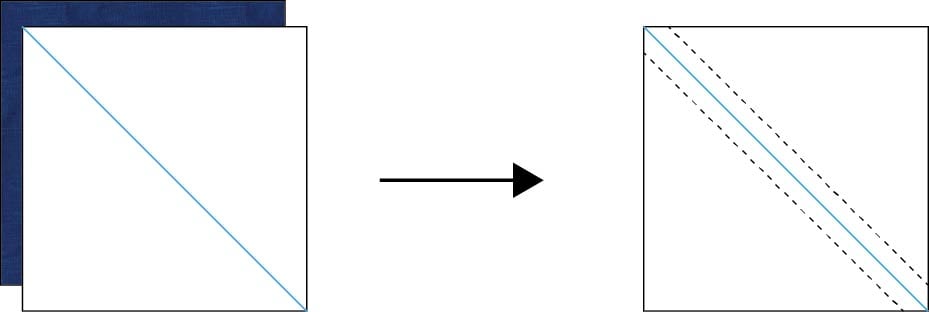
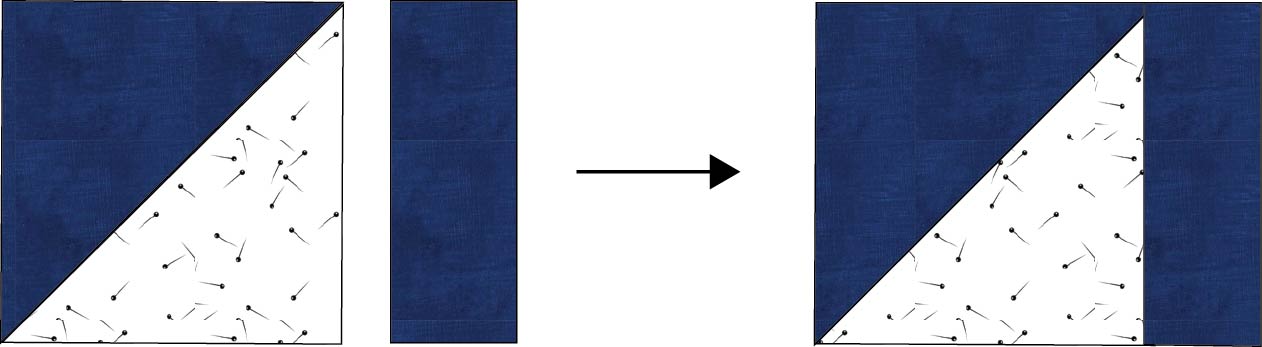
1. Use the pencil or fabric marking pen to draw a diagonal line across the wrong side of the 10” white fabric squares. This is a cutting line.
Place the 10” white fabric squares right sides together with the 10” background fabric squares. Pin the squares together.
2. Sew 1/4’’ away from the cutting line on on both sides of the line.

3. Cut each piece in half diagonally along the line. Open and press to make 2 half square triangles (HST units). Trim each unit to 9 1/2” x 9 1/2”.
Repeat to make 14 HST units. You will have one HST left over that you can use in a different project.
Make 13 Boat Hull Pieces

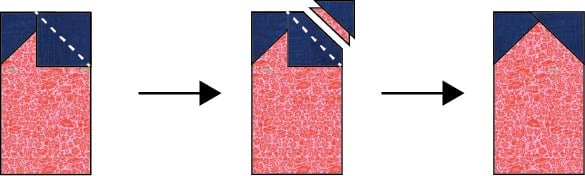
1. Use the fabric marking pen or pencil to draw a diagonal line across the back of all the 3 1/2” background fabric squares. This is a stitching line.
2. Place a 3 1/2” background fabric square right side down on one end of a 3 1/2” x 12 1/2” light blue rectangle. Make sure the angle of the drawn line matches the angle of the line in the diagram above. Pin in place. Stitch across the drawn line.
3. Cut away the extra fabric 1/4” past the sewn line. Open the snowball corner and press.

4. Place a 3 1/2” background fabric square right side down on the other end of your light blue rectangle. Make sure the angle of the drawn line matches the angle of the line in the diagram above. Pin in place. Stitch across the drawn line.
5. Cut away the extra fabric 1/4” past the sewn line. Open the snowball corner and press.
Repeat to make 13 boat hull pieces.
Sew the Easy Sailboat Blocks Together
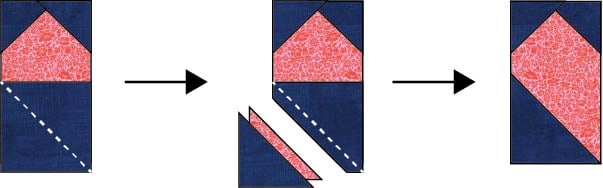
1. Sew a 3 1/2” x 9 1/2” background fabric rectangle to the right side of a background fabric and white HST unit as shown.
Repeat to make 13 pieces.

2. Sew a boat hull piece to the bottom edge of each sail piece.
Trim the blocks to 12 1/2’’ square, if desired.
Tip: I love my 12 1/2” square ruler for squaring up blocks this size.
Irish Chain Quilt Block Tutorial with a Heart
Make 48 four patch Units

1. Place a 2 1/2” x 42” small scale floral fabric strip right sides together with a 2 1/2” x 42” background fabric strip and sew along one long edge. Press the seam toward the darker fabric.
Repeat to make 6 strip sets (make 7 strip sets if your fabric is 40” wide or less).

2. From each strip set, cut 16 pieces 2 1/2” wide x 4 1/2” tall. You will need 96 pieces.
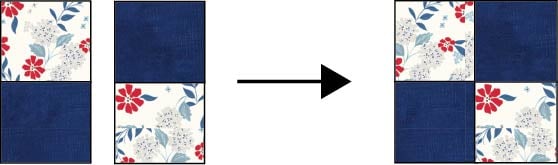
3. Sew the pieces into 4-patch units:
Sew 2 pieces together as shown (one flipped upside down) to make a 2 color 4-patch. Repeat to make 48 4-patch units.
Make 13 Hearts

1. Use the fabric marking pen or pencil to draw a diagonal line across the back of all the 1 1/2” background fabric squares. This is a stitching line.
2. Place a 1 1/2” background fabric square right side down on one one corner of a 2 1/2” x 4 1/2” red fabric rectangle. Make sure the angle of the drawn line matches the angle of the line in the diagram above. Pin in place. Stitch across the drawn line.
3. Cut away the extra fabric 1/4” past the sewn line. Open the snowball corner and press.
Repeat to make 24 pieces.
4. Place a 1 1/2” background fabric square right side down on a closely adjacent corner of each heart piece. Make sure the angle of the drawn line matches the angle of the line in the diagram above. Pin in place. Stitch across the drawn line.
5. Cut away the extra fabric 1/4” past the sewn line. Open the snowball corner and press.
Repeat this step for all of the heart pieces.

6. Place a 2 1/2” background fabric square right side down on the bottom half of a heart piece. Make sure the angle of the drawn line matches the angle of the line in the diagram above. Pin in place. Stitch across the drawn line.
5. Cut away the extra fabric 1/4” past the sewn line. Open the snowball corner and press.
Repeat this step for only 12 of the heart pieces.
6. Place a 2 1/2” background fabric square right side down on the bottom half of the remaining heart pieces. Make sure the angle of the drawn line matches the angle of the line in the diagram above. Pin in place. Stitch across the drawn line.
5. Cut away the extra fabric 1/4” past the sewn line. Open the snowball corner and press.
Repeat this step for the other 12 heart pieces.
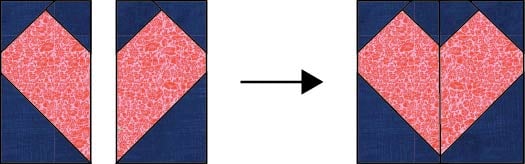
6. Sew two opposite heart pieces together as shown. Press the seam open.
Repeat to make 12 hearts.
Sew the Irish Chain Heart Blocks Together
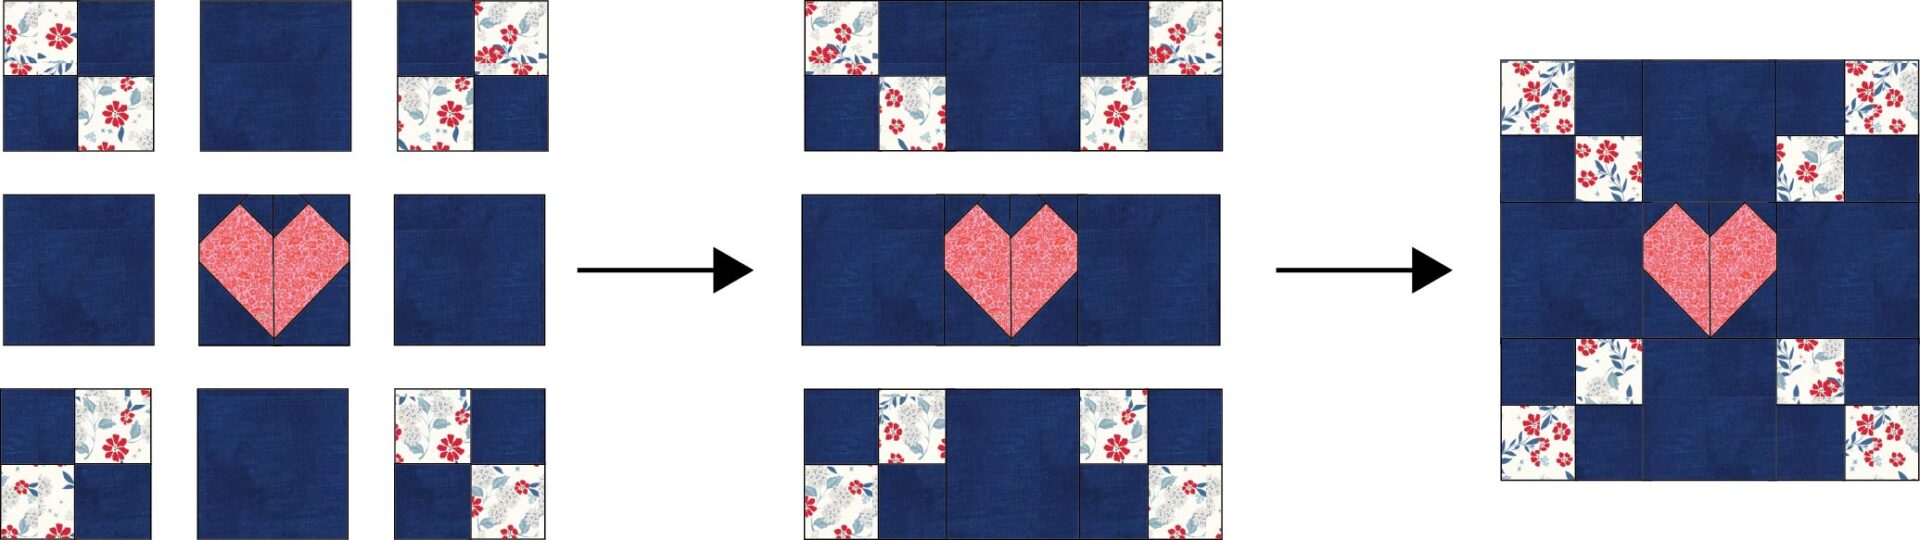
1. Arrange a heart piece in the center with four 4-patch units and four 4 1/2” background fabric squares as shown. Sew together in 3 rows. Sew the rows together to make the Irish Chain Heart Blocks.
2. Trim the block to 12 1/2’’ square, if desired.
Assemble the Quilt Top

1. Sew 3 sailboat blocks and 2 Irish chain blocks into a row. Press the seams toward the Irish chain blocks. Make 3 rows like this.

2. Sew 2 sailboat blocks and 3 Irish chain blocks into a row. Press the seams toward the Irish chain blocks. Make 2 rows like this.
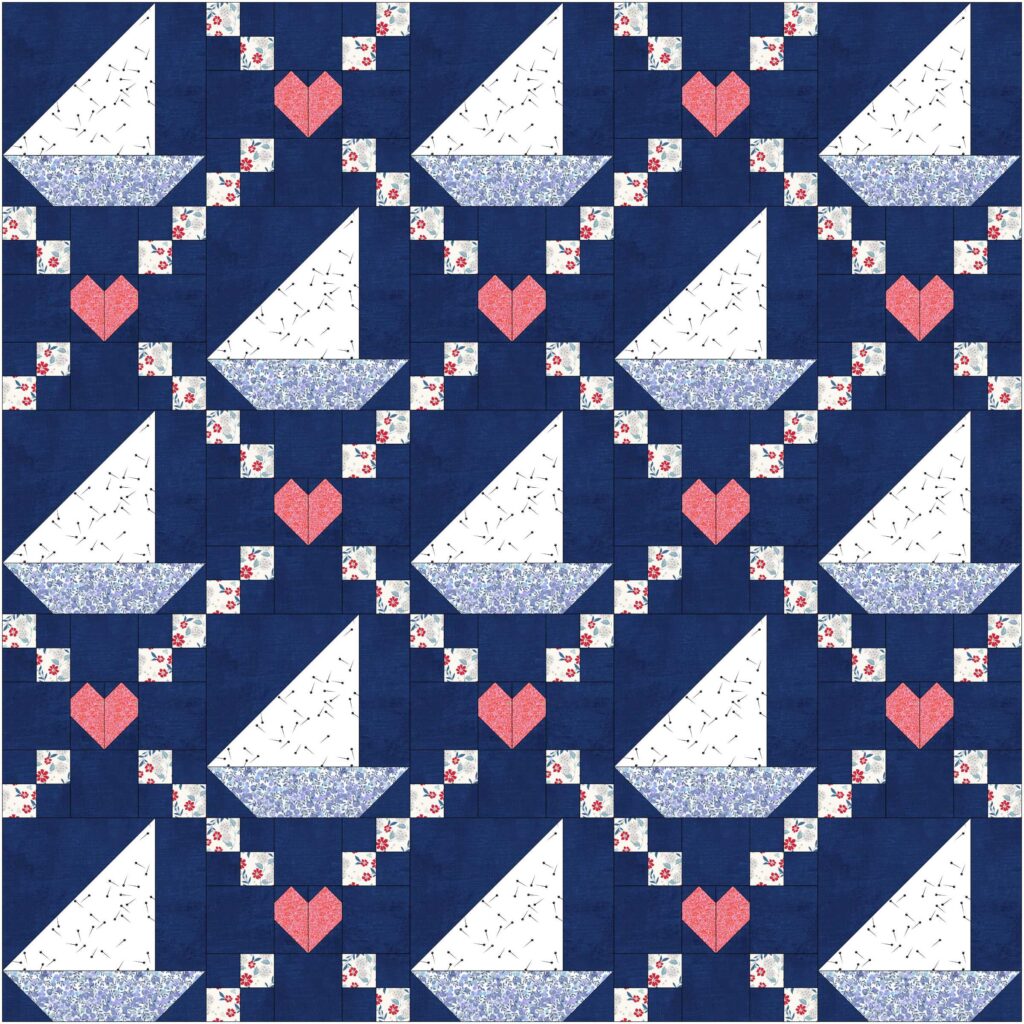
3. Sew the quilt block rows together in an alternating pattern.
Attach the Pieced Border

1. Sew two 2 1/2” x 2 1/2” small floral print squares on the ends of a 2 1/2” x 8 1/2” background fabric strip. Press the seams toward the background fabric strips.
Repeat to make 12 pieces.

2. Sew 3 of these pieces together with 2 2 1/2” x 12 1/2” background fabric strips in between.
Repeat to make 4 border pieces. Set two border strips aside for the sides of the quilt.

3. Sew two 2 1/2” background fabric squares to the ends of the other two border pieces. These are for the top and bottom edges of the quilt.
4. Sew the two border pieces without background fabric squares on the ends to the side edges of the quilt.
5. Sew the remaining border pieces to the top and bottom edges of the quilt.
Finishing the Chesapeake Bay Sailboat Quilt

1. Cut or piece together a 69” x 69” piece of backing fabric and make a quilt sandwich with the backing, batting, and top.
2. Baste together with fusible batting, pins or basting spray.
3. Quilt as desired. Straight line quilting or cross hatch quilting with your walking foot would be fast and easy.
4. Cut 6-7 binding strips and bind using your favorite method. This is my favorite quilt binding method.
xoxo,


CHESAPEAKE BAY SAILBOAT QUILT PATTERN
Purchase this pattern in PDF format! The PDF file contains all of the instructions, plus the step by step photos that have been reduced to fit the page nicely with no ads.
Download the file immediately and keep your confirmation email so you can download it again later. Unlimited downloads are available from the confirmation email.
Disclosure: some of my posts contain affiliate links. If you purchase something through one of those links I may receive a small commission, so thank you for supporting SewCanShe when you shop! All of the opinions are my own and I only suggest products that I actually use. 🙂