Fat Quarter Fancy – Free Quilt Pattern using 9 Fat Quarters!

|
fat-quarter-quilt-pattern.jpg

I know you have been searching for a fast and fun quilt pattern to use up your fat quarter stash… here it is! Sew up this beautiful throw quilt using 9 fat quarters plus a little more than a yard of background fabric.

Don’t miss my free Fat Quarter Fancy Star Quilt Pattern either! 

UPDATE: This blog post has been converted to an optional PDF that’s optimized for printing. Find it here. The blog post below contains everything and is totally free to read, print, and sew! Just hit CTRL +P on your computer to print. The PDF download for $2 is totally optional.

_DSC0087.jpg

I used fat quarters of the new Confetti Blossoms from QT Fabrics. They are so bright and beautiful – I love how my quilt turned out! Ask for this collection at your local quilt shop or find them online at Bear Creek Quilting Company.

_DSC0091-2.jpg

The Fat Quarter Fancy throw quilt is approximately 52” square – made up of 36 blocks that are 8 1/2” (finished). That’s a smallish throw quilt or a large baby quilt. You could easily adapt the pattern to make it larger or smaller using more or fewer blocks.

_DSC0094.jpg

I used my leftover fabric to make a scrappy binding. You will need an extra fat quarter if you want to use them for the binding too.

Are you ready to make a Fat Quarter Fancy Quilt? Let’s go!

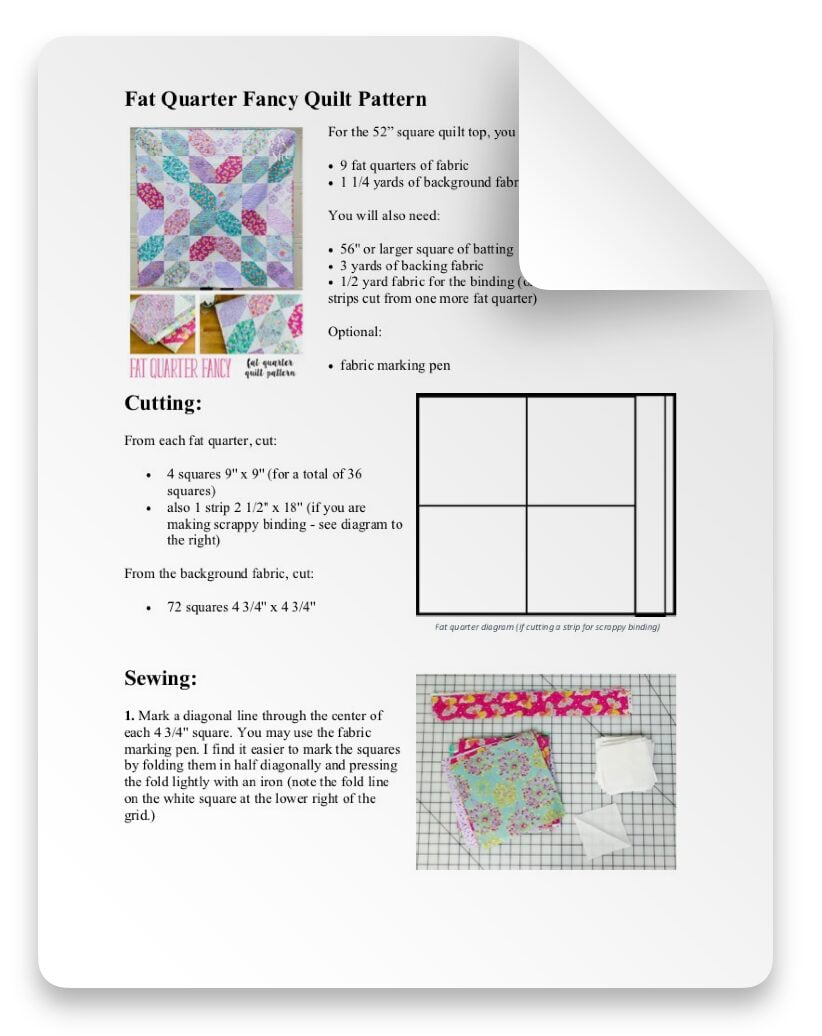
Fat Quarter Fancy free quilt pattern

For the quilt top, you will need:

  • 9 fat quarters of fabric

  • 1 1/4 yards of background fabric

You will also need:

  • 56” or larger square of batting

  • 3 yards of backing fabric

  • 1/2 yard fabric for the binding (or the fat quarter scraps + strips cut from one more fat quarter)

Optional:

  • fabric marking pen

_DSC0007.jpg
Fat quarter diagram (if you are cutting a strip for scrappy binding).

Fat quarter diagram (if you are cutting a strip for scrappy binding).

Cutting:

From each fat quarter, cut:

  • 4 squares 9” x 9” (for a total of 36 squares)

  • also 1 strip 2 1/2” x 18” (if you are making scrappy binding – see diagram to the right)

From the background fabric, cut:

  • 72 squares 4 3/4” x 4 3/4”

_DSC0020.jpg

Sewing:

1. Mark a diagonal line through the center of each 4 3/4” square. You may use the fabric marking pen. I find it easier to mark the squares by folding them in half diagonally and pressing the fold lightly with an iron (see the photo above the cutting instructions).

2. Place a 4 3/4” background fabric square in the corner of a 9” square as seen above. Sew along the marked line.

3. Continue sewing a 4 3/4” squares to each 9” square – it’s faster to chain piece them without cutting the thread as seen above.

_DSC0026.jpg

4. Then turn the long string of squares around and sew a 4 3/4” square to the opposite corner as seen above. I still haven’t cut the threads in between each block yet.

_DSC0034.jpg

Now it’s time to cut the threads in between each block. I found this Sunflower Quilts Thread Cutter at quilt market. It’s a fun way to separate chain pieced quilt blocks.

_DSC0036.jpg

5. Trim the corners away 1/4” past each seam. Save those to make half square triangles for another quilt. 🙂

_DSC0039.jpg

6. Fold the background corners back and press. Repeat steps 5 and 6 to make 36 blocks.

7. Arrange the blocks as seen in the diagram above. Note that the quilt top can be divided into quarters and the blocks in each quarter are all ‘pointed’ in the same direction.

_DSC0047.jpg
_DSC0055.jpg

8. Sandwich the quilt top and backing with the batting in between. This time I used SpraynBond basting spray to hold them together. You could also use fusible batting or pin basting. Quilt as desired. I quilted straight lines about 1/2” apart using my walking foot.

Trim the extra backing and batting away.

_DSC0063.jpg

9. Sew the binding strips together at an angle to make at least 220” of binding. If you are making scrappy binding, you’ll need more than just the strips cut from the 9 fat quarters (those will only make about 160” of binding).

10. Bind and fall in love with your new quilt! I used the same machine binding method that I use on my mini quilts.

I’m adding this pattern to my list of 11 Modern Quilt Patterns… all easy and free!

Happy quiltmaking!

xoxo,

1signature.jpg

Disclosure: some of my posts contain affiliate links. If you purchase something through one of those links I may receive a small commission, so thank you for supporting SewCanShe when you shop! All of the opinions are my own and I only suggest products that I actually use. 🙂

Similar Posts

33 Comments

  1. I love this quilt pattern! Thank you for sharing an easy to sew quilt that is a beautiful use of fat quarters. Thank you for easy to understand directions!

  2. Susan Page says:

    This is so cute!!
    what is the finish dimensions of the quilt?

  3. Pam from CA says:

    Beautiful fabrics! Love the design! Thank you for the free PDF!

  4. Janice King says:

    Perfect! Was just looking for a quick and beautiful pattern for a dear little girl. This fabric is perfect!

  5. so well explained.Very helpful for the beginners,The pattern and the material is really awesome.The pictures and illustration makes its really easy to understand and sew.

  6. This is Gorgeous Thank you. What is the finished size of each block at step 5 after the triangles are trimmed

  7. Hello! I’m very new to quilting. This pattern looks very easy & quite beautiful. Thank you so much for posting. Could this be adapted to a quilt as you go project? I plan to increase to a queen size quilt.

  8. Did you press the seams toward the white fabric with each block? Wondering about the top middle blocks if the two seams together were too bulky?

  9. I lost the instructions for this after I cut my fabric and almost gave my self aneurysm looking for it, I am ready to layout my blocks and I am loving it, thank you, thank you, thank you

  10. Bc Miller says:

    Could you use 5" charm squares for the 4 3/4" corner blocks, or would it throw everything off?

    1. In theory, sure, you can use any size square, just adjust the snowball corner block. I’d try a 2 or 2 1/2" square for a 5" square. Test first, I’m not great at math. But I just saw a tutorial on Shabby Fabrics you tube that uses 5 1/2" square and snowballs the corner using a 2.5" block. So I tested a 5" charm pack square and it worked with a 2"…but that was for the x’s and o’s pattern. This pattern above has a distinct look because you have a good bit of "focus" fabric showing on the edges. Try, ya never know, you could create a new pattern 🙂

  11. Great tutorial, thank you! Before I cut off the "scrap" triangles from the block, I sew another line of stitching 1/2" away from first stitching line (towards the edge). Then when I cut off the corner triangle, it already has a line of stitching and creates a half-square triangle. And they match the fabrics I’m using. I’m going to make a matching pillow or maybe sew them in a row into the backing. No waste. You can certainly sew the triangles after you’ve cut them off, but it’s a bias edge and it’s easier to just sew 2 rows of stitching on snowball section before cutting the excess off.

  12. I’m currently making this with charm packs…I cut my corner square 2.5…thinking I am just replacing the corner when I trim the corner away. My block no longer measures 5 inches. Hoping someone can help! Thank you for the pattern!

  13. Rachael Marcy says:

    Thank you for this fabulous pattern and tutorial. It is so pretty. I am almost finished making my first quilt, for my neice whose name is Xelah, so the big “X” in the middle is awesome!

  14. I love the pattern, but when I tried to cut 4x 9" squares I realized that fat quarters are not necessarily cut at exactly 18". And there is no wiggle room to square up the sides. Any ideas on making this with 8-1/2" squares? I’ve had this problem with pre-cut jelly rolls, too. One entire roll turned out to be 2-1/4" wide! Thanks for your help and your free patterns!

    1. I ran into the same issue so I cut my FQ squares to 8 " and the corner squares to 4 ". It works for poorly cut fat quarters.

  15. Oh, goodness, this inspired me! I have 52 fat quarters lying here staring at me, and I have turned into a mixing/matching/cutting fool this morning. The Chiefs won the Super Bowl, so we get today off to attend the parade. Turns out I’m a Patriots fan, so I’ll stay home and sew. . .your pattern AND a day off. . .manna from Heaven!

  16. This is EXACTLY the pattern I’ve been searching for to make a quick quilt to showcase my fat quarter bundle that has large-scale prints! Thank you SO MUCH for your well-written tutorial!

    I would like a bit more length; do you think adding one row to the top and one to the bottom would look ok? Or would it look a little off since I wouldn’t be adding to the sides?

  17. Meg Pease says:

    I have just made the Fat Quarter Fancy quilt. Went together quickly, I was lucky had 9 half yards of beautiful fabric and purchased background fabric. I set my blocks differently, but did have the X in the middle. Have tried to post a photo on FB but not successful. Thanks for a great pattern 🙂

  18. Granny AS says:

    I LOVE this pattern! It looks so fancy yet seems reasonably straightforward to me, as a fairly new quilter. This may be ‘the one’ for me! Thank you so much for sharing.

  19. Thank you for sharing this pattern. I just finished a top today using blue and white fat quarters that I have had for several years and couldn’t figure out what to do with them. I’m sure I’ll make this pattern again – it’s a great pattern.

  20. Hi, I am very new to quilting. As in, this is my first time. Ever. And I have some questions that aren’t answered by the pattern.

    Do you sew all of the final blocks together? Or do you just place them over the batting and sew? This might be a very basic question but I am not sure and would rather ask.

Leave a Reply