Fat Quarter Fancy Star Quilt: Queen Size Star Quilt Pattern
Grab 16 fat quarters and make an easy queen size star quilt! This beginner friendly and fat quarter friendly free quilt pattern is what you’ve been looking for. It will brighten up your guest room, your family room, or any room in the house.

I know you love my other ‘Fat Quarter Fancy’ quilt patterns:
- The original Fat Quarter Fancy Quilt that everyone has already made
- My Fat Quarter Fancy II quilt pattern that takes the first one to new heights
Or check out ALL my fat quarter friendly quilt patterns.
The blog post below is totally free to read, print, and sew! Just hit CTRL +P on your computer to print. There is an optional PDF download offered at the end of the post. Join our Sewing Bee Community for access to over 300 PDF patterns (including this one), live workshops, premium video courses, and more.

Why should I make this Fat Quarter Friendly Pattern?
Are you looking for a fast and easy pattern that packs a big punch? Here you go! The 10” quilt blocks in this pattern are simple 4-patches made up of squares and half square triangles. I’ll share my favorite half square triangle shortcut method to make this quilt even easier.
By the way, you can also use scraps to make this quilt! Each block requires two print squares: one 5 1/2” and one 6”. Those two squares should match, so raid your scrap bin and see if you have the right sized pieces.
The real beauty of this quilt comes when you arrange the blocks together in a way that draws your eye to a gorgeous 20” star at the center. No one will be able to look away!

There’s more than one way to lay out the blocks too! Here’s a beautiful alternate quilt layout with 16 stars. Sew through your fabric stash with all my free quilt patterns.

And here’s another gorgeous alternate layout with the exact same blocks!
With a simple 4” border, this queen size quilt is 88” x 88”. You can leave the border off if you like for a quilt that is 80” x 80”.
OPTIONAL: I used my Accuquilt cutter to cut the pieces for this quilt. If you love to use your Accuquilt fabric cutter like I do, I’ll share the cutting die numbers for the dies I used. Using an Accuquilt is not necessary for this quilt, but I love it! See all my Accuquilt friendly quilts.

How to Choose the Right Fat Quarter Bundle
A fat quarter is a piece of fabric that is 18” x 21”. Fat quarter bundles abound, and I love them all because they contain perfectly coordinated collections of fabric. I often find beautiful fat quarter bundles at my local quilt shop, on Etsy, from Fat Quarter Shop, and even on Amazon.
When I made this particular quilt, I used a bundle of Christmas fabrics from Allison Glass, but you can only tell up close. The fabrics are beautiful bright colors that I’m happy to look at all year.
I think it would also look beautiful using floral fabrics like the Tilda fabrics that I tested using EQ8 quilt design software (see above).

I’m really crushing on classic blue and white quilts right now too, so I almost used my Starlight Gatherings Bundle from Moda. That would have been beautiful too!
I can’t wait to see all of the star quilts that my readers make!

Free Fat Quarter Star Quilt Pattern
The finished quilt is 88” x 88”. It’s perfect for snuggling on the couch or dressing up a queen sized bed.
You will need:
- 16 coordinating fat quarters of fabric
- 4 yards* of background fabric (I used Kona Snow)
- a rotary cutter, acrylic ruler, and mat
- sewing machine
- thread (I suggest thread matching the background fabric)
- ironing board and iron
- pencil or fabric marking pen
* This quilt requires exactly 4 yards of background fabric. I suggest buying 4 1/4 yards in case of cutting mishaps (we all have them!). You will need 4 1/2 yards of background fabric if you are using an AccuQuilt fabric cutter.
To sew the quilt top into a finished quilt, you will also need:
- 3 yards of 108” wide quilt backing fabric (or enough fabric to piece together a 95” x 95” quilt back)
- a piece of quilt batting at least 95” x 95”
- 3/4 yard of binding fabric (9 binding strips)
Cutting:
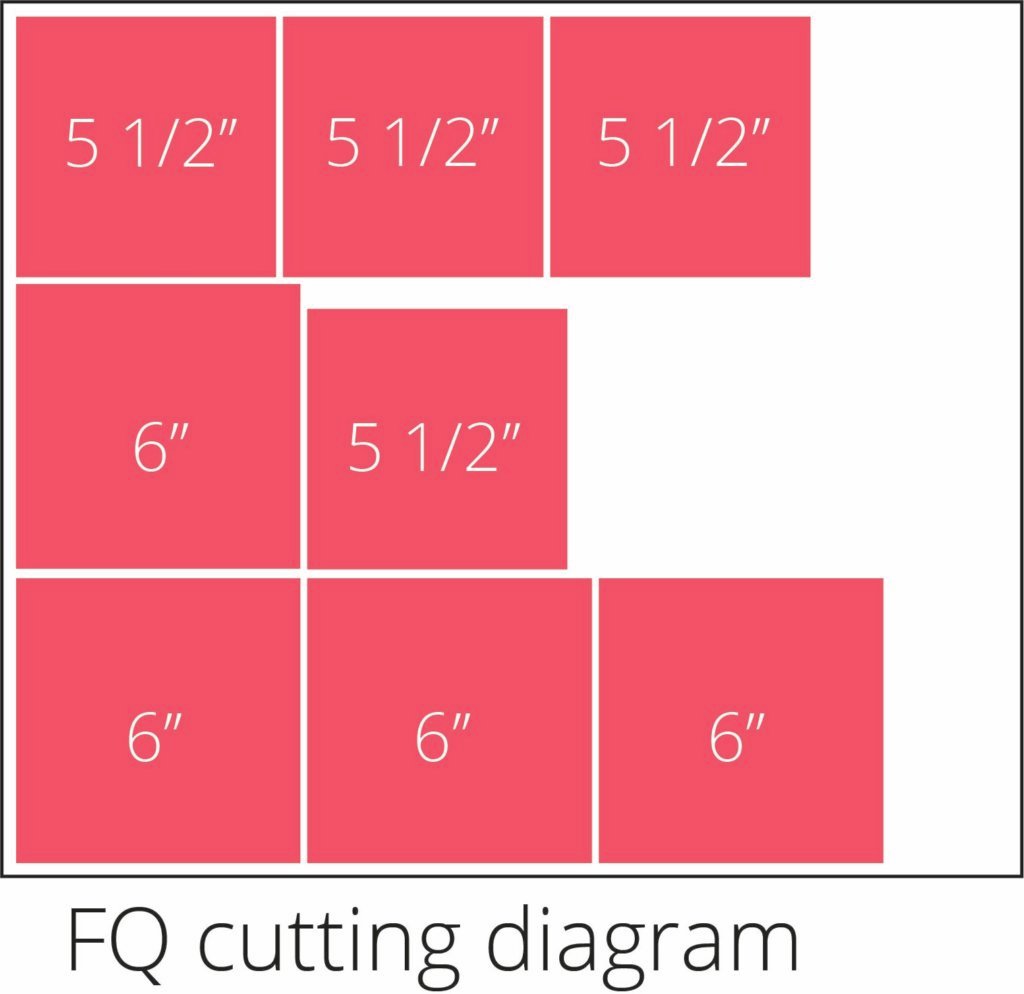
From each fat quarter, cut:
- 4 squares 5 1/2” x 5 1/2”
- 4 squares 6” x 6”
From the background fabric, cut:
- 64 squares 5 1/2” x 5 1/2”
- 64 squares 6” x 6”
- 9 strips 4 1/2” x 42”
Optional Accuquilt cutting instructions:
- The 5 1/2” squares may be cut with die 55803 (available separately or in the 10” Qube set)
- Instead of cutting 6” squares, you may cut 5” finished HST triangles with die 55805 (available separately or in the 10” Qube set). You’ll need 8 HST triangles from each fat quarter and 128 from the background fabric.
Make 128 Half Square Triangles (HST’s)

1. Use the pencil or fabric marking pen to draw a diagonal line across the wrong side of all of the 6” background fabric squares. This is a cutting line.
Place the 6” background fabric squares right sides together with 6” print squares. Pin the squares together.
2. Sew 1/4’’ away from the cutting line on on both sides of the line.

3. Cut each piece in half diagonally along the line. Open and press to make 2 half square triangles (HST units). Trim each HST to 5 1/2” square. Repeat to make 128 HST units.
If you are using AccuQuilt-cut fabric pieces, sew the 128 background fabric 5” HST pieces together with the 128 print 5” HST pieces.
Make the 4-patch Blocks

1. Arrange 2 half square triangle units together with a 5 1/2” print fabric square and a 5 1/2” background fabric square as shown.
Note: All of the print fabrics in the same block should match.
2. Sew together in 2 rows. Sew the rows together to make the block.
Repeat to make 64 blocks.
Assemble the Fat Quarter Fancy Star Quilt

1. Arrange the 64 quilt blocks on a large table, a quilt design wall, or the floor. Refer to the diagram above for exact placement, or arrange the blocks in a way that you like more.

2. Sew the blocks together to make 8 rows. Then sew the 8 rows together.

3. Piece together two 4 1/2” x 42” background fabric strips to make each side border piece.
The expected length of the side border pieces is 80 1/2”. I highly recommend measuring the quilt top and cutting all border pieces the correct size. See how to cut the correct size quilt borders. Cut and attach the side borders

4. Piece together the remaining five 4 1/2” x 42” background fabric strips to make the top and bottom border pieces.
The expected length of the top and bottom border pieces is 88 1/2”. Measure your quilt top with the side borders and cut 2 strips the required length. Attach the side border pieces.
Finishing the Quilt

1. Cut or piece together a 95” x 95” piece of quilt backing fabric and make a quilt sandwich with the backing, batting, and top.
2. Baste together with fusible batting, pins or basting spray.
3. Quilt as desired. Straight line quilting or cross hatch quilting with your walking foot would be fast and easy.
4. Cut 9 binding strips and bind using your favorite method. This is my favorite quilt binding method.
xoxo,


FAT QUARTER FANCY STAR QUILT PATTERN
Purchase this pattern in PDF format! The PDF file contains all of the instructions, plus the step by step photos that have been reduced to fit the page nicely with no ads.
Download the file immediately and keep your confirmation email so you can download it again later. Free patterns must be downloaded within 30 days.
Disclosure: some of my posts contain affiliate links. If you purchase something through one of those links I may receive a small commission, so thank you for supporting SewCanShe when you shop! All of the opinions are my own and I only suggest products that I actually use. 🙂