DIY Fur Baby Coat – how to sew a dog coat
Learn how to sew a dog coat or coat for any of your pets with this easy sewing tutorial.

This warm coat will help keep fur babies warm no matter the season! This free sewing tutorial to make a dog coat pattern would also work for a cat, rabbit, pig, whoever keeps you company.
The blog post below is totally free to read, print, and sew! Just hit CTRL +P on your computer to print. There is an optional PDF download offered at the end of the post. Join our Sewing Bee Community for access to over 300 PDF patterns (including this one), live workshops, premium video courses, and more.
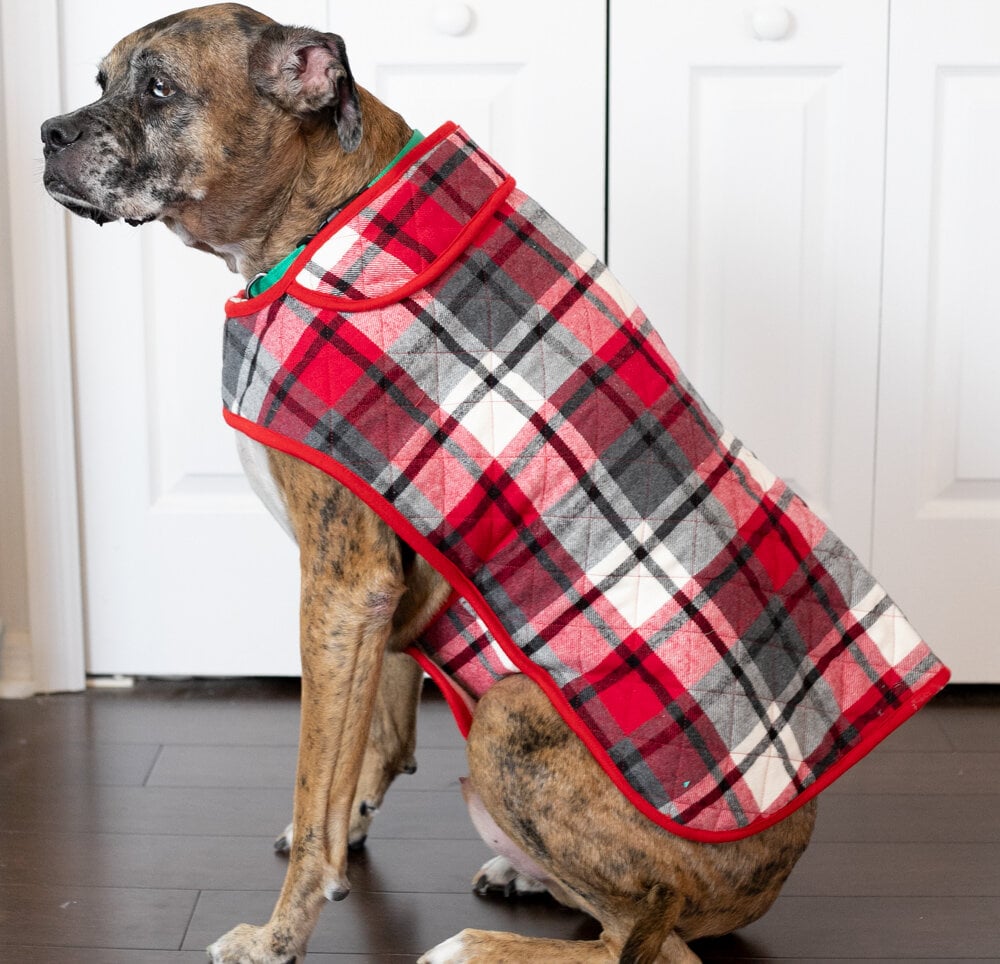
My dog’s warm and cozy coat is sewn from 2 layers of flannel fabric with quilt batting sandwiched in between – it’s like a quilt he can wear, especially because it is bound like a quilt.
To save time, you could also use pre-quilted fabric. Instead of cotton or flannel, fleece would be a good choice for an extra warm coat.

In order to make a pattern template for your dog coat, Indy and I made a 10 minute video tutorial showing you how to use batting (or a piece of scrap fabric) and draping techniques to draft a template that will fit your pet perfectly. Watch the video on the SewCanShe YouTube channel.
Don’t worry – you can do this. It’s how completely inexperienced sewists make beautiful clothes on Project Runway!
To make my DIY Fur Baby Coat, you will need:
- a piece of batting or scrap fabric large enough to drape over your dog as seen above
- plaid flannel or other outer fabric for the top (exterior) part of the coat – I needed about a yard*
- cotton or polyester batting for the inside of the coat (see my batting tip below) – I needed about 30’’x40’’*
- fabric for the lining of the coat – again, I needed about a yard*
- 2 1/2’’ wide bias binding – I needed about 5 yards total. See my easy continuous binding video tutorial here. Bias binding is used instead of straight cut binding, to help it lay smoothly around all the curves.
- hook and loop tape for the closure, a.k.a. – velcro (I used this extra wide hook and loop tape – it worked great!)
- matching thread, a safety pin, scissors, sharpie marker, and a sewing machine
Batting tip: I used Hobbs double sided fusible batting for the actual coat so I could easily fuse all the layers together before quilting. You could use quilt basting spray or attach the layers by sewing around the edges instead. I used plain cotton batting for draping and drafting the template pieces.
*Note: you could use pre-quilted fabric instead of separate layers of exterior and lining fabrics and batting.

Cutting:
1. Use the draping techniques shown in the video tutorial to draft pattern templates for the coat, straps, and collar.

2. In order to make a perfectly symmetrical coat, fold the pattern templates that you made in half down the middle and cut them in half as seen above. Choose the best halves to trace.
Do not fold or cut the strap piece for the belly – you will trace it flat.
Fold a new piece of batting (or the pre-quilted fabric) in half and place the large coat piece and the collar piece on the fold. Trace around them, smoothing out the edges and making any other adjustments that you’d like to make. As you can see from the photo above, I changed the direction of the neck flaps a bit and made my collar piece wider.
Place the belly strap piece on the batting and trace around it. Use a spool of thread or other object to help draw curved corners at one end of the strap.
Once you have traced the drafted templates and made them look nice on the new batting, cut out these pieces. You should have:
- 1 large coat piece
- 1 collar piece
- 2 belly strap pieces
Note: if you are using pre-quilted fabric, you can now skip to the ‘Construct the Coat’ section below.

3. When you are done cutting out the nice batting pieces for the actual coat, use them as templates to cut the same pieces from your two fabrics.

Before starting to sew, you should have:
- 3 large pieces for the body of the coat (two fabric pieces plus batting)
- 3 collar pieces (two fabric pieces plus batting)
- 6 strap pieces (four fabric and two batting pieces)

Quilt the Coat Layers Together
1. Place the large batting piece for the body of the coat against the wrong side of the flannel fabric and then smooth out the lining fabric over the other side of the batting. The right sides of the fabric should be facing out with the batting sandwiched in between.
Repeat to make a quilt sandwiches for the collar and 2 strap pieces.
2. Secure the layers together using one of the following quilt basting methods:
- press to fuse, if using fusible batting – this is what I did
- secure the layers with quilt basting spray such as SpraynBond
- sew around all of the pieces 1/8’’-1/4’’ from the edge with a long basting stitch
- use safety pins to pin well

3. Quilt the layers together any way that you like (or not at all, if desired). I used my walking foot and straight line quilting in a cross hatch pattern. Luckily, the plaid on my exterior fabric had an underlying pattern of 2’’ squares, so I used them as a guide and didn’t do any marking!
Repeat for all of the coat pieces.


Construct the Coat
1. Sew binding on the strap and collar pieces first:
- Fold the binding in half lengthwise (wrong sides together) and sew it to the wrong side of the pieces with a 1/4’’ seam allowance. Stretch the bias binding slightly when sewing around curves
- Then wrap the binding around to the front (exterior) side of the pieces and sew it down close to the fold.
Each of the strap and collar pieces need binding on only 3 sides. Refer to the photo below to see where to sew it.

Do not sew binding on the two straight short ends of the strap pieces and the mostly straight edge of the collar.

2. Try the coat on your dog and use a fabric marking pen to mark the places where the belly straps should go.
3. Place the large coat piece wrong side up and pin the strap pieces to the edges, wrong sides together as seen above.
Sew the straps to the coat, stitching 1/8’’- 1/4’’ from the raw edges.

4. Place the coat right side up and pin the collar in place. Sew the collar to the coat, stitching 1/8’’- 1/4’’ from the raw edges.

5. Use the 2 step binding technique that you used before to bind all the way around the edges of the coat.

If you need help joining the binding, see how I did it on this travel pouch. This coat and that bag are bound the same way.
When sewing the binding down on the right side of the coat, make sure that you fold the belly straps away from the coat so they don’t get caught in the stitching (see above).

Sew on the Hook and Loop Tape
Note: If you are making a coat for a smaller pet, you could use a button and buttonhole closure instead. Try the coat on your pet to see how much the straps need to overlap.
1. Cut pieces of hook and loop tape (velcro) to go on the belly straps and the neck flaps. The extra wide (and sticky) hook and loop tape that I bought just for this project was so useful!

Since it was sticky, I was able to put it in place and then easily stitch it down – no pins needed. However, my needle did get a little bit gummed up.
Use a heavy duty needle for sewing on the hook and loop tape if needed.
Keep in mind that one belly strap will need tape on the right side and the other strap will need the opposite part of the tape on the wrong side. It’s the same for the neck flaps, one will need tape on the right side and the other will need it on the wrong side. 🙂

Now take your happy fur baby out to show off their new coat!
If you sew a dog coat using this free tutorial, I’d love to see! Please post a photo to instagram and tag me @sewcanshe so I can take a look.

DIY DOG COAT SEWING TUTORIAL
Purchase this pattern in PDF format! The PDF file contains all of the instructions, plus the step by step photos that have been reduced to fit the page nicely with no ads.
Download the file immediately and keep your confirmation email so you can download it again later. Unlimited downloads are available from the confirmation email. Free patterns must be downloaded within 30 days.

If you love dogs as much as I do, check out my cage comforter tutorial – it’s perfect for donating to shelters!
Happy sewing,

Disclosure: some of my posts contain affiliate links. If you purchase something through one of those links I may receive a small commission, so thank you for supporting SewCanShe when you shop! All of the opinions are my own and I only suggest products that I actually use. 🙂