DIY Walker Caddy with a cup holder! Free Sewing Pattern
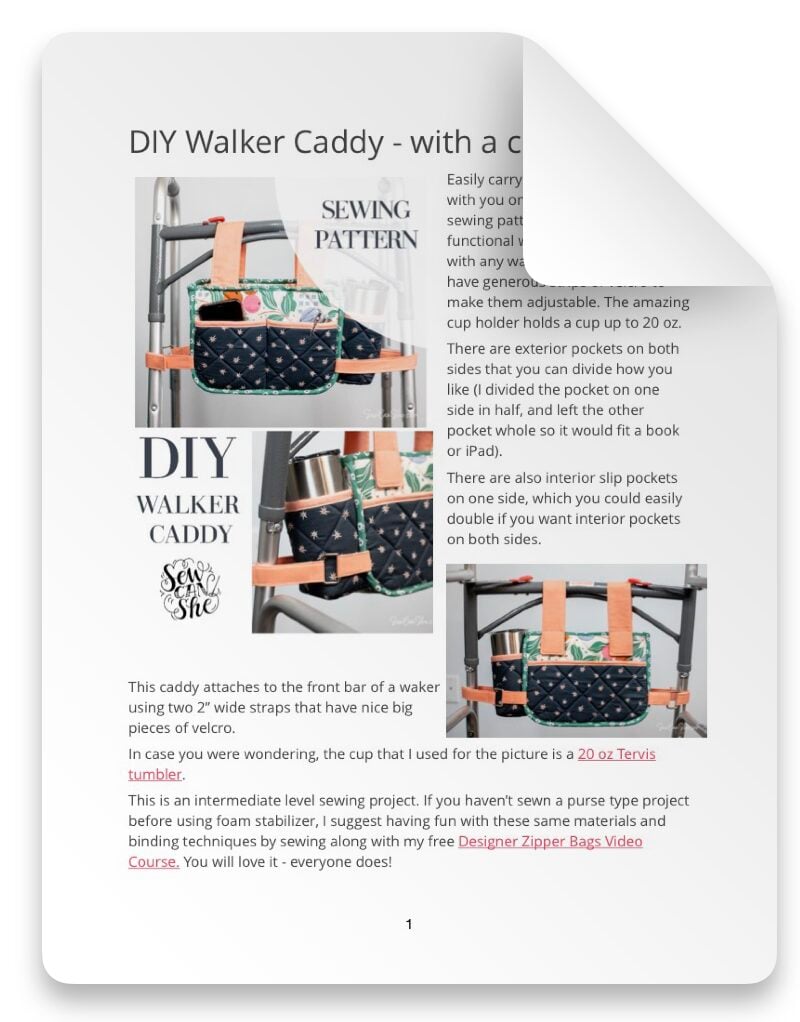
This free sewing pattern for a clever and functional walker caddy will work with any walker because the straps have generous strips of velcro to make them adjustable. Easily carry everything you need with you on your walker! The amazing cup holder holds a cup up to 20 oz. Use fabrics that the recipient will love so she or he will use it with pride!

The blog post below is totally free to read, print, and sew! Just hit CTRL +P on your computer to print. There is an optional PDF download offered at the end of the post. Join our Sewing Bee Community for access to over 300 PDF patterns (including this one), live workshops, premium video courses, and more.

There are exterior pockets on both sides that you can divide how you like (I divided the pocket on one side in half, and left the other pocket whole so it would fit a book or iPad).
There are also interior slip pockets on one side, which you could easily double if you want interior pockets on both sides.

This caddy attaches to the front bar of a waker using two 2’’ wide straps that have nice big pieces of velcro.
In case you were wondering, the cup that I used for the picture is a 20 oz Tervis tumbler.
The approximate dimensions of the caddy are 14’’ wide and 8’’ tall (not including the straps).

There are 1’’ wide side straps that loop through rectangular rings and secure with more velcro. These side straps keep everything totally secure – even if you decide to run down the hall with a full cup!
I used foam stabilizer (ByAnnie Soft and Stable) because I love how beautiful and sturdy it makes bag and organizer projects like this. If you prefer, fusible fleece or quilt batting may be used instead but the caddy will not be as sturdy.
This is an intermediate level sewing project. If you haven’t sewn a purse type project before using foam stabilizer, I suggest having fun with these same materials and binding techniques by sewing along with my free Designer Zipper Bags Video Course. You will love it – everyone does!

Are you ready? Let’s sew a DIY Walker Caddy
You will need:
- 2 yards of fabric total (more fabric would be needed if you use a directional print). Fat quarters or yardage will work. I used:
- I/4 yard white floral print for the exterior caddy
- 1/4 yard peach print for the caddy lining
- 1/4 yard navy print for the pocket exteriors
- 1/4 yard green print for the pocket linings
- 1/4 yard green floral for making the bias binding
- 3/4 yard solid peach fabric for my straps, additional binding, and interior pocket.
- 1/2 yard of 60’’ wide foam stabilizer (such as ByAnnie’s Soft and Stable)
- 1/2 yard medium weight woven stabilizer (such as Pellon Shape Flex SF101)
- 2 rectangular rings with a 1’’ opening
- 6’’ length of 1’’ wide hook and loop tape (velcro)
- 4’’ length of 2’’ wide sew-in hook and loop tape (velcro)
- fabric marking tools such as chalk and/or a Frixion pen
- Basting spray (such as SpraynBond)
- Creative Grids Curved Corner Ruler or circle template with a 2 1/2’’ radius

Prepare and Cut the Quilted Pieces
For quilted piece A (the caddy sides and gusset), cut…

For quilted piece B (the pockets and cup holder), cut…

1. Use the basting spray to adhere the wrong side of one exterior fabric to the foam stabilizer. Then adhere the wrong side of the lining fabric to the opposite side of the stabilizer.
Repeat to make two fabric/stabilizer/fabric sandwiches – A and B.
Tip: If basting spray is not available, you may machine baste by sewing each piece of fabric to the foam stabilizer all the way around, 1/8’’ from the edge.

2. Machine quilt Piece A and Piece B any way that you like.
I used my fabric chalk to mark a quilting line at a 45 degree angle. After quilting the first line with my sewing machine’s even feed foot, I set up the quilting guide with a 2’’ distance to help me quilt lines 2’’ apart on the whole piece. Then I turned my fabric and quilted lines in the opposite direction to create diagonal squares.

3. Cut the quilted pieces into the sides, gusset pieces, pocket pieces, and cup holder piece. See cutting diagrams below.


From Quilted Piece A, cut:
- 2 side pieces 8’’ x 11’’
- gusset A piece 3 1/2’’ x 6 3/4’’
- gusset B piece 3 1/2’’ x 18’’


From Quilted Piece B, cut:
- 2 pocket pieces 5 1/2’’ x 11’’
- 1 cup holder piece 8 1/4’’ x 9 1/2’’

4. Using the Curved Corner Ruler or circle template with a 2 1/2’’ radius, cut 2 1/2’’ radius curves at the bottom corners of both of the side pieces and both of the pocket pieces.

Side pieces and pocket pieces with lower curved corners.

5. Cut 3’’ squares away from the bottom corners of the 8 1/4’’ tall x 9 1/2’’ wide cup holder piece.

6. Use a long stitch length on your sewing machine to baste around all of the quilted pieces, 1/8’’ from the edge. This ‘seals’ the edges as well as compresses the layers together to make sewing and binding the caddy together easier.

Additional Cutting
1. From the strap (and interior pocket) fabric, cut:
- 4 rectangles 2 1/2’’ x 12 1/2’’ (upper straps)
- 2 rectangles 4’’ x 5’’ (rectangle ring tabs)
- 1 rectangle 4’’ x 12’’ (shorter velcro strap)
- 1 rectangle 4’’ x 17’’ (longer velcro strap)
- 1 square 11’’ x 11’’ (interior pocket)
- 1 1/2’’ x 3 1/2’’ (gusset binding piece – not shown)
From the woven fusible interfacing, cut:
- 2 rectangles 2 1/2’’ x 12 1/2’’ (to stabilize the upper straps)
- 1 square 11’’ x 11’’ (to stabilize the interior pocket)

2. Cut (and piece together if necessary) the following binding pieces:
- bias cut binding (cut on 45 degree angle):
- 2 strips 2 1/2’’ x 26’’ (for binding curved edges)
- straight or bias cut binding:
- 2 strips 2 1/4’’ x 11’’ (for binding the top edges of the pockets)
- 1 strip 2 1/4’’ x 9 1/2’’ (for binding the top edge of the cup holder)
- 1 strip 2 1/4’’ x 32’’ (for binding the top edge of the caddy)


Bind the Top Edges of the Pockets and Cup Holder
1. Fold a 2 1/4’’ x 11’’ binding strip in half lengthwise. Pin or clip the binding to the top edge of one of the pocket pieces on the interior (lining) side.
Stitch with a 1/4’’ seam allowance.


2. Fold the binding around to the front (exterior) side of the pocket. Pin or clip in place.
Topstitch the binding in place close to the edge.
Repeat the bind the top edge of the remaining pocket and the top edge of the cup holder.


Assemble the Pockets
1. Apply the fusible interfacing to the wrong side of the 11’’ pocket square.
Fold the square in half and press. Topstitch along the fold to make the top edge of the pocket.
Use the 2 1/2’’ radius curve on the ruler or template to curve the bottom edges of the pocket.


2. Pin or clip the interior pocket against the lining side of one of the quilted side pieces.
Baste the pocket in place around the edges (1/8’’ from the edge)
Set this quilted side piece aside for now.


3. Cut the 2’’ wide hook and loop tape (velcro) into two pieces, each 2’’ x 2’’ (you should have two 2’’ square soft pieces and two 2’’ square scratchy pieces.
Attach the two soft pieces to the other quilted side piece (the one without the interior pocket). The two soft velcro pieces should be aligned with the top edge, 1 1/2’’ away from each top corner. Sew them in place, stitching all the way around 1/8’’ from the edge.

4. Pin or clip the quilted pocket pieces to the exterior sides of the quilted side pieces.
Baste around the curved edges, 1/8’’ from the edge.


5. The side piece without velcro should now have a pocket on both sides. Use chalk or a fabric pen to mark a dividing line down the center of the exterior pocket.
Sew along this line to divide the pocket, backstitching neatly at the top. This will divide the interior pocket as well.

Make the Straps
1. Fuse the fusible woven interfacing strips to the 2 1/2’’ x 12 1/2’’ upper strap pieces.
2. Place 2 pieces right sides together and sew around three sides, leaving one short end open, with a 1/4’’ seam allowance.
Clip the corners, turn the strap right side out, and press. Topstitch around the edges.
Repeat to make the other strap as well.


3. Sew the two scratchy sides of the 2’’ square velcro pieces to the closed ends of the straps.
4. Attach the strap pieces to the inside of the side piece with an interior pocket as follows:
- the top edges of the straps lined up with the top inside edge of the side piece, 1 1/2’’ away from either corner.
- The scratchy velcro pieces at the ends should be facing down.
- Sew the straps to the top edge, 1/8’ from the edge.

5. Next make the ring tabs and side straps.
Fold the 4’’ x 5’’ strap pieces wrong sides facing with the 5’’ edges together, press. Open and fold the long edges to the inside fold, press. Fold in half and press to make a 1’’ x 5’’ strap.


Topstitch along both sides of the strap, 1/8’’ from the edge.
Push one end of the strap through one of the rectangle rings and fold in half. Topstitch on the strap horizontally about 3/4’’ below the ring (to keep the ring from sliding around.
Repeat to make 2 ring tabs.

6. Pin or clip the ring tabs to the front of the caddy side that has soft velcro sewn at the top. The tabs should be 5’’ below the top edge (right on top of the quilted pocket).
Sew the ends of the tabs in place 1/8’’ from the edge.

7. Fold and press the 4’’ x 12’’ and 4’’ x 18’’ strap pieces the same way as the ring tabs to make one strip 1’’ x 12’’ and one strip 1’’ x 18’‘. Topstitch along the long edges 1/8’’ from the edge.

8. Pin or clip the 1’’ straps to the front of the caddy side that has wide straps sewn at the top.
Place the longer strap on the right side.
The tabs should be 5’’ below the top edge (right on top of the quilted pocket).
Sew the ends of the tabs in place 1/8’’ from the edge.


Make the Cupholder and the Gusset
1. Place the cupholder piece on your workspace with the exterior side up.
Referring to the photo above right, fold the piece over to make 3’’ long side A meet 3’’ long side B, right sides together. Pin or clip in place.
Use a fabric marking pen to mark a dot 1/4’’ from the corner where the raw edges meet.

2. Sew with a 1/4’’ seam allowance from the marked dot to the inside corner.


3. Fold the other corner together, making the 3’’ long edges meet (right sides together) and pin or clip. Make a mark 1/4’’ away from the outer corner, as before.
Sew with a 1/4’’ seam allowance from the marked dot to the inside corner.

4. Finish the raw edges together with a zig zag stitch – taking care to stop at the marked dots so that you don’t sew together the very ends of the seams – these need to be open for the next step.

5. Open flat the 3 1/2’’ edge at the bottom center of the cup holder. Pin or clip it against the bottom end of Gusset A (3 1/2’’ x 6 3/4’’).
The wrong side of the cup holder should be against the exterior (right side) of Gusset A.

Stitch across the end with a 1/4’’ seam allowance.

6. Pin or clip the side edges of the cup holder against the side edges of Gusset A.
Again, the wrong side of the cup holder should be against the exterior of Gusset A.

Sew the sides of the cup holder to the sides of Gusset A with a 1/8’’ seam allowance.

7. Place Gusset B on top, lining up the bottom 3 1/2’’ end of Gusset B with the bottom 3 1/2’’ end of Gusset A, with the cup holder sandwiched in between.

Sew the gusset ends together with a 1/4’’ seam allowance.


8. Flip the piece over and place the 1 1/2’’ x 3 1/2’’ gusset binding piece on top of the seam, right side down against Gusset A. Pin or clip.
Sew across with a 1/4’’ seam allowance. Stitch again across this seam 1/8’’ from the edge – this will help compress all the layers to make it less bulky.


9. This binding wraps around a little differently than the other binding. Simply fold the raw edge over and behind the seam allowance. Then press the seam allowance flat against Gusset B to hide the raw edge of the binding.
Sew close to the top edge of the binding – on Gusset B.

From the right side, it should look like a line of topstitching about 3/8’’ below the cup holder.

Sew the Gusset to the Caddy Sides
1. Secure all of the straps on the Caddy Sides by tucking them inside the pockets or securing them with masking tape.

2. Pin or clip the long edge of the gusset around the side and bottom of the front side piece (with a divided pocket) with the wrong side (interior) of the gusset against the wrong side (interior) of the side piece.


To help the straight edge of the gusset curve around the bottom corner of the side piece, make 1/4’’ scissor clips into the seam allowance of the gusset below the cup holder and where it curves around the other corner.

3. Sew the gusset to the front side piece with a 1/4’’ seam allowance. Sew slowly to help achieve an even 1/4’’ seam allowance.
Tips:
- Make sure you are using a heavy duty needle for sewing through this many layers – such as a size 100/16. These needles are my favorite.
- Use a sewing stiletto to help around the curves.

4. Pin or clip the back side piece to the other edge of the gusset. Remember to make 1/4’’ clips into the gusset seam allowance to help it fit smoothly around the curves.
Sew with a 1/4’’ seam allowance.

Bind the Raw Edges
1. The side seams must be bound with bias strips to help it fit smoothly around the curves.
Fold one of the 2 1/2’’ x 26’’ bias strips in half lengthwise (wrong sides together) and pin or clip the raw edges to the seam allowance – over the gusset.

2. Sew with a 1/4’’ seam allowance.

3. Wrap the binding around to the side of the caddy and sew in place close to the folded edge.
Cut away any extra binding.

Repeat to bind the other seam with the remaining 2 1/2’’ x 26’’ bias strip.

4. Fold the remaining 2 1/4’’ x 30’’ binding strip in half lengthwise (wrong sides together) and pin or clip it to the inside top edge. Leave about 5’’ open along one of the side edges with about 4’’ of binding free at either end.
Attach the binding with a 1/4’’ seam allowance.

5. Bring the ends of the binding together and fold back where they meet at the center, creasing the fold well to mark a stitching line for joining the binding ends.
Tip: If you want, you can cut the binding ends now, 1/4’’ past the creased fold on either side (not shown).

6. Pin the ends of the binding, right sides together matching up the crease lines.
Stitch along the crease. Trim the seam allowance to 1/4’’ and finger-press it open.


7. Refold the binding wrong sides together and finish sewing the binding to the top inside edge of the caddy.
Turn the binding over to the outside of the caddy and pin or clip in place.
Sew the binding down close to the folded edge.

Finish the Side Straps
If possible, fit the side straps to the caddy that the walker will be used with. If the intended walker is not available, cut 2’’ off each strap end and attach the velcro as seen in Steps 4-5 below.
1. Place the caddy on the intended walker backwards – with the cup holder on the left and the ring tabs facing you.
Wrap each 1’’ strap around a side leg and then through the back side of a rectangle ring. Pull the strap tight enough so the caddy won’t swing around – but not too much so that the straps and caddy are stretched. Pin each strap back on itself.
Adjust the straps until the caddy is secured tight enough and it is centered.

2. Unpin each strap one at a time and use a fabric pen to draw a line where the strap folds around the ring.

3. Cut away the extra strap 4’’ past each line.

4. Cut two 3’’ pieces of 1’’ wide hook and loop tape (velcro). You should have 2 scratchy 3’’ pieces and 2 soft 3’’ pieces.
At the end of a strap, fold the raw edge over 1/2’’ and pin a scratchy 3’’ piece of velcro on top. It should be 1/2’’ away from the drawn line.
Sew the velcro piece in place, stitching all the away around close to the edge.

5. Pin and stitch a 3’’ soft strip of velcro 1/2’’ away from the line on the other side, so that the soft strip and the scratchy strip are 1’’ away from each other.

All done! I can’t wait to see the beautiful walker caddies that you make! Please upload a picture to Instagram and tag me @sewcanshe or #sewcanshe so I can take a look.
Happy sewing,

WALKER CADDY SEWING PATTERN
Purchase this pattern in PDF format! The PDF file contains all of the instructions, plus the step by step photos that have been reduced to fit the page nicely with no ads.
Download the file immediately and keep your confirmation email so you can download it again later. Free patterns must be downloaded within 30 days.
Disclosure: some of my posts contain affiliate links. If you purchase something through one of those links I may receive a small commission, so thank you for supporting SewCanShe when you shop! All of the opinions are my own and I only suggest products that I actually use. 🙂