2 Zip Fanny Pack – Free Sewing Pattern
Sew your own fanny pack (a.k.a. hip bag, sling bag, waist wallet, belt bag) using your favorite fabric and easy sewing techniques. This free sewing pattern will show you how!

When my kids first saw me sewing these, they were mortified.
‘Please, don’t wear that!’
‘Don’t make me one!’
‘Why, why, why???’
But then we went on a quick mini vacation for 3 days at a water park resort in Orlando. This was the handiest bag we owned and everyone asked me to carry their hotel key cards, phones, and even a can of sunscreen!
Plus – they saw so many other vacationers (kids, young people, and even ‘old people’ like me) wearing hip bags too (I would say 25% of the people at the park).
At the end of the first day, my 14 year old Chloe picked up my DIY ‘fanny pack’ and said:
‘Wow, mom. Your’s is the prettiest one!’
The blog post below is totally free to read, print, and sew! Just hit CTRL +P on your computer to print. There is an optional PDF download offered at the end of the post. Join our Sewing Bee Community for access to over 300 PDF patterns (including this one), live workshops, premium video courses, and more.

I never wore mine as a sling bag like this, but I saw lots of other people doing it.
The technique that I’m going to show you uses foam stabilizer that is sandwiched in between two layers of cotton fabric and quilted. This technique is shown in my free Triple Zip Bag sewing pattern and Designer Zipper Bags Video course.

But you don’t have to use that technique, if you’d rather use one of the pretty new vinyl or cork fabrics that are coming out. I have found that they don’t need a lining and they look fabulous.
You can find pretty vinyl fabrics like the one above at SewHungryHippie. I really like Fabric Funhouse for high quality cork fabric.

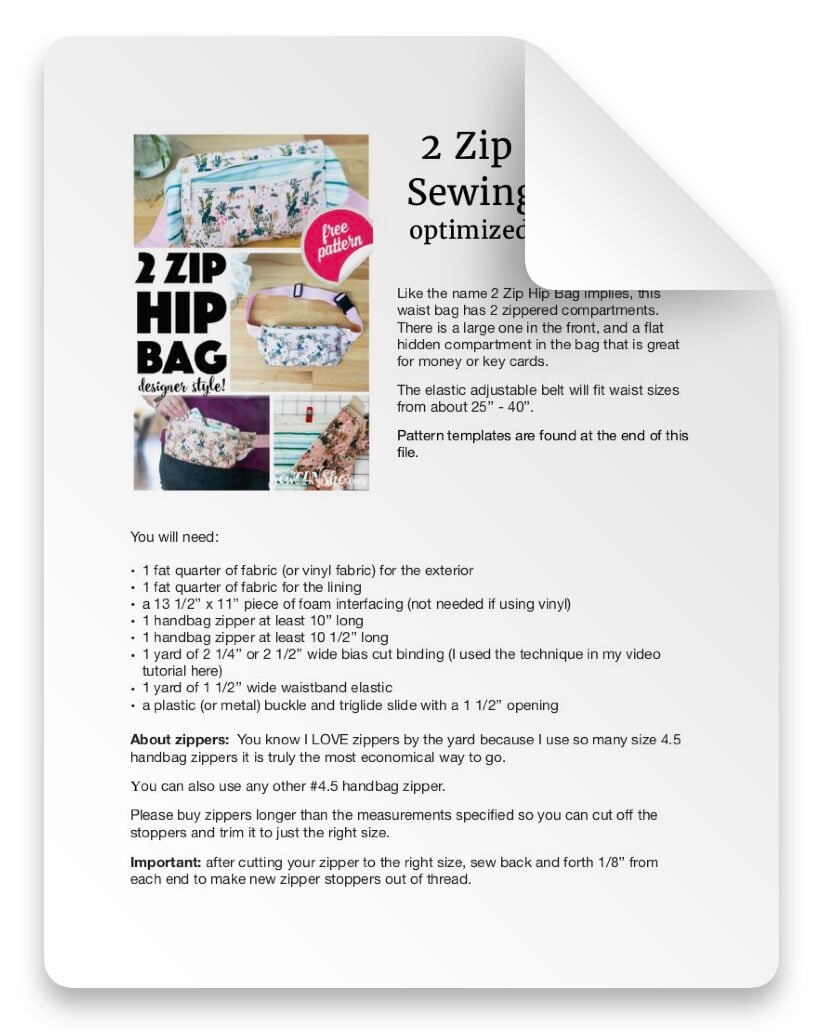
Like the name 2 Zip Hip Bag implies, this waist bag has 2 zippered compartments. There is a large one in the front, and a flat hidden compartment in the bag that is great for money or key cards.
I used one yard of 1 1/2’’ wide waistband elastic for my bag because I love how comfortable it is. You could also use nylon webbing strap or make your own 1 1/2’’ wide belt if you so choose.
The elastic adjustable belt will fit waist sizes from about 25’’ – 40’’.
I also use hand bag zippers (zipper by the yard to be more precise). I’ll leave links for where you can buy them. You can also use regular size sewing zippers for a different overall look.
So let’s get sewing!
2 Zip Hip Bag – Free Fanny Pack Pattern with a Photo Tutorial

You will need:
- 1 fat quarter of fabric (or vinyl fabric) for the exterior
- 1 fat quarter of fabric for the lining
- a 13 1/2’’ x 11’’ piece of foam interfacing (not needed if using vinyl)
- 1 handbag zipper at least 10’’ long
- 1 handbag zipper at least 10 1/2’’ long (not shown)
- 1 yard of 2 1/4’’ or 2 1/2’’ wide bias cut binding (I used the technique in my video tutorial here)
- 1 yard of 1 1/2’’ wide waistband elastic
- a plastic (or metal) buckle and triglide slide with a 1 1/2’’ opening
(I put a materials list for this project in my Amazon Storefront.)
About zippers:
You know I LOVE zippers by the yard because I use so many size 4.5 handbag zippers it is truly the most economical way to go.
If you choose to ignore my advice, you can also use any other #4.5 handbag zipper. Please buy zippers longer than the measurements specified so you can cut off the stoppers and trim it to just the right size.
Important: after cutting your zipper to the right size, sew back and forth 1/8’’ from each end to make new zipper stoppers out of thread.
Cutting Instructions:
All of my measurements are height x width. This is usually only important if your fabric is directional. Click the link below to download the free pattern pieces.
download the 2 zip hip bag pattern templates here
From your exterior fabric, cut:
- 1 rectangle 13 1/2’’ x 11’’
- 2 from the side flap template (1 reversed)
OPTIONAL: If you are using vinyl fabric instead of exterior fabric, cut:
- 1 rectangle 2 3/4’’ x 10’’
- 1 rectangle 5 1/4’’ x 10’’
- 1 rectangle 4 1/2’’ x 10 1/2’’
- 2 from the side flap template (1 reversed)
From your lining fabric, cut:
- 1 rectangle 13 1/2’’ x 11’’ (not needed if using vinyl)
- 2 from the side flap template (1 reversed)
- 2 from the inside divider pattern template
Make the Quilted Piece (Watch Lesson 1 of my free Designer Zipper Bags video course to see how easy this is!)
Note: skip this step if you are using vinyl fabric or cork.

1. Place the wrong side of one of the 13 1/2’’ x 11’’ fabric pieces against the foam stabilizer piece of the same size. Machine baste around it 1/8’’ from the edge.
2. Place the wrong side of the remaining 13 1/2’’ x 11’’ fabric piece against the other side of the foam stabilizer. Machine baste around 1/8’’ from the edge.

3. Sew quilting lines all over this piece – any way you like! I used wavy lines with my walking foot.

4. From this quilted piece, cut:
- 1 rectangle 2 3/4’’ x 10’’
- 1 rectangle 5 1/4’’ x 10’’
- 1 rectangle 4 1/2’’ x 10 1/2’’
Machine baste 1/8’’ from the edges of these pieces to seal the edges.
Make the Back Zipper Panel:
Start here if you are using vinyl for the exterior fabric.

1. Place the 10’’ long zipper face down against the top edge of the 5 1/4’’ x 10’’ quilted (or vinyl) piece. Pin or clip in place.

2. Stitch with a 1/4’’ seam allowance.

3. From the back (lining side) of the piece, carefully trim away 1/8’’ from the foam and fabric layers behind the zipper tape. Do not cut the zipper tape. This is so the zipper tape will fold down against the inside of the pouch and cover the raw edge.


4. Finger press the zipper tape against the lining fabric. Sew along the edge of the zipper tape to secure and cover the raw edges.

Note: This can also be sewn from the front side. Simply press or finger press the zipper tape against the lining and then topstitch from the front 1/8’’ from the fold.

5. Place the top edge of the zipper face down against a long edge of the 2 3/4’’ x 10’’ quilted (or vinyl) piece (right sides together). Stitch with a 1/4’’ seam allowance, as before.

6. Trim away 1/8’’ of fabric and stabilizer behind the zipper tape and topstitch as before.
Set this piece aside for a few minutes.
Attach the Inside Divider:

1. Place the two inside divider pieces wrong side together. Baste around them, sewing 1/8’’ from the edge.

2. Move the zipper slider on the back zipper panel to the center. Center the inside divider against the lining side of the back zipper panel. Pin in place (unless you are using vinyl – in which case, try to do this without pinning).

3. Trim around the inside divider so that the back zipper panel is the same size and shape.
4. Before removing the pins, baste all the way around this piece 1/8’’ from the edge to secure it together.

5. Turn the back zipper panel over to the exterior side. Topstitch one more time right on top of the topstitching along the top of the zipper. This will help the inside divider from flopping around.
Make the Side Flaps:

1. Place each exterior fabric side flap right sides together with a matching lining fabric side flap. Stitch across the top straight edge and the bottom curved edge with a 1/4’’ seam allowance.
Trim the bottom curved edge with pinking shears, or clip notches along this edge using small scissors.

2. Turn each piece right side out and press flat.

3. Carefully turn the raw edges of the smaller opening to the inside by 1/4’’. Press. Leave the raw edges of the larger opening as-is.

4. Topstitch 1/8’’ from the top straight edge and the bottom curved edge. Baste the larger opening closed 1/8’’ from the edge.

Repeat these steps for both side flaps.
Make the Front Zipper Panel:
{These steps are the same as how you attached the bottom edge of the zipper for the back panel.}

1. Place the 10 1/2’’ long zipper face down against the top edge of the 4 1/2’’ x 10 1/2’’ quilted (or vinyl) piece. Pin or clip in place.
2. Stitch with a 1/4’’ seam allowance.
3. From the back (lining side) of the piece, carefully trim away 1/8’’ from the foam and fabric layers behind the zipper tape. Do not cut the zipper tape. This is so the zipper tape will fold down against the inside of the pouch and cover the raw edge.
4. Finger press the zipper tape against the lining fabric. Sew along the edge of the zipper tape to secure and cover the raw edges.
Note: This can also be sewn from the front side. Simply press or finger press the zipper tape against the lining and then topstitch from the front 1/8’’ from the fold.
Assemble Your 2 Zip Hip Bag:

1. On the lining side, mark the center at the top and bottom of the front zipper panel and the back zipper panel.

2. Place the front zipper panel along the top edge of the back zipper panel with right sides together and matching up the top center marks. Pin or clip in place.

3. Moving from the center outward, pin or clip the top zipper tape only (not the side of the front zipper panel) around the top edge of the back zipper panel.
Make 1/4’’ clips about 1/2’’ apart into the zipper tape where it needs to curve around the edges.

On each side, the front zipper tape should end about 1/2’’ away from the zipper on the back panel.
In the photo above you can see where I clipped into the zipper tape to help it curve around the edge.
Note: You will start and stop sewing 1/4’’ away from the ends of the zipper tape on the front zipper panel.

Note: At this point I recommend switching to a zipper foot if you haven’t already.
4. Stitch the top zipper tape of the front zipper panel to the curved edge of the back zipper panel, starting and stopping 1/4’’ from each end.

5. Turn the bag over so you can work on the bottom curved seam. Pin or clip the pieces together, matching up the center marks.

6. Moving from the center outward, pin or clip the bottom edger of the front zipper panel around the bottom edge of the back zipper panel.
Make 1/4’’ clips about 1/2’’ apart into the straight edge of the top zipper panel where it needs to curve around the bottom zipper panel.

7. Sew the straight edge to the curved edge using a 1/4’’ seam allowance. As before, begin and end sewing 1/4’’ from each corner on the front piece.
Insert the Side Flaps and Sew the Side Seams:

1. With the bag still inside out, lay it on your workspace with the flaps as seen above.
The front of the zipper bag is against the table, as well as the right side of both side flaps. The turned-in edges of the side flaps are pointing toward the bag.

2. Carefully insert the side flap inside the bag through the side opening (smaller turned-under end first).
Line up all raw edges and pin or clip in place. You will need to flatten the front of the bag against the back of the bag. Depending on your seam allowances, there may be some pinching at the corners. This is no big deal.
Repeat with the other side flap on the other side of the bag.

3. Turn the bag over and make sure the longer front zipper is at least halfway open.
You can also peek inside to make sure that now the front (exterior sides) of the flaps are facing up and they are both about even with the top of the back zipper.


4. When you have both sides pinned or clipped to your satisfaction, sew both seams with a 1/4’’ seam allowance.
Bind the Raw Edges
If desired, turn your bag right side out and check that everything looks good. Then turn it inside out again to sew the seam binding.

If you have another favorite way of binding, feel free to do this step any way that you like. Below is my favorite binding method. You could also finish this seam with a serger or zig zag stitch.
1. Fold the yard of 2 1/2’’ wide or 2 1/4’’ wide bias binding in half with the wrong sides together.
Line the raw edges up with the raw edges of the inside seam.
Sew the binding around the bag with a 1/4’’ seam allowance. Leave a tail of binding at least 5’’ long at the start. Stop sewing 5-6’’ from where you started.

2. Bring the binding together and fold the ends back where they meet. Cut away the extra binding 1/4’’ past the folds where they meet.

3. Open the binding ends and place them right sides together. Stitch with a 1/4’’ seam allowance. You may have to fold the bag in half to achieve this. 🙂

4. Finger press the seam open and then fold the binding wrong sides together as before. Lay the binding flat against the bag and finish sewing it on.

Examine the edges and curves of the bag. Trim to an even 1/4’’ seam allowance, if necessary.

5. Flip the binding around to the other side of the seam. Stitch it down close to the fold.
Turn the bag right side out and press gently.
Make the Adjustable Belt (or waist strap)

Note: This elastic adjustable belt will fit waist sizes from about 25’’ – 40’’. You may adjust the length of both pieces if needed. If you are using nylon webbing straps instead of elastic pieces, then I suggest adding a few inches to each side to make up for the lack of stretch.
1. Cut the yard of waistband elastic into two pieces, 8’’ long and 28’’ long.
2. Thread the elastic through the female side of the buckle by pushing it down through the top opening and folding it back on itself.

2. Fold the raw edge of the elastic under by about 1/2’’ and clip in place.
Note: My folded under edge is almost 2’’ away from the buckle. This is so I don’t have to struggle to fit it under my sewing machine foot.

3. Secure the elastic and hide the raw ends by sewing in a rectangle that is about 1 1/2’’ x 1/2’’.
Set this piece aside.

Note: Examine your triglide slide. If it has a raised edge like mine above, that is the top of the slide. If not – don’t worry about it!
The remaining two pieces of hardware (the triglide slide and the male end of the buckle) will be threaded from the bottom.

4. Push one end of the longer piece of elastic up through the first opening on the bottom of the triglide slide and down through the other opening.
Then (without twisting the elastic), push the end up through the first opening on the male end of the buckle and down through the other opening.

5. Loosen the elastic that is threaded through the triglide slide by pulling up the elastic on top about 2’’.
Now you will make a loop by threading the end of the elastic back up and down through the triglide slide in the exact same direction you did the first time.

6. Push the elastic through about 2 – 2 1/2’’. Fold the raw edge under and clip the end of the elastic to itself (not to the elastic on top).

Here is another view of that.

7. Adjust the elastic so you can keep it out of the way while you stitch a rectangle to secure the end and hide the raw edges.

7. Insert one end of each elastic piece into the folded under ends on the side flaps.
If you arrange your straps as seen above (looking at the under side of the bag and the belt pieces), then you can wear the bag on your right hip and the buckle will snap approximately at your left hip.

8. Secure the belt pieces by sewing back and forth over the folded-under edges of the flap where the belt is inserted.

Enjoy your beautiful 2 Zip Hip Bag! If you make one, be sure to snap a pic and show me by tagging me on Instagram @sewcanshe.
2 ZIP HIP BAG FANNY PACK SEWING PATTERN
Purchase this pattern in PDF format! The PDF file contains all of the instructions, plus the step by step photos that have been reduced to fit the page nicely with no ads.
Download the file immediately and keep your confirmation email so you can download it again later. Unlimited downloads are available from the confirmation email. Free patterns must be downloaded within 30 days.

You might also like my collection of Amazing (and free) Cross Body Bag Patterns.
Happy sewing!

Disclosure: some of my posts contain affiliate links. If you purchase something through one of those links I may receive a small commission, so thank you for supporting SewCanShe when you shop! All of the opinions are my own and I only suggest products that I actually use. 🙂