Receipt Roll Scrap Quilt Using Adding machine Paper
Sew the scrappiest quilt ever using your smallest scraps and a roll of calculator receipt paper! I first saw this idea on Pinterest and I didn’t believe it could be done until I tried it myself.

Here’s a free tutorial and quilt pattern so you can string-piece fabric scraps together on a roll of inexpensive adding machine paper to make fabric strips that can be sewn into a quilt.
Sew through your fabric stash with all my free quilt patterns.

This blog post has been converted to an optional PDF that’s optimized for printing. Find it here. The free Receipt Roll Quilt Pattern is included in the blog post below and is totally free to read, print, and sew! Just hit CTRL +P on your computer to print.

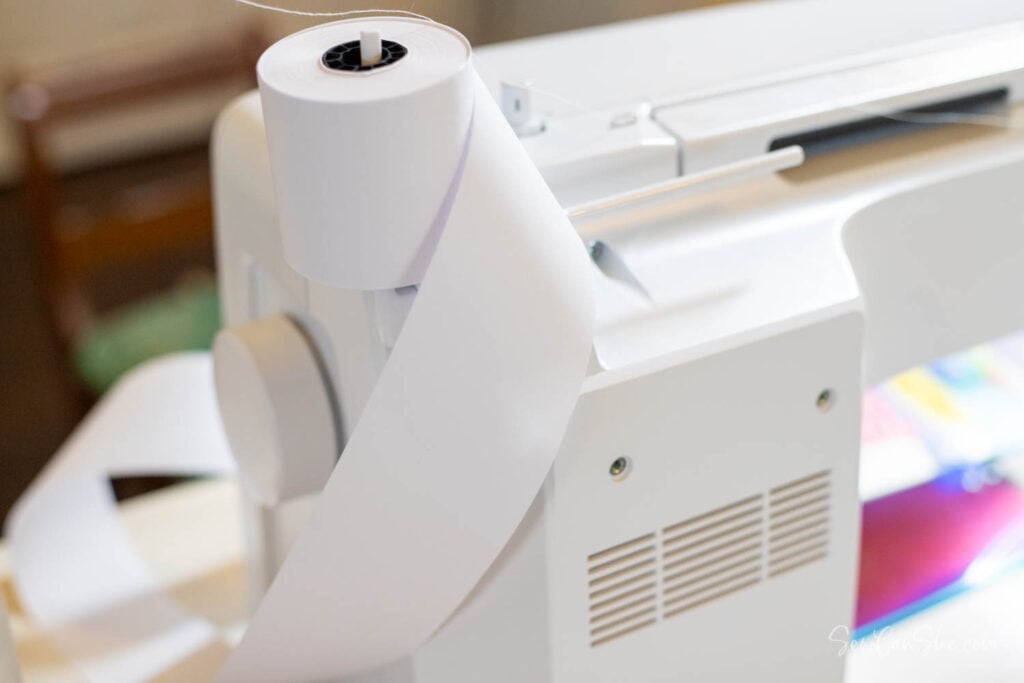
I purchased some inexpensive adding machine paper on amazon here and then a few days later sat down with my bin of Tula Pink Scraps… the rest is quilt history!
It didn’t take very long until I had yards and yards of calculator receipt paper covered in fabric. This is a simple form of foundation paper piecing that you can work on while you are listening to music, watching a movie, or enjoying an audio book. It’s so relaxing!
My adding machine receipt paper is approximately 2 1/4” wide, so my scrappy strips were not quite as wide as jelly roll fabric strips.

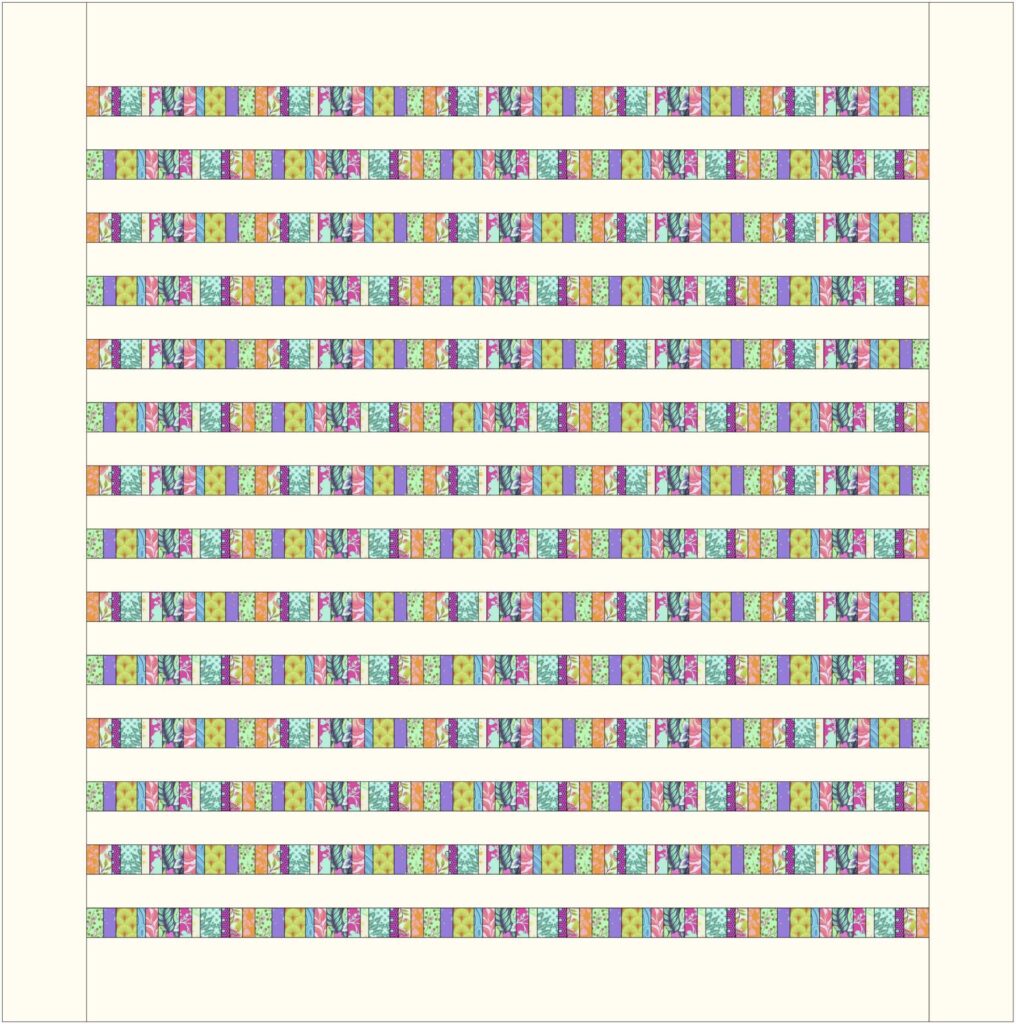
After sewing 20 yards of receipt roll strips, I sewed them into this adorable throw quilt that’s approximately 60” x 60”. If your receipt paper is a different size than mine, this tutorial will still work – you’ll just have to adjust the size of the borders as needed.
Check out all my free quilt patterns here!

I used EQ8 Quilt Design Software to see what the long paper pieced strips of scraps would look like in different layouts. Once you have made a roll of pieced fabric there are so many possibilities like log cabin blocks, rail fence blocks, or just about quilt you can make with a jelly roll (keep in mind that the standard adding machine calculator paper roll is not quite as wide as jelly roll strips).

In the tutorial below I’ll share with you tips and tricks for sewing your own Receipt Roll Quilt. Grab your basket of scraps and let’s get started!
How to Choose Fabrics for your Calculator Paper Strip Quilt

This is a great pattern for using up all your scraps of the same color, scraps from a favorite designer (mine are all from Tula Pink) or even scraps in an entire rainbow of colors. You can use large or small scraps of fabric. I’ll show you how I cut mine to fairly consistent widths, but that is totally optional.
The only other fabric you need for this quilt is a solid or blender fabric for the background (I chose Kona Snow). If you choose to use scraps and a solid background fabric, this quilt is so budget friendly!
How to Cut Your Fabric Scraps for Sewing them to Receipt Paper

If your scrap fabrics are already small, you won’t have to cut them before getting started. Not all of mine were the right size, though, so I cut them into strips first.
If you decide to cut your fabrics into strips first, make sure the strips are at least 1/4” – 1/2” taller than your roll of calculator or receipt paper.
Then stack up your strips and slice them into easy to grab pieces. I varied the size of pieces from about 1” – 2 1/2”. That was just my preference.
Of course, the larger the scraps you use, the faster your strip of string pieced fabric will grow!
Besides scrap fabrics You will need:
- a roll of calculator or receipt paper (mine is 2 1/4” wide, but you can use any size)
- 2 1/2 yards background fabric to make the quilt pictured (suggested: cream or white)
- 1/2 yard binding fabric
- 3 1/2 yards backing fabric, or enough to piece together a 65” x 65” square
- a 65” x 65” piece of quilt batting
- a rotary cutter, acrylic ruler, and mat
- sewing machine
- thread (I suggest thread matching the background fabric)
Cutting:
Cut your scrap fabric pieces as needed. You can always cut more as you go.
From the cream colored fabric (or other background fabric), cut:
- 17 strips of fabric 2 1/2” x the width of the fabric (40-42”)
- 2 border strips 5 1/2” x 50 1/2”*
*Border tips:
- You will need to piece 5 1/2” wide strips of fabric together to make the borders.
- The long side border strips will be cut later. The height of the quilt is sure to vary based on the width of your receipt paper and your seam allowances. Instead, wait until the center of the quilt top is finished so you can measure it and sew accurate borders. See how to measure and cut accurate quilt borders.
Binding fabric:
- cut 6 strips 2 1/2” x width of fabric (40-42’’)
How to Sew the Receipt Paper Fabric Strips
Use a 1/4’’ seam allowance and a short stitch length such as 1.5-2. The shorter stitch length will make it easy to remove the paper from the back of your quilt later.

Tip: I found it easiest to work with the roll of adding machine receipt paper on my right. After a while, I discovered that I could place the roll on my vertical thread spool pin for easy rolling!


1. Place the first scrap of fabric across the receipt paper right side up. The first scrap is the only piece that will be laid right side up.
Then lay your second scrap on top, right side down so that right sides are together. Line up the raw edges on the right.
Make sure that both pieces are at least as tall as the calculator paper – but they don’t have to be the same height or width.

2. Sew along the raw edges on the right side with a 1/4” seam allowance.


3. Open the fabrics and finger press along the seam. You can also use a seam roller or press with an iron to make it nice and flat. I just finger pressed.
Lay the next scrap on top, right side down with the raw edges on the right lined up.

4. Stitch. Open the top fabric and finger press the seam.

5. Continue adding scraps!

You’ll need 20 yards of receipt paper fabric to make this quilt pattern.
Tip: Unroll 20 yards of paper and mark the place where you’ll need to stop. Then roll it back up again to sew.

If you stop for a while and then resume sewing scraps to paper, you may need to join two foundation pieced strips.
To do that, simply trim the ends of the paper even with the fabric pieces.

Then place the fabric strips right sides together with the paper lined up. Sew with a 1/4” seam allowance and press the seam to the side.
Trimming and Cutting the Strips of Fabric

1. Place the strip of foundation pieced scrap fabric on your cutting mat fabric side down. Use a ruler and rotary cutter to carefully trim the extra fabric away along the edges of the receipt paper.

2. From the trimmed strip, cut 14 pieces that are 50 1/2” long.
Tip: Use a tape measure to measure the length needed and make a mark with a pencil. Then cut.

3. Sew the 17 strips of fabric (2 1/2” wide) together end to end to make a very long strip.
From this, cut 13 pieces that are 50 1/2” long.
Assemble the Quilt Top

1. Sew the strips together alternating scrappy strips and background strips, using a 1/4” seam allowance.
Tips:
- Pin the strips together before sewing for better accuracy.
- I found it easier to sew with the paper side up.
- Leave the paper on the back of the scrappy strips until instructed to remove the paper before adding the side borders. This will prevent stretching and seams coming unsewn.
- There also is no need to press until the paper is removed.
- Don’t worry if the side edges are uneven. This will happen! You’ll trim the edges before sewing the side borders.

2. Add the 5 1/2” x 50 1/2” border strips to the top and bottom edges.

3. Now that all of the seams in the scrappy strips have been secured, it’s safe to remove the paper.
It’s pretty easy to remove if you tear away the middle pieces first and then pick off the narrow pieces near the seam allowances. Some foundation paper piecing quilters use tweezers to remove every bit of paper. I’m not that picky (pun intended!) and know that the little bits will get washed away when I wash the quilt.

4. With the paper removed, press the seam allowances either toward the scrappy strips or the background fabric, as desired.
Trim the side edges to make them even.

5. Measure the height of the quilt top in the center and a few inches away from each side edge. Use the average of these measurements to cut the side borders. See how I measure and calculate quilt borders.
The side borders should be 5 1/2” wide x about 60-61” tall.

Finishing your Receipt Roll Scrappy Quilt
1. Cut or piece together a 65’’ x 65’’ piece of backing fabric and make a quilt sandwich with the backing, batting, and top.
2. Baste together with fusible batting, pins or basting spray.
3. Quilt as desired. Straight line quilting with your walking foot would be fast and easy.
4. Cut 6 binding strips and bind using your favorite method. This is my favorite quilt binding method.
Happy quilting,

Disclosure: some of my posts contain affiliate links. If you purchase something through one of those links I may receive a small commission, so thank you for supporting SewCanShe when you shop! All of the opinions are my own and I only suggest products that I actually use. 🙂
