Sew a Mug Caddy Organizer: free fat quarter friendly sewing pattern
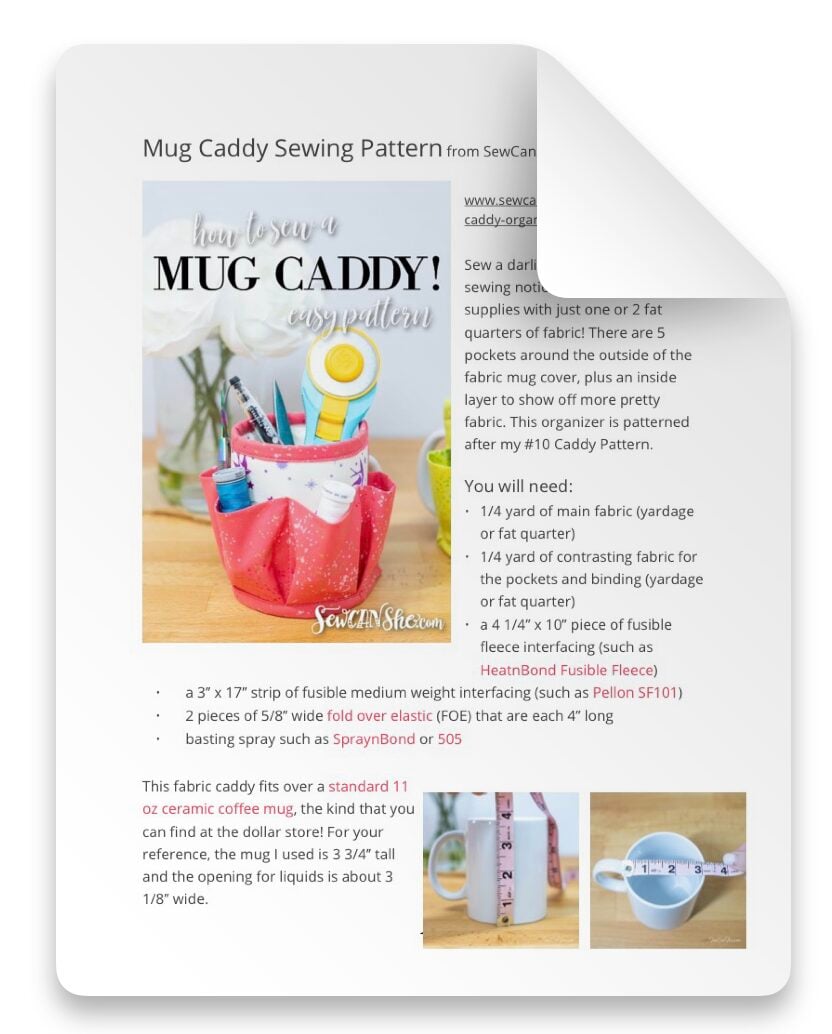
Sew a darling mug caddy to store sewing notions, office tools, or art supplies with just one or 2 fat quarters of fabric! There are 5 pockets around the outside of the fabric mug cover, plus an inside layer to show off more pretty fabric.

I know there are other mug caddy sewing patterns out there, but I think you’ll love mine the best. It’s patterned after my #10 Caddy Pattern, and as a special bonus to SewCanShe readers – I’m sharing this desktop or workspace organizer pattern with you for free in the blog post below.
If you love this, find more amazing sewing ideas in my free sewing patterns.
The blog post below is totally free to read, print, and sew! Just hit CTRL +P on your computer to print. There is an optional PDF download offered at the end of the post. Join our Sewing Bee Community for access to over 300 PDF patterns (including this one), live workshops, premium video courses, and more.
I never liked the fabric ties that I see on other mug caddy patterns – they are so bulky and look like they could get easily untied. I used pretty fold over elastic (FOE) instead. After some experimentation, I came up with a technique for sewing the elastic on that is both easy and leaves no raw edges.
Of course, this is one main difference between the Mug Caddy and the #10 Caddy, because the latter fits over a can and doesn’t need an opening for the mug handle.

And of course, this free sewing pattern is fat quarter friendly! I used two fat quarters of fabric – one for my main fabric and one for the pockets and binding. If you wanted to squeeze the entire project out of one fat quarter of fabric, you could do that too! There are cutting diagrams below.
You’ll also need small amounts of fusible fleece interfacing and medium weight fusible interfacing.


This fabric caddy fits over a standard 11 oz ceramic coffee mug, the kind that you can find at the dollar store! For your reference, the mug I used is 3 3/4’’ tall and the opening for liquids is about 3 1/8’’ wide.


How to Sew the Mug Caddy Organizer
You will need:
- 1/4 yard of main fabric (yardage or fat quarter)
- 1/4 yard of contrasting fabric for the pockets and binding (yardage or fat quarter)
- a 4 1/4’’ x 10’’ piece of fusible fleece interfacing (such as HeatnBond Fusible Fleece)
- a 3’’ x 17’’ strip of fusible medium weight interfacing (such as Pellon SF101)
- 2 pieces of 5/8’’ wide fold over elastic (FOE) that are each 4’’ long
- basting spray such as SpraynBond or 505
- a fabric marking pen or pencil (such as a Frixion Pen)

Cutting:
From the main fabric, cut:
- 2 rectangles 4 1/4’’ x 10’’
- 1 rectangle 7 1/2’’ x 9’’
From the contrasting fabric for the pockets and binding, cut:
- 1 rectangle 6’’ x 17’’
- 1 strip 2 1/4’’ x 30’’ (or smaller strips to sew together that will equal at least 30’’ – as seen in the diagrams above)
As indicated in the materials list, you’ll also need:
- a 4 1/4’’ x 10’’ rectangle of fusible fleece
- a 3’’ x 17’’ strip of medium weight fusible interfacing


Fuse the Stabilizers to the Fabrics
1. Fuse the fusible fleece to the wrong side of one of the 4 1/4’’ x 10’’ main fabric rectangles. Then use the basting spray to adhere the remaining 4 1/4’’ x 10’’ rectangle to the other side of the fusible fleece.
Alternatively, you could attach the second piece of fabric to the back of the fusible fleece by sewing around the edges with a long basting stitch, about 1/8’’ from the edge.

2. Fold the 6’’ x 17’’ pocket piece in half lengthwise and press. Don’t you love my vintage iron? I do!

3. Unfold the pocket fabric piece and lay the 3’’ x 17’’ piece of medium weight fusible interfacing inside on one half of the fabric piece. Press to fuse.
Fold the pocket rectangle in half again and press to make a stabilized strip that is 3’’ x 17’’.

Sew the Pockets
1. Lay the main piece and the pocket piece right side up on your work space (you can pick which side you want to be the right side on either one).
2. Use the fabric marking pen to draw the following 1/2’’ marks along the bottom edge of the main piece:
- 2 marks that are each 3/8’’ away from the side edges
- 4 more marks that are 1 7/8’’ apart and away from the other marks (this may not be exact for the last space – that’s okay)
3. Use the fabric marking pen to draw vertical lines on the pocket piece (they should go from top to bottom):
- 2 marks that are each 3/8’’ away from the side edges
- 4 more marks that are 3 1/4’’ apart and away from the other marks (this may not be exact for the last space – that’s okay)

4. Lay the pocket piece on top of the main piece with both pieces facing up. Match the lines on the pocket piece with the marks along the bottom edge of the main piece. Place a pin on each marked line.

5. Sew along each marked line from the bottom edge to the top. Backstitch neatly at the top of each pocket and cut threads.


6. Flatten each pocket and fold the extra fabric into equal sized pleats on each side. Pin the pleats. Repeat for all 5 pockets.

7. Sew across the bottom raw edges 1/4’’ from the edge to secure the pleats and the bottom of the pockets.

Make the Fabric Flap
1. Fold the 7 1/2’’ x 9’’ piece in half with right sides together and the 9’’ long edges lined up.
Pin the side edges.

2. Sew only the side edges with a 1/4’’ seam allowance.

3. Turn the flap right side out and press flat.

4. Place the main piece on your workspace with the pocket side down. Center the flap on top. Align the raw edges on the flap with the top raw edges of the main piece. Pin.
Sew across the top edge with a 1/4’’ seam allowance.


5. Fold the two 4’’ long pieces of fold over elastic (FOE) in half with the raw edges together.
Pin the elastic pieces to the back of the caddy on the right or left side (it doesn’t really matter).
The top elastic loop should be about 3/8 below the top edge. The bottom elastic loop should be about 3/8’’ above the bottom edge. The raw edges of the elastic should be lined up with the raw edges of fabric on the side of the caddy.
6. Sew the ends of the elastic to the caddy, sewing 1/4’’ from the edge.

Sew Binding to the Caddy
1. If necessary, sew together the binding strips to make 1 strip that is at least 30’’ long.
Fold the strip in half lengthwise and press.

2. Sew the binding to the back of the caddy first.
Start by pinning one end of the binding to the bottom edge with the raw edges lined up.
Tip: You can pin the flap and the elastic loops down to keep them away from the binding if you wish.

3. Begin sewing 3-4’’ away from the end of the binding. Sew the binding to the caddy with a 1/4’’ seam allowance.


Miter each corner when you come to it.
To do this:
- Stop sewing 1/4’’ away from the corner. Remove from your sewing machine and cut threads.
- Fold the binding to the right making a 45 degree angle fold. Crease the fold with your fingernail.
- Then fold the binding to the left, making the raw edges line up with the next side of the caddy. Pin or clip in place while you put it back under your sewing machine.

Begin sewing again at the edge and continue sewing the binding around all sides of the caddy, mitering each corner as shown.

The binding should go over the top raw edge of the flap and the raw edges of the elastic, but it should not catch any other parts of the flap or elastic.


4. When you come to the bottom edge of the caddy, stop sewing about 2’’ past the last corner. Remove from the sewing machine.
Bring the ends of the binding together and fold them back where they meet. Crease the folds with your fingernail or an iron. Trim away the extra binding 1/4’’ past each fold.


5. Place the ends of the binding right sides together and pin. Stitch with a 1/4’’ seam allowance.

6. Finger press the seam in the binding open. Re-fold the binding and finish sewing it to the caddy.

7. Turn the binding over to the right side of the caddy and sew it down close to the fold.

A sewing stiletto helps with this step, especially to help folding the corners.

Finish Sewing the Elastic
1. Check the back side of the caddy to make sure that neither the flap nor the elastic folds got caught in the binding.

2. Fold the caddy in half with the pockets showing on the outside. Pin the elastic loops so that the fold on the elastic lays on the free edge of the caddy, on top of the inside binding and overlapping the binding by just about 1/8’’.

3. Sew the elastic to the free edge of the caddy, stitching right over the ‘ditch’ where the binding and the inside fabric meet.

When finished, the elastic should connect the two short ends of the caddy and the folds on the elastic do not show.

It is easiest to place the caddy over the coffee cup with the flap folded up at first.
The elastic is a tight fit over the mug handle so go slowly. This is intentional.

Then push the flap down inside the cup. The elastic will hold the caddy on securely.
As always, I love to see the things you make with my tutorials! Post a picture to Instagram and tag me @sewcanshe or #sewcanshe so I can take a look.
If the pocket or binding steps are unfamiliar to you, you can see them demonstrated in my #10 Caddy and Mini Caddy Video Course.
Happy sewing,

MUG CADDY ORGANIZER SEWING PATTERN
Purchase this pattern in PDF format! The PDF file contains all of the instructions, plus the step by step photos that have been reduced to fit the page nicely with no ads.
Download the file immediately and keep your confirmation email so you can download it again later. Unlimited downloads are available from the confirmation email.
Disclosure: some of my posts contain affiliate links. If you purchase something through one of those links I may receive a small commission, so thank you for supporting SewCanShe when you shop! All of the opinions are my own and I only suggest products that I actually use. 🙂