The Card Kitty: playing card holder for card games – free sewing Pattern
Sew a DIY card holder that makes it easy to see your cards and easy to play! This easy sewing project makes card games possible for little people and big people who have trouble with a handful of cards.

We especially love it for games like Phase 10 where you need to look at a lot of cards at once.
The blog post below is totally free to read, print, and sew! Just hit CTRL +P on your computer to print. There is an optional PDF download offered at the end of the post. Join our Sewing Bee Community for access to over 300 PDF patterns (including this one), live workshops, premium video courses, and more.

I cannot believe how much fun my family has been having ever since I made these card kitties! Seriously. Well, first my kids didn’t know what they were…
My son Connor must have thought they were… mega swimmies?
But it just happened that I finished all four on the last day of school. So, after dinner that night, I asked if they wanted to play Uno. It’s kind of embarrassing, but three out of the four didn’t even know how to play.
But once we got started, we were all having so much fun that we played until almost midnight (since it wasn’t a ‘school night’)!
I know that many of you are waiting for the Card Kitty sewing tutorial – and hope you have just as much fun with it as we are. They are really easy to sew up so you should be able to make a few in an afternoon.
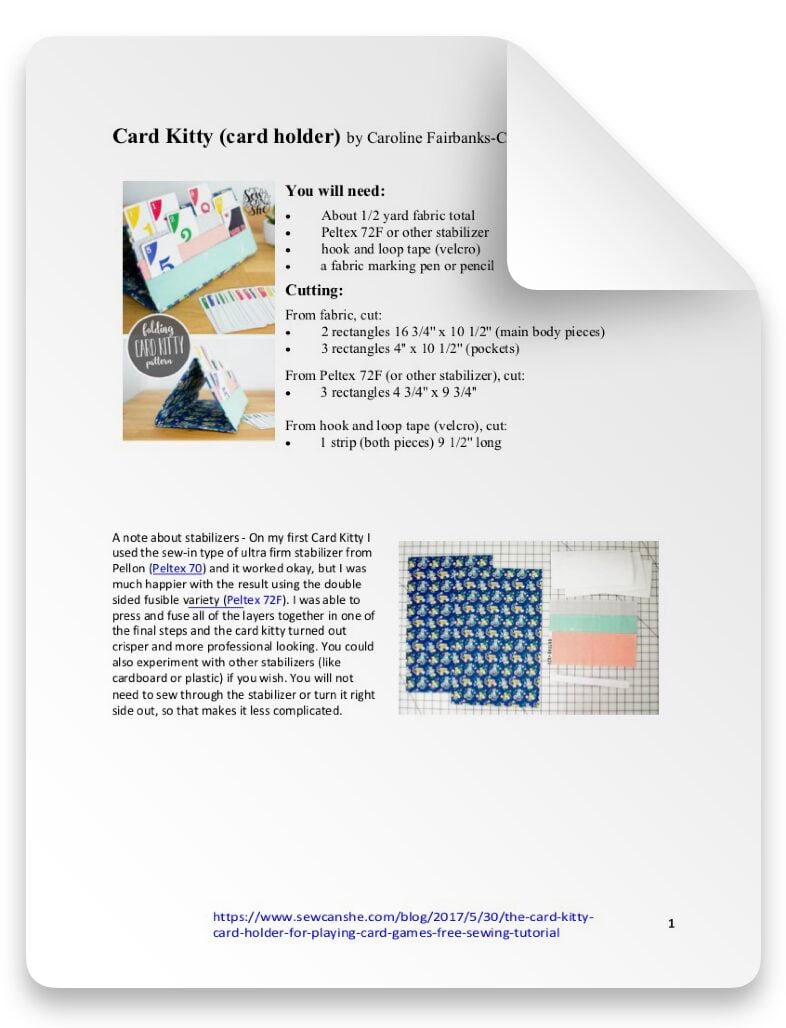
A note about stabilizers – On my first Card Kitty, I used the sew-in type of ultra-firm stabilizer from Pellon (Peltex 70), and it worked okay, but I was much happier with the result using the double-sided variety (Peltex 72F). I was able to press and fuse all of the layers together in one of the final steps and the card kitty turned out crisper and more professional looking. If you wish, you could also experiment with other stabilizers (like cardboard or plastic). You will not need to sew through the stabilizer or turn it right side out, which makes it less complicated.
Let’s get on with it!

Card Kitty (card holder) Free Sewing Tutorial
You will need:
- About 1/2 yard fabric total
- Peltex 72F or other stabilizer
- Hook and loop tape (velcro)
- A fabric marking pen or pencil
Cutting:
From fabric, cut:
- 2 rectangles 16 3/4” x 10 1/2” (main body pieces)
- 3 rectangles 4” x 10 1/2” (pockets)
From Peltex 72F (or other stabilizer), cut:
- 3 rectangles 4 3/4” x 9 3/4”
From hook and loop tape (velcro), cut:
- 1 strip (both pieces) 9 1/2” long


1. Choose one of the 16 3/4” x 10 1/2” main pieces to be the front. Mark horizontal lines across it as shown in the diagram above:
- 1 line that is 1 1/2” from the bottom
- 1 line 5” above that
- 1 line 5” above that

2. Fold the 3 fabric rectangles that are 4” x 10 1/2” in half lengthwise (right sides together) and pin.


3. Stitch across the long edge. Turn the right side out and press. Topstitch across one long edge on each one to make the top edge of the pockets.


4. Pin one of the pocket pieces to the main body piece that you marked, 1” below the top line. The topstitching should be along the top edge.
(yes, I left part of the Cotton + Steel selvage on this piece. It was just too cute not to show off!)


5. Sew the pocket piece in place by stitching across the bottom edge.
Pin the next pocket 1” below the first and sew it in place the same way.


6. Sew the third pocket in place 1” below the second pocket. Baste the sides of the pocket in place within the 1/4” seam allowance.
Sew a dividing line across the middle of the pockets to keep them from stretching out.


7. Pin one side of the hook and loop tape (velcro) to the bottom of the same piece, just below the lowest marked line. Stitch it in place, sewing around the tape close to the edge.


8. With the 3 pockets and the velcro sewn to the pocket piece, place the remaining rectangle of the same size on top and pin around the sides and top.
Stitch the two pieces together with a 1/4” seam allowance, leaving the bottom edge open. Clip the top corners.
Turn the piece right side out, pushing out the corners. Press flat.


9. Insert one of the 4 3/4” x 9 3/4” pieces of stabilizer inside the card kitty and work it all the way to the top. Smooth out all of the edges. If the stabilizer doesn’t fit, you can take it out and trim it down a little bit so it will lay flat.
Sew across the top marked line, backstitching neatly at the start and end.


10. Repeat step 9 with the other two pieces of stabilizer, sewing on the remaining marked lines after inserting each one.
Press the raw edges at the opening to the inside 1/2” (right along the strip of velcro). Stitch the opening closed, sewing on your previous stitching for the velcro.

If you used fusible stabilizer, this is a great time to press both sides of the card kitty and fuse it all together.

11. On the back side of the card kitty, sew the remaining piece of velcro close to the top.

All done. Now make more for everyone in your card circle!
Don’t forget to pin the Card Kitty free sewing tutorial so you can find it later! And did you know you can sew a Yahtzee Wallet too?
Happy Sewing!
xoxo,

CARD KITTY SEWING PATTERN TO MAKE PLAYING CARD GAMES EASIER
Purchase this pattern in PDF format! The PDF file contains all of the instructions, plus the step by step photos that have been reduced to fit the page nicely with no ads.
Download the file immediately and keep your confirmation email so you can download it again later. Unlimited downloads are available from the confirmation email.

Disclosure: some of my posts contain affiliate links. If you purchase something through one of those links I may receive a small commission, so thank you for supporting SewCanShe when you shop! All of the opinions are my own and I only suggest products that I actually use. 🙂