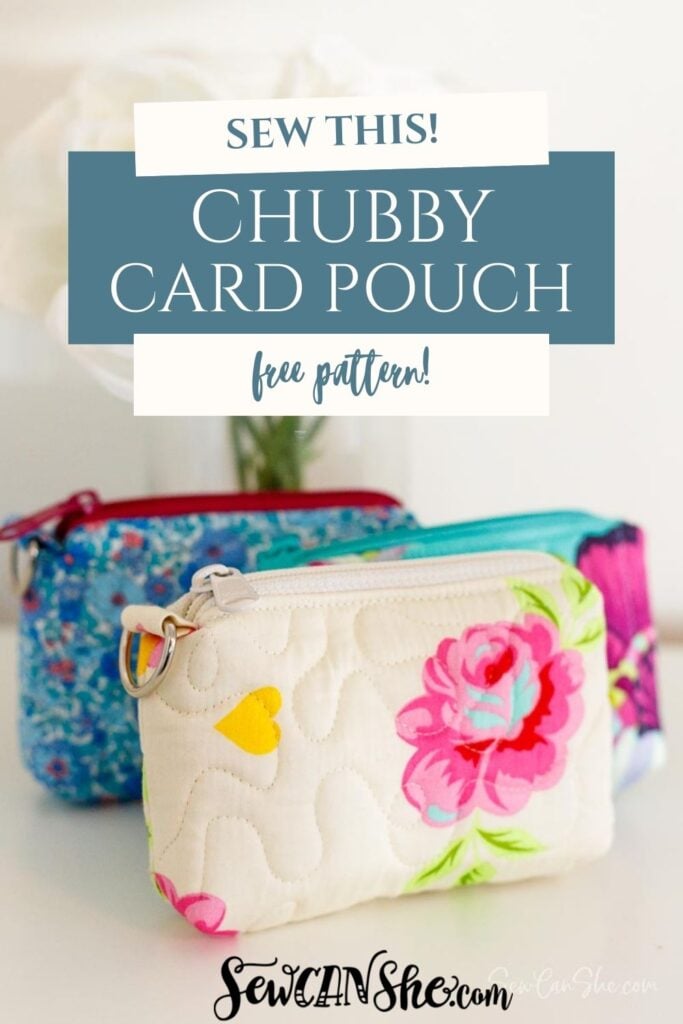
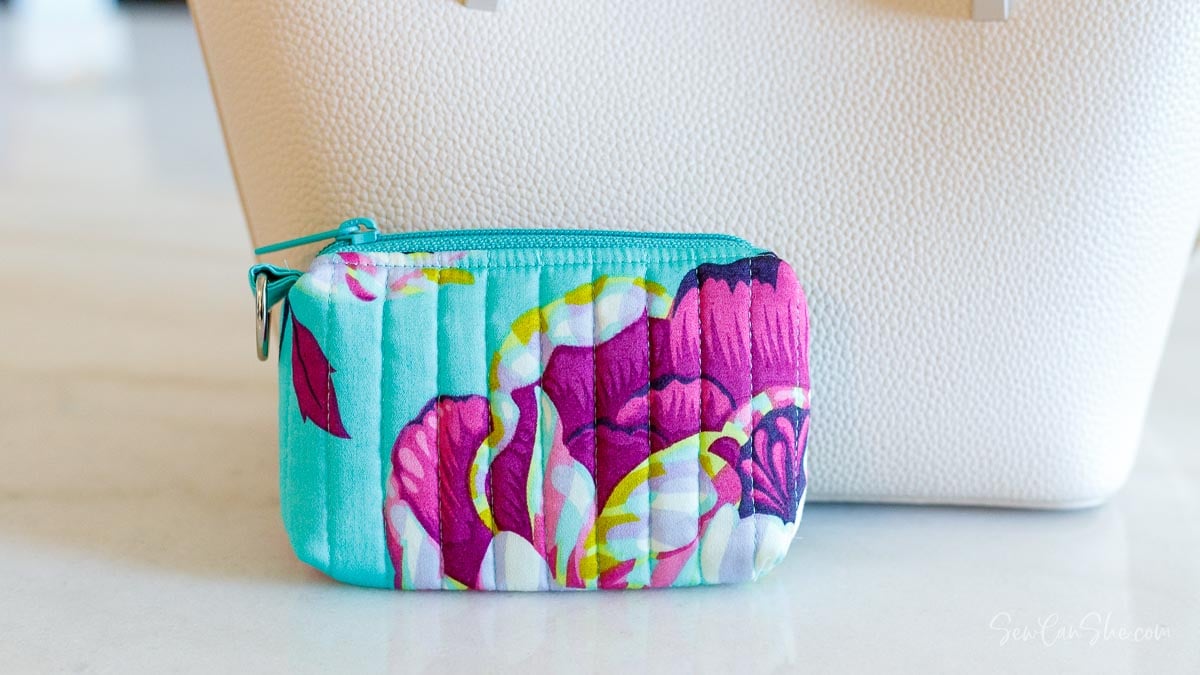
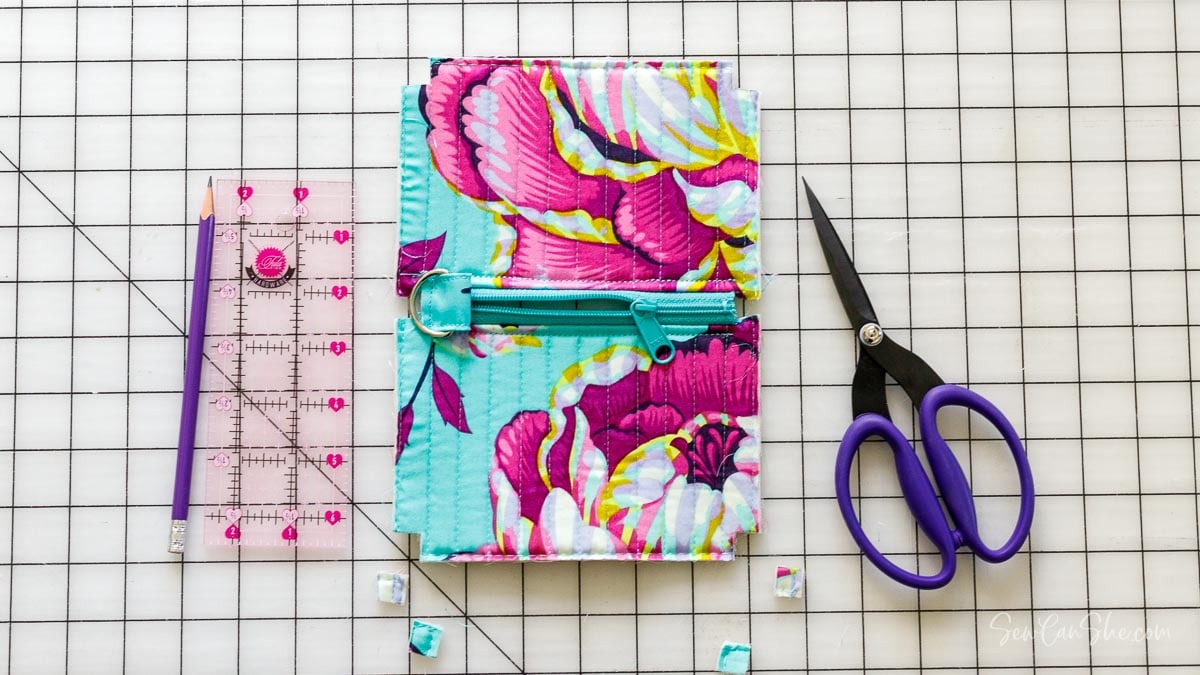
Chubby Card Pouch: Free Sewing Pattern for a cute Zipper Wallet!
Sew a cute quilted zipper wallet with my free sewing pattern! This card pouch is just right for holding your cash, cards and coins. Toss it in your purse or clip it to a strap and leave the purse at home. This is the perfect pattern for making quick and thoughtful gifts.
Fabric scraps or cotton fat quarters are perfect for this project. I recommend using foam stabilizer to give it a professional look, but quilt batting or fusible fleece will work too. The finished size is approximately 5’’ wide, 4’’ tall, and 1” deep.
I am including step by step instructions for every technique, including quilting the fabric and foam stabilizer together. If you are already a fan of bags and pouches with foam stabilizer, this is a great way to use up scraps… you may already have some quilted pieces that you can use!
The pull tab with a D-ring is totally optional, but you might love it so you can attach a wrist strap or charm.
The blog post below is totally free to read, print, and sew! Just hit CTRL +P on your computer to print. There is an optional PDF download offered at the end of the post. Join our Sewing Bee Community for access to over 300 PDF patterns (including this one), live workshops, premium video courses, and more.
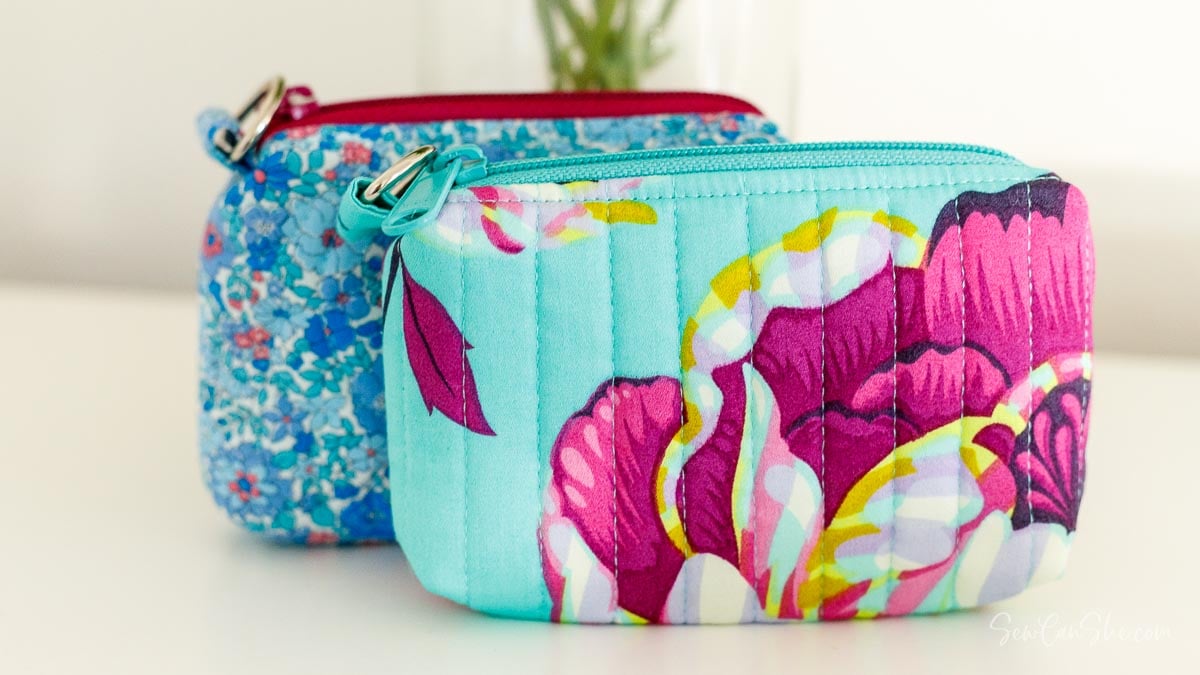
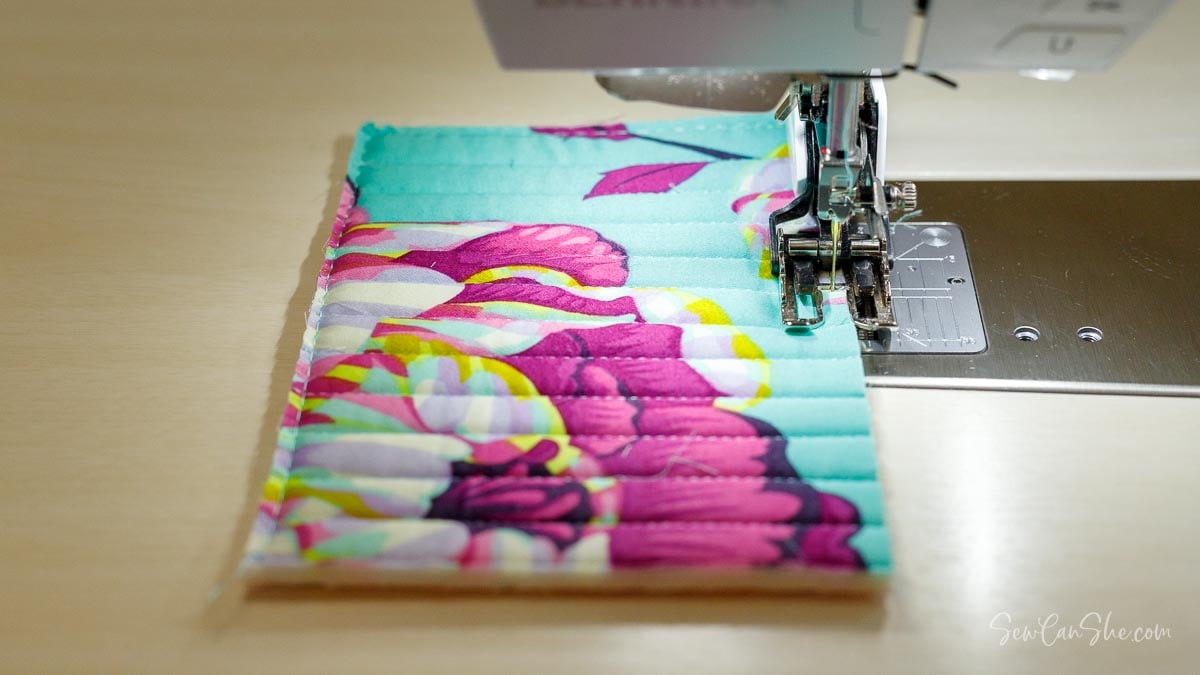
If you don’t want to spend a lot of time quilting the fabric and foam stabilizer layers, you can sew simple straight lines 1/2” apart like I did for this turquoise and pink pouch.
Don’t forget that this easy to sew zipper pouch is fat quarter friendly! A fat quarter is a 18” x 21” piece of fabric that is sold separately or in bundles. This pattern can be used with regular 1/4 yard pieces of fabric too – or scraps.
There is easy binding (in straight lines only – no curves) that can be cut from leftover fabric from the fat quarters or from other scraps.
Zipper Tips
I highly recommend size 4.5 or 5 handbag zippers for this project. They are durable and wide and provide a more professional finish than regular dressmaking zippers. Plus there are so many beautiful options! Nylon zipper teeth are easy to sew over, but you can use metal metal zippers as well. Here are tips for using metal zippers.
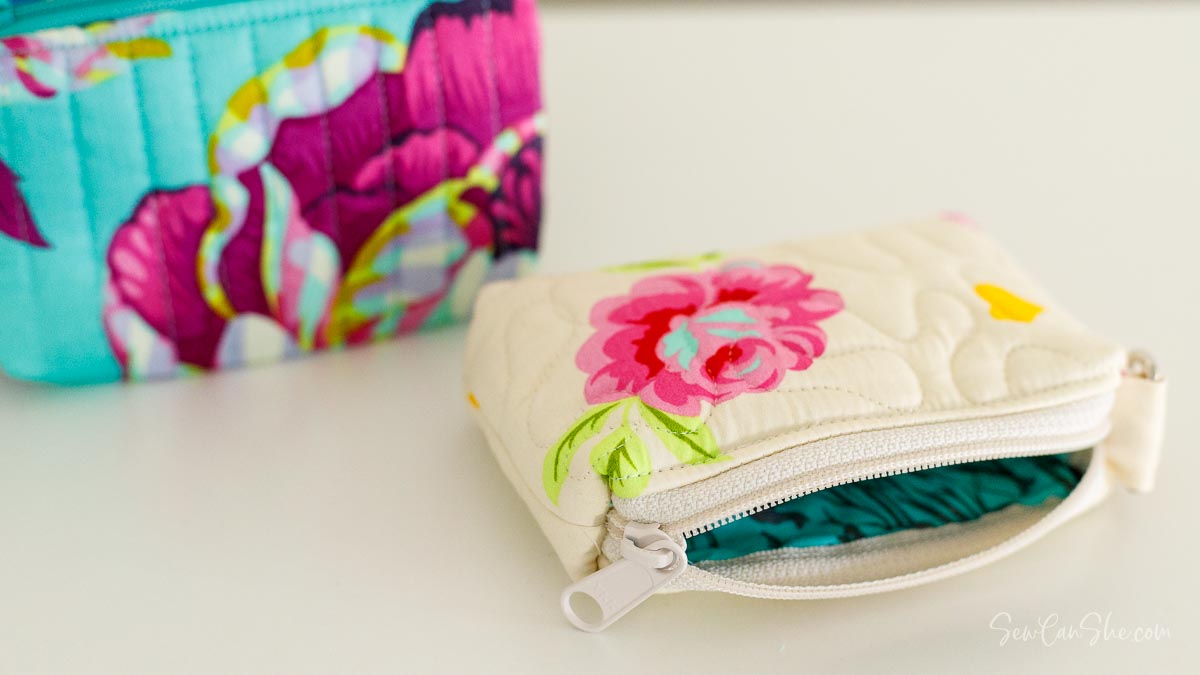
There are boxed corners at the top and bottom to give it a roomy interior and prevent the pinched zipper ends that you often see on other zipper pouches. All of the inside seams are finished with binding or enclosed under the zipper tape for a beautiful clean interior.
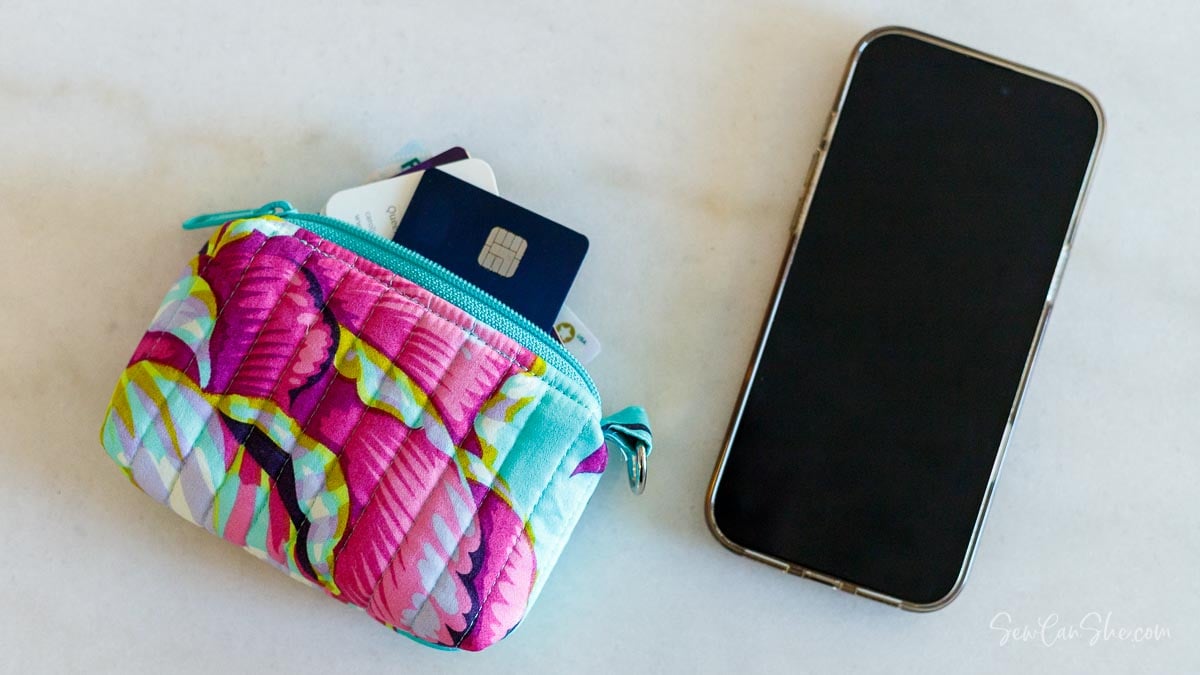
Use the D-ring to attach it to the inside of your purse, or leave your purse at home because this beautiful wallet can hold all your cards and cash, plus your car’s key fob. The only other thing you’ll need is your phone!
If you love small zipper bags, you might also like my:
- Easy Zipper Pouch Pattern in 2 Sizes
- Ribbon and Vinyl Zipper Pouch Pattern
- Clamshell Zipper Bag Pattern
Or see all my Free Zipper Pouch Patterns!
All of the fabric and stabilizer pieces are cut from measurements without printable templates. This saves time and paper and allows much more accurate cutting than pinning paper to fabric.
Needle and Thread Tips
I recommend using a heavy-duty size 90/14 or 100/16 needle for this project because you will be sewing through many layers. My favorite needles are Superior Titanium Coated Topstitch Needles that can be found in your local quilt shop and on Amazon.
For bags and pouches, I always use polyester thread because it has a tiny bit of stretch, unlike cotton thread.
So are you ready? Let’s sew a chubby card pouch or two or three!
Chubby Card Pouch Pattern
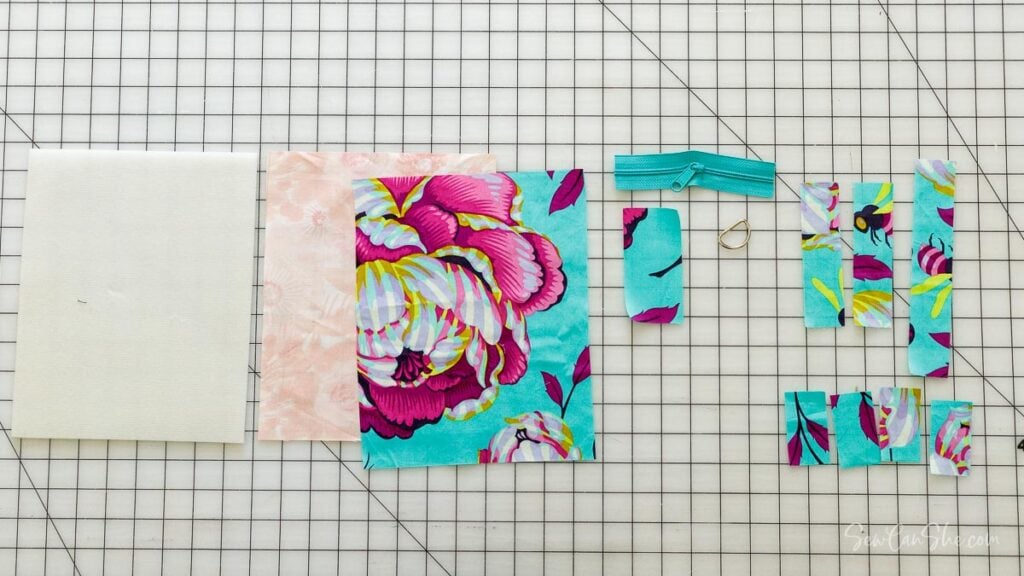
you will need:
- 1 fat quarter or quarter yard of quilting cotton for the exterior
- 1 fat quarter or quarter yard of quilting cotton for the interior
- a 8” x 10” piece of foam stabilizer, quilt batting, or fusible fleece (I used Soft and Stable)
- 1 handbag zipper 5 1/2’’ or longer (I used a piece of Zipper By the Yard)
- a D-ring with a 1” opening (I buy my d-rings from Amazon)
- fabric pen or pencil
- Wonder clips
Cutting
I cut my binding pieces from exterior fabric so they would be more visible to you in the step by step photos. I recommend cutting the binding to match your lining fabric, so that is what the cutting instructions state.
From the fabric for the exterior of the pouch, cut:
- 1 rectangle 10” tall x 8” wide (the orientation of the rectangles only matters if you are using directional fabric)
- 1 rectangle 4” x 2” for the tab
From the fabric for the interior of the pouch, cut:
- 1 rectangle 10” tall x 8” wide (the orientation of the rectangles only matters if you are using directional fabric)
- the following binding strips
- 1 strip 1 3/8” x 5 1/2”
- 2 strips 1 3/8” x 4”
- 4 strips 1 3/8” x 2 1/4”
Quilting
1. Cut a piece of stabilizer 8” x 10”. I used Soft and Stable foam stabilizer because I love the shape and body that it gives my pouches. But you could substitute quilt batting or fusible fleece.
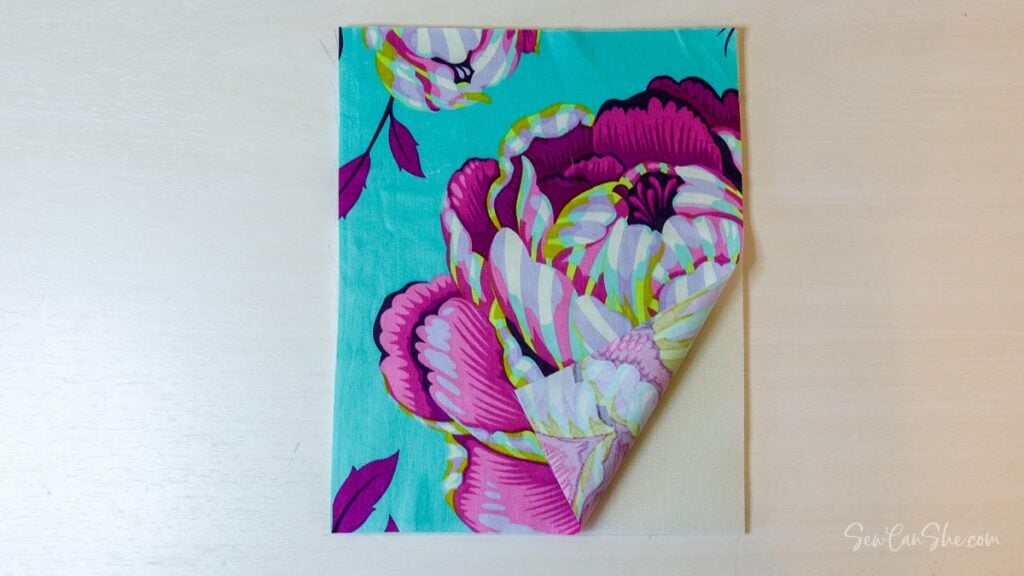
Smooth the first piece of fabric over your stabilizer (right side up).

2. Use a long sewing machine stitch to baste all the way around 1/8’’ from the edge. Here’s a how-to blog post and video for this step.
Note: if you are using fusible fleece, you could press to fuse for this step instead of machine basting.
3. Smooth the second piece of fabric over the back of the stabilizer (right side up) and baste all the way around 1/8’’ from the edge.
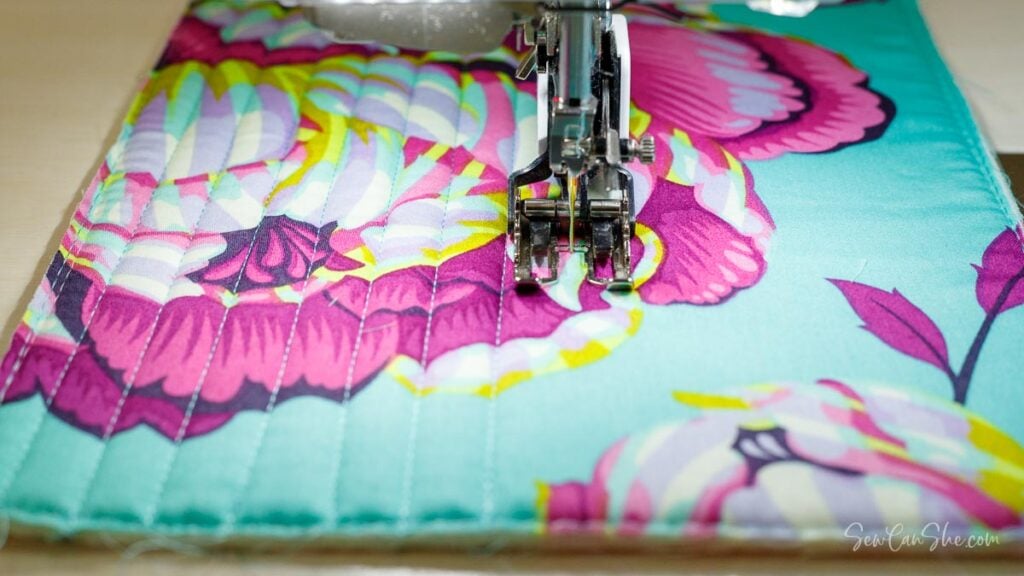
4. Quilt the fabric and stabilizer together however you like. Easy straight line quilting is a good option if you’re in a hurry. If your sewing machine has a walking foot, I recommend using it for this step.

If you have a long-arm quilter, you can use up extra backing fabric at the bottom of your quilts by adding any stabilizer you like and other fabric, like fat quarters. That is how I got these pieces.
Second Round of Cutting
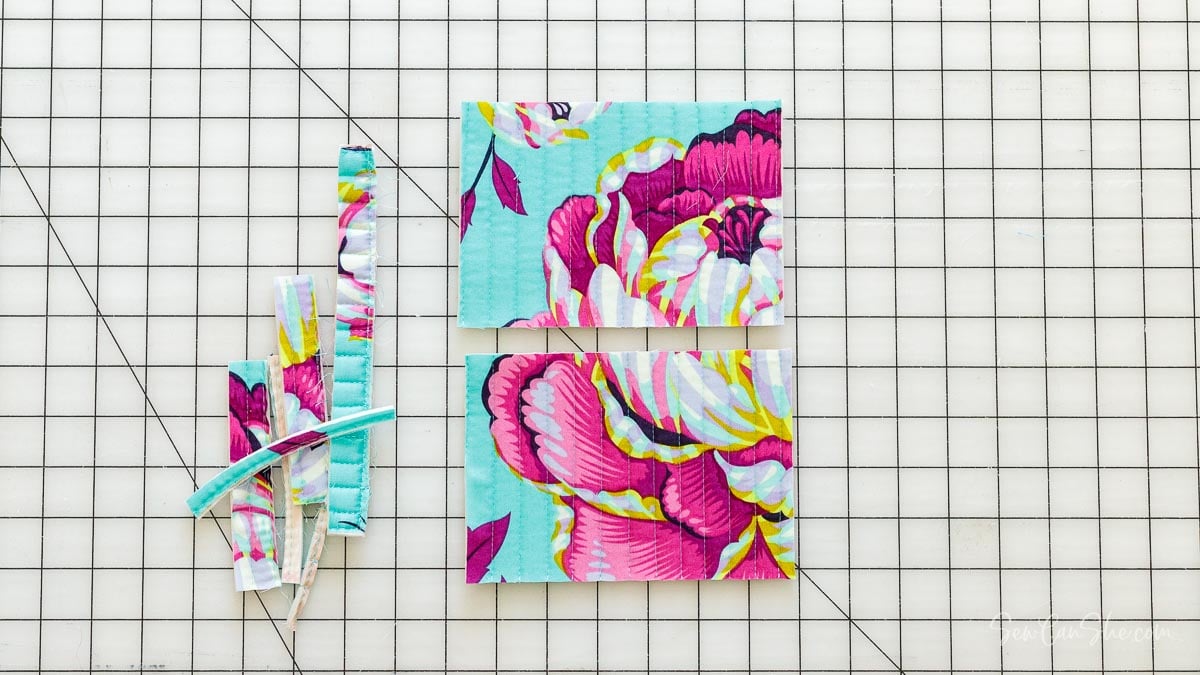
1. From the quilted piece, cut two rectangles 4 1/2” tall and 6 1/2” wide.
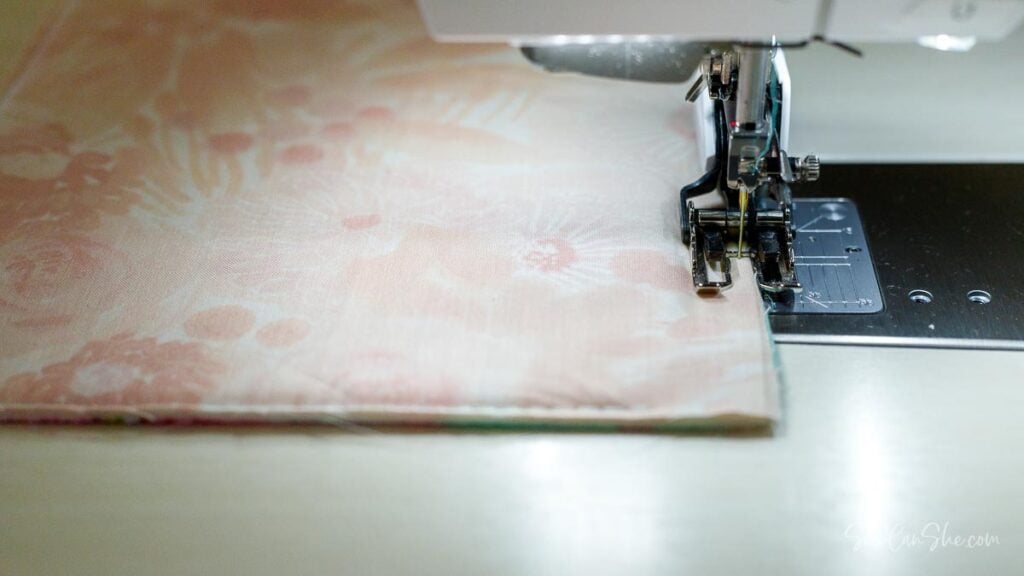
2. Use a long basting stitch to sew all the way around the quilted pouch pieces to seal the edges. Baste 1/8” away from the cut edges.
Make the Tab
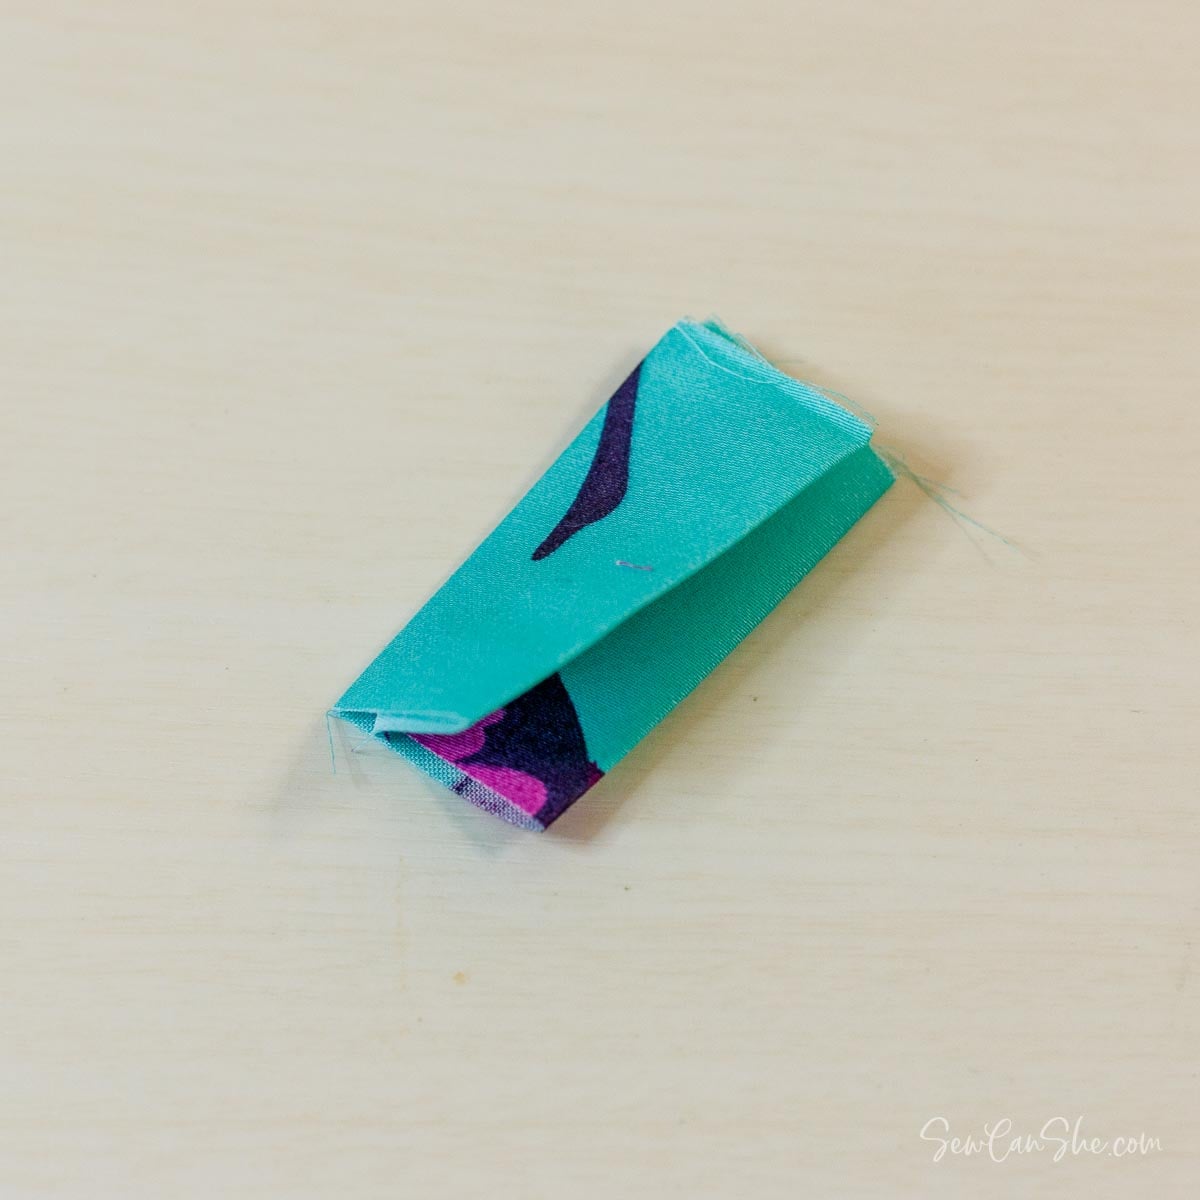
1. Fold the 2” x 4” rectangle in half wrong sides together, matching the 2” edges. Open, and fold the 2” edges to the center, press. Fold the piece in half again to make a 1” x 2” strip, press.
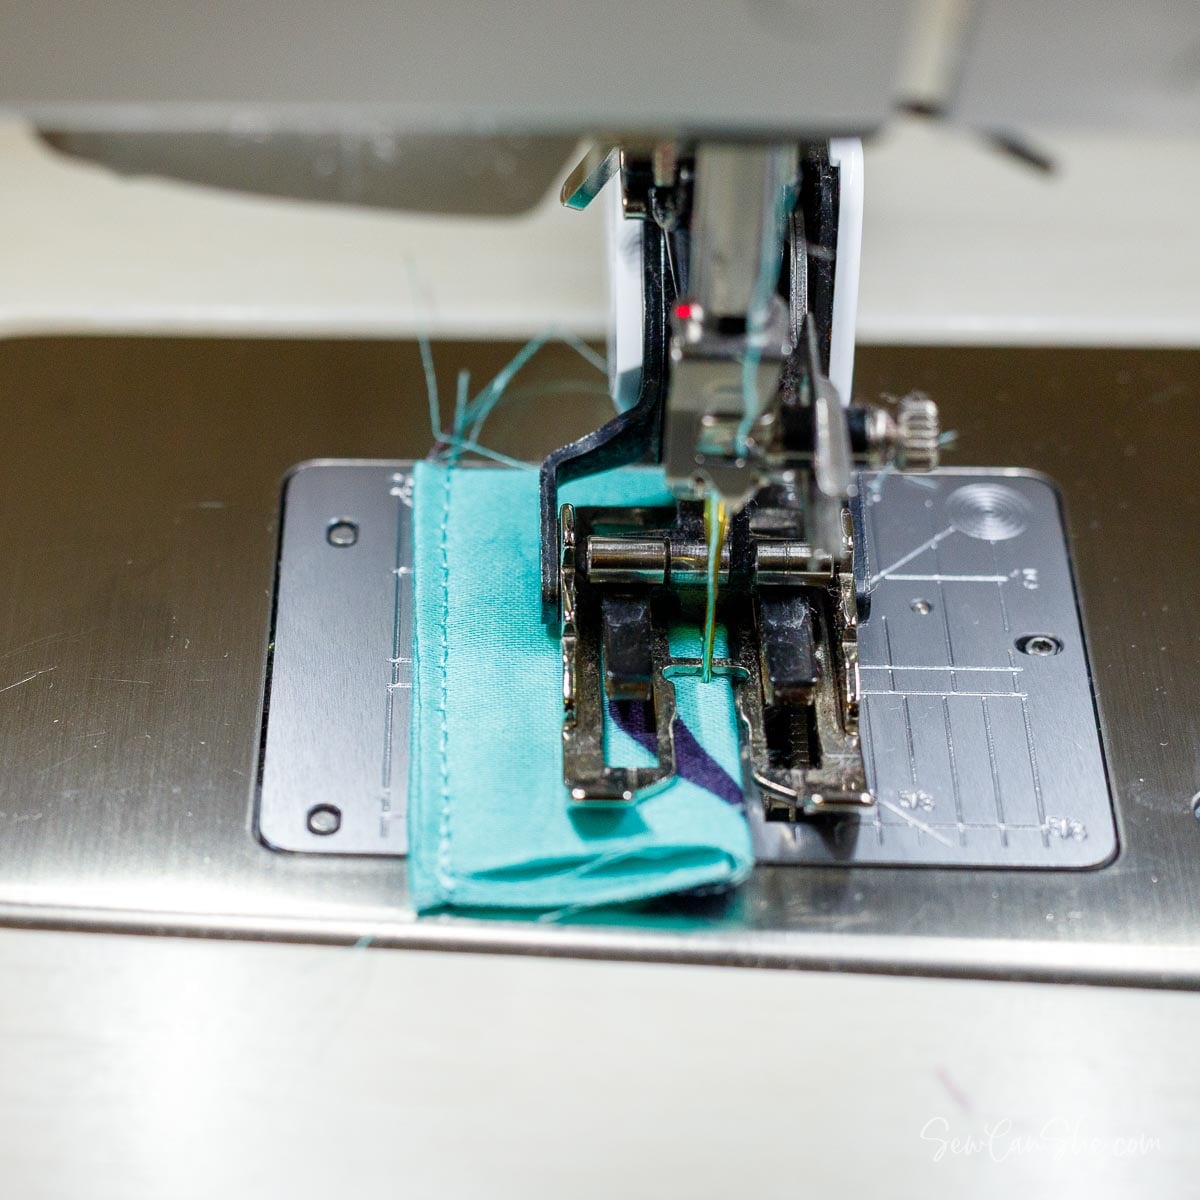
2. Topstitch along the sides of the tab, sewing 1/8” away from the edge.
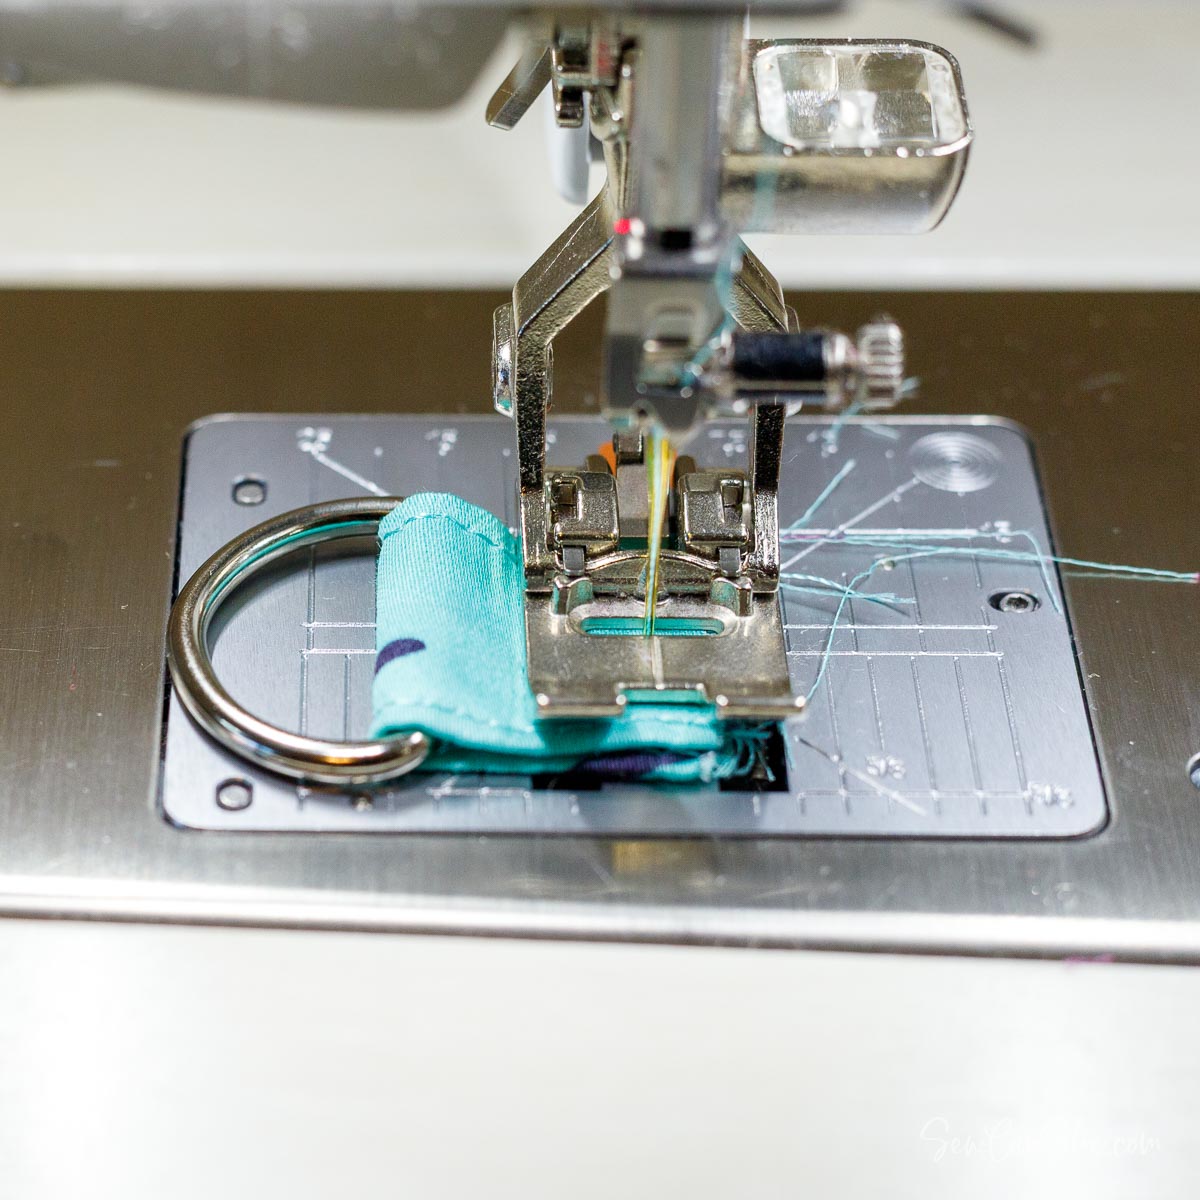
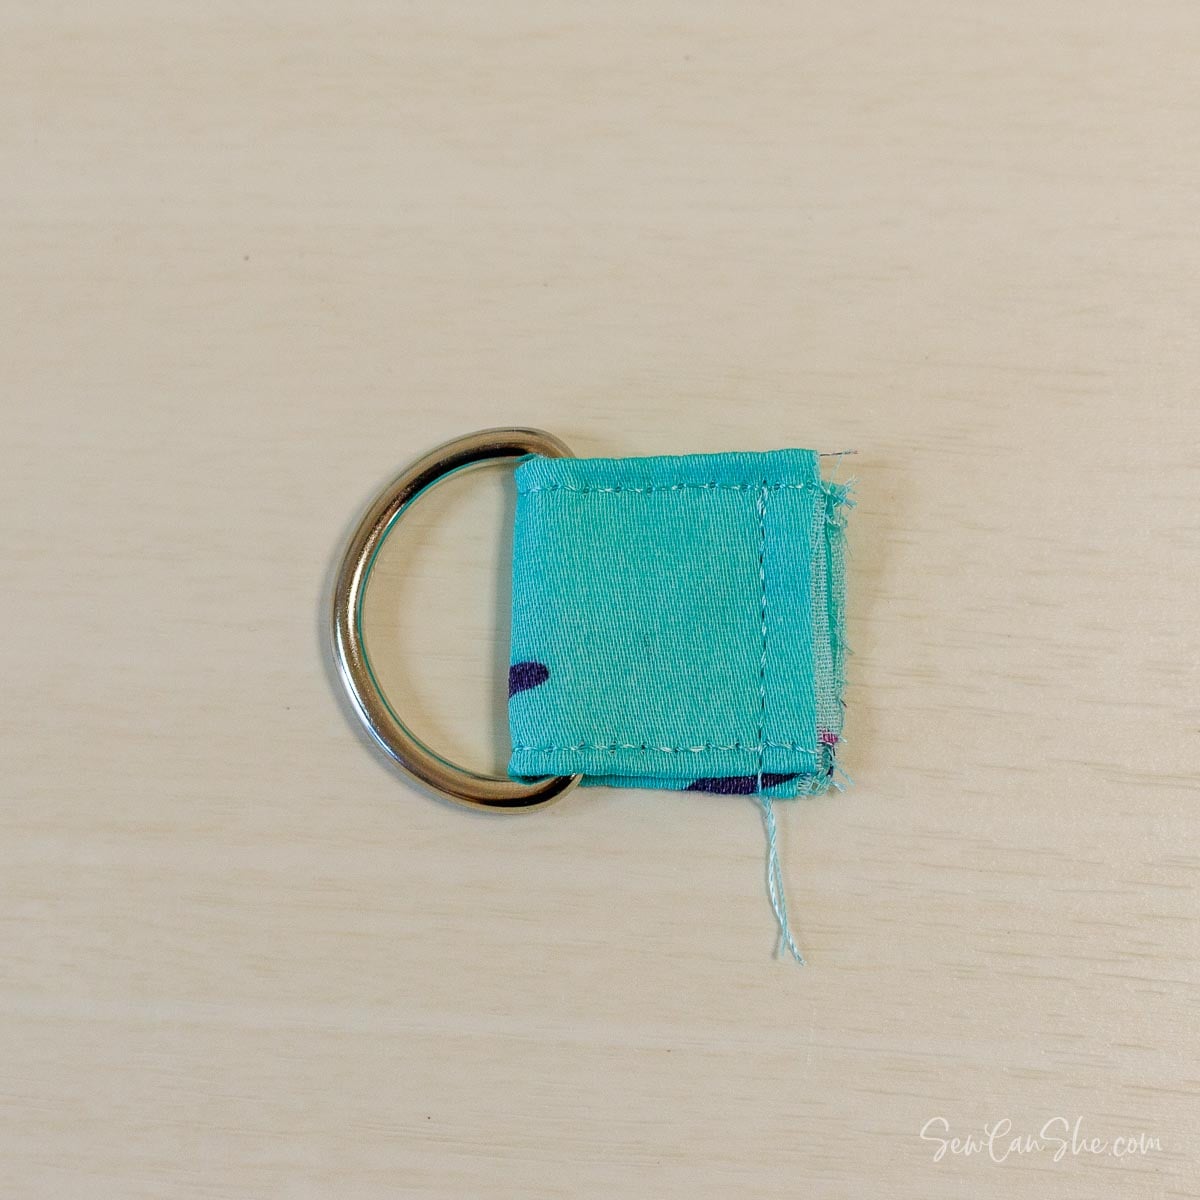
3. Fold the tab around the D-ring, placing the raw edges together. Sew 1/8” away from the raw edges.
Attach the Zipper to the Pouch Pieces

1. If you are using Zipper by the Yard from ByAnnie (or a different brand), add a zipper pull and cut a 5 1/2” long piece of zipper. Sew across the ends to prevent your zipper pull from accidentally coming off.
2. Center the zipper across the top edge of one 4 1/2” x 6 1/2” pouch piece, with the top of the zipper face down against the right side (exterior fabric) on the pouch piece. There should be 1/2” of free space at either end of the zipper.
Pin or clip in place.
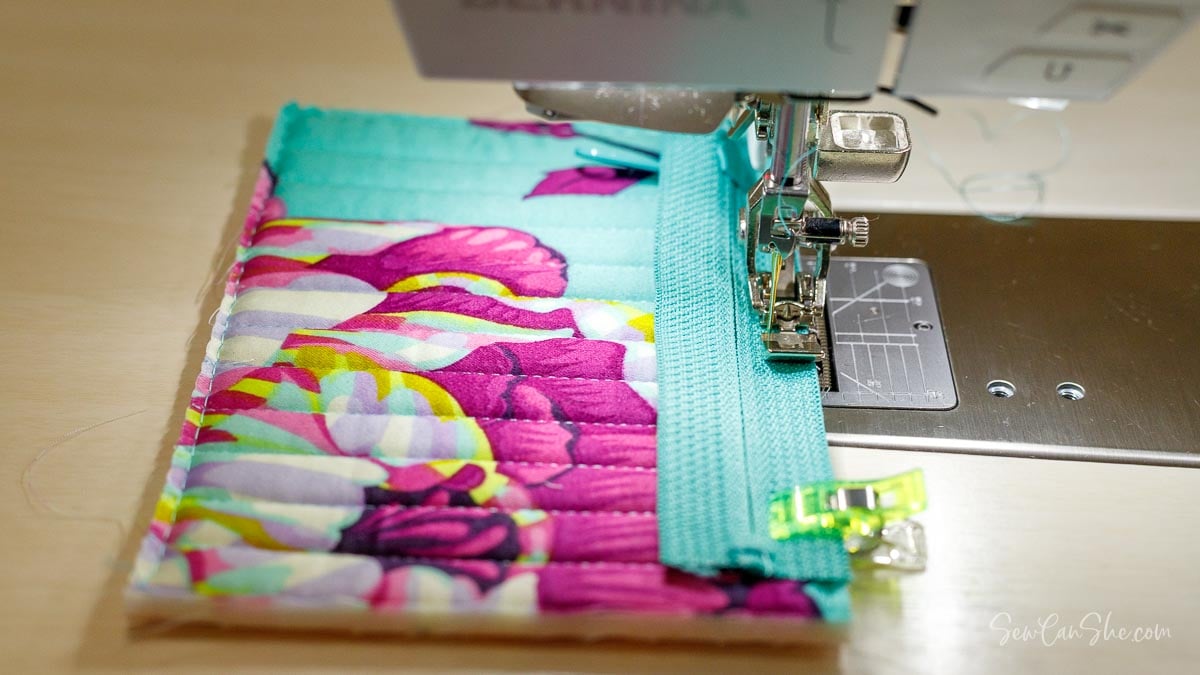
3. Switch to the zipper foot on your sewing machine and sew the zipper to the pouch piece with a 1/4’’ seam allowance.
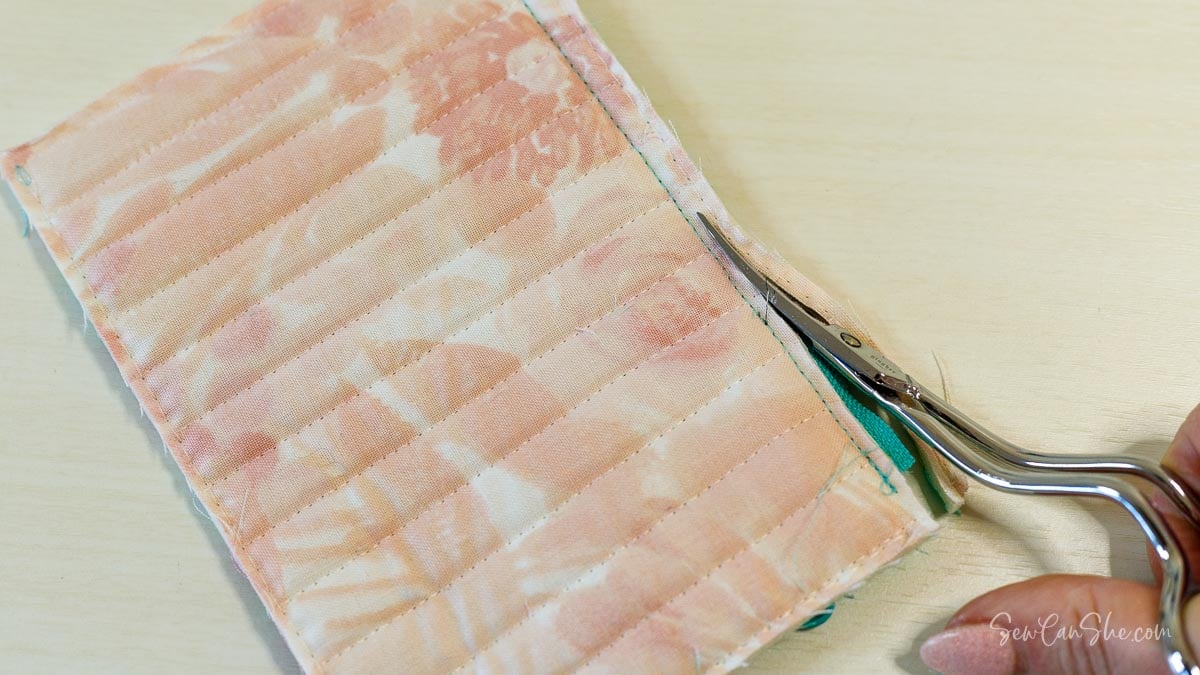
3. Flip the piece over. Carefully trim 1/8’’ away from the seam allowance, cutting the fabric and foam only, not the zipper tape. Trim all the way across the top edge of the piece, not just under the zipper.
I love my Ginger double curved embroidery scissors for this step (I have tried other brands and they are not as sharp).
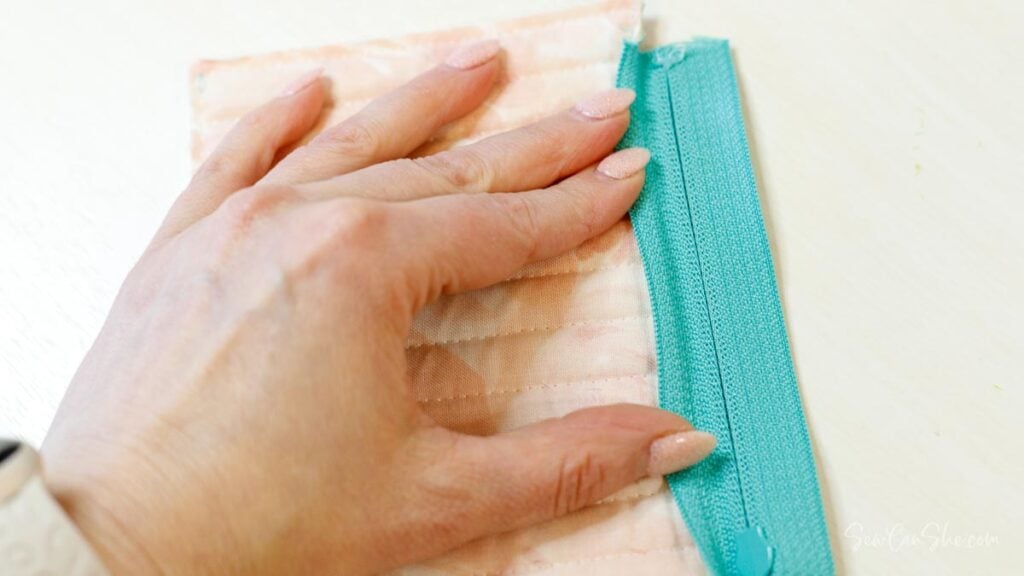
Then fold the zipper away from the panel and finger press the zipper tape against the back of the panel, covering the trimmed seam allowance.

4. Topstitch on the right side, 1/8’’ away from the zipper.
Make sure the zipper tape underneath is flat against the back as you sew, so the trimmed seam will be enclosed for a neat finish.
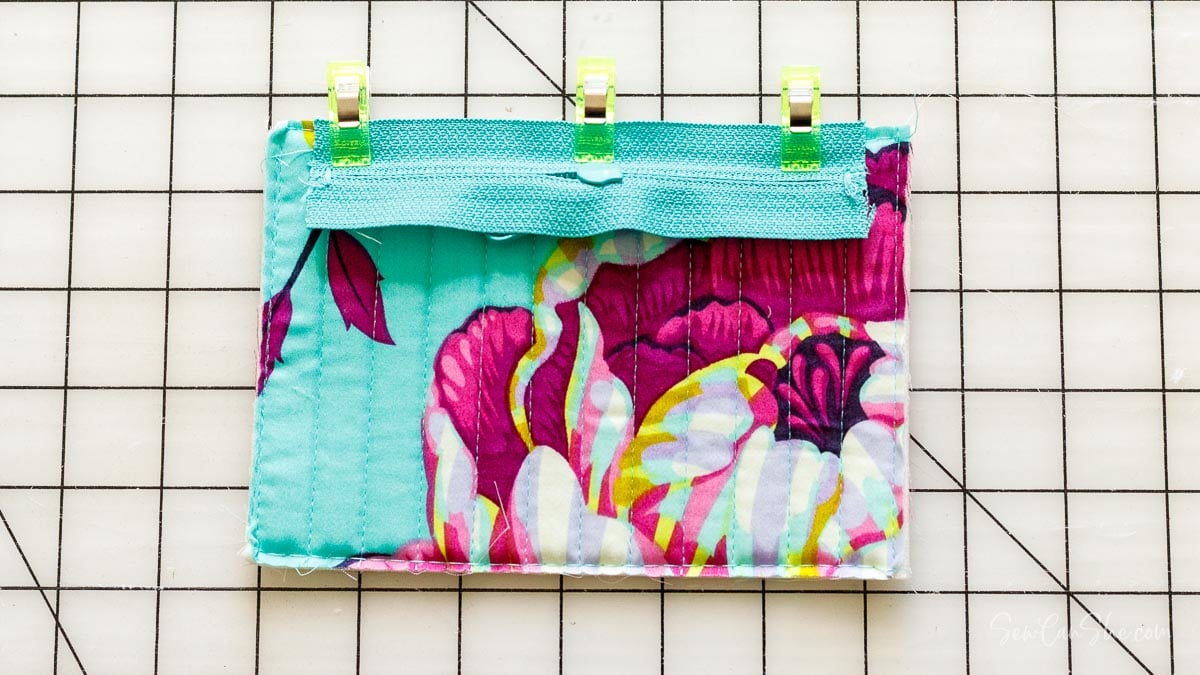
5. Place the piece face down (exterior fabrics right sides together) against the remaining pouch piece. Pin or clip the remaining zipper tape to the top edge of the pouch piece underneath. Make sure that the pouch pieces are lined up with one another.
6. Stitch with a 1/4’’ seam allowance.

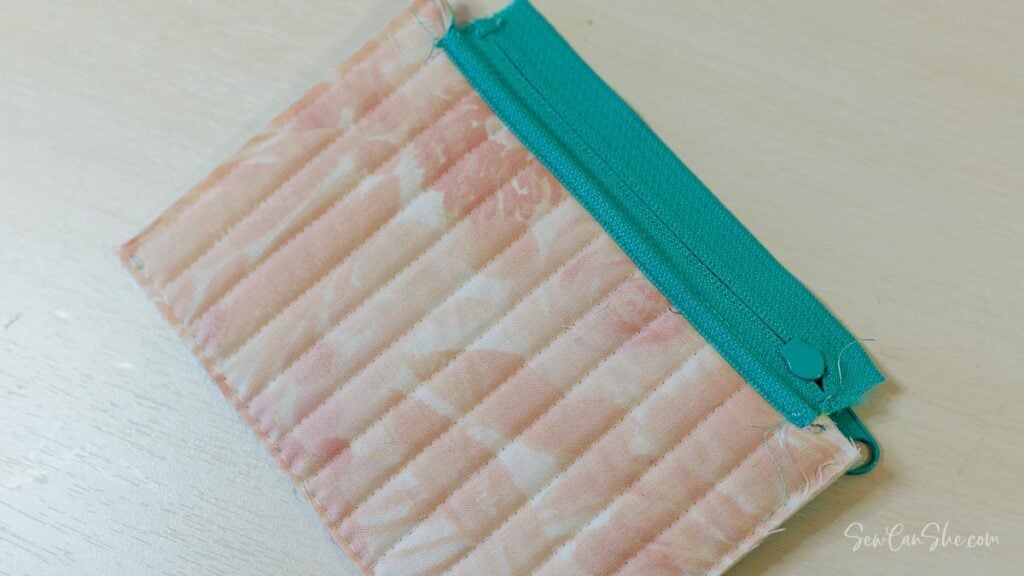
7. Trim the seam allowance and top stitch as before.
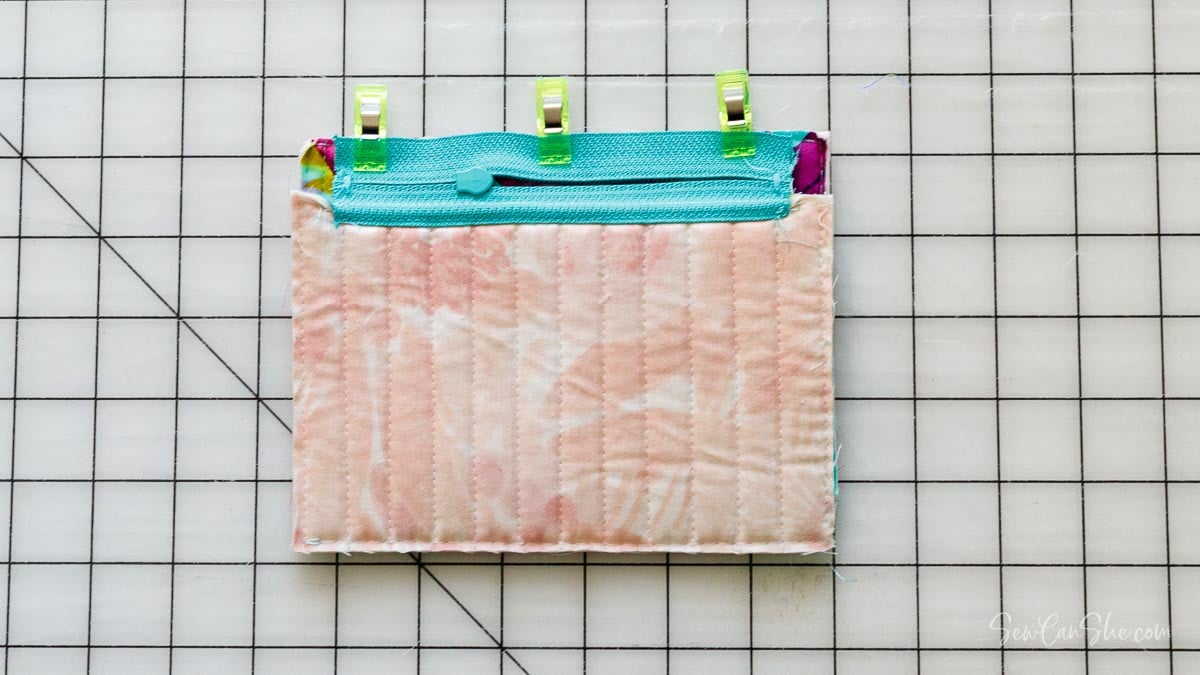
Attach the Tab and Cut the Boxed Corners
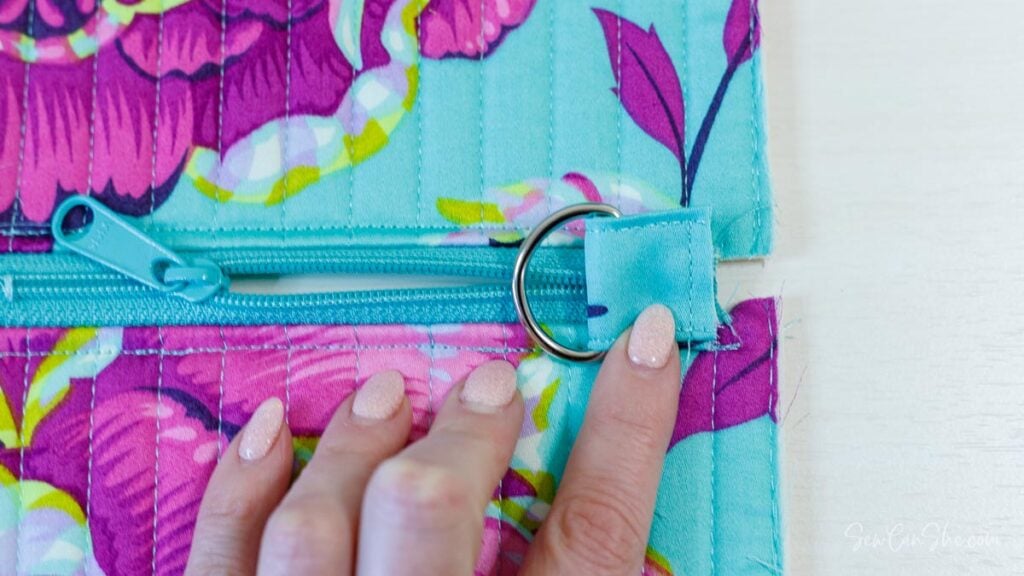
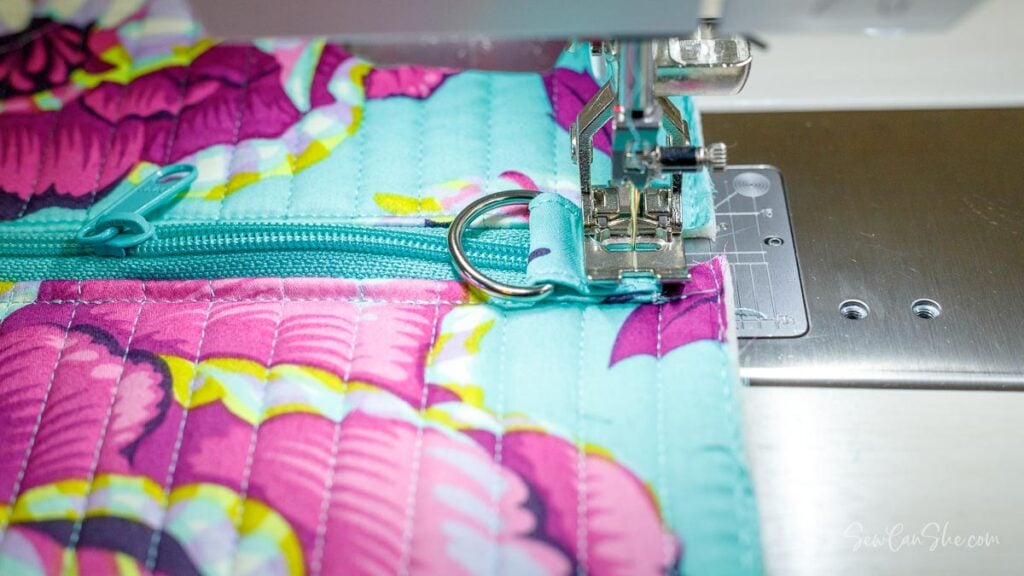
1. Place the tab with the d-ring on top of the zipper with the raw edges of the tab lined up with the raw edges at the open end of the zipper.
2. Sew across the end of the tab, 1/8” away from the raw edges.
3. Use a small ruler and a fabric pen or pencil to mark four 1/2” squares at the outer corners of the pouch pieces. Carefully cut out these 1/2” squares.
Sew and Bind the Seams

1. With the pouch pieces right sides facing, pin or clip the side and bottom edges together.

2. Sew those three seams with a 1/4” seam allowance. Skip the small cut-out corners.
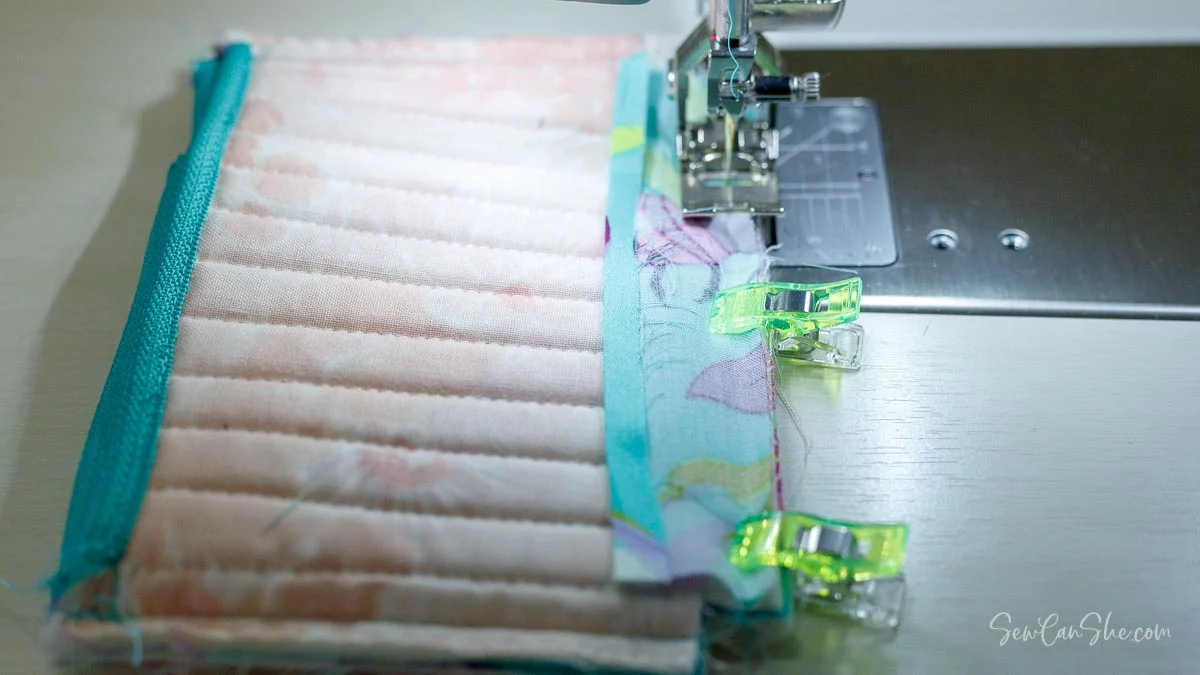
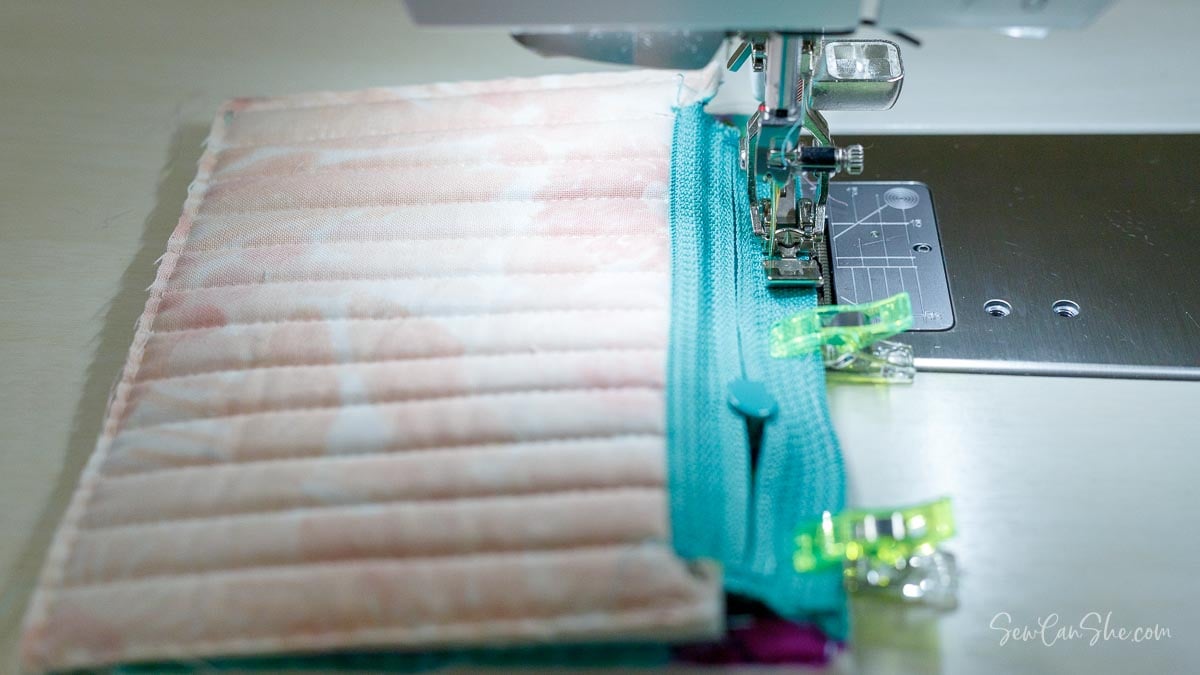
3. Pin or clip the 1 3/8” x 5 1/2” binding piece to the longest seam. Sew with a 1/4” seam allowance.
Tip: You may fold and press one long edge on each binding strip over 1/4” before sewing. Some people find this makes the second binding step easier.
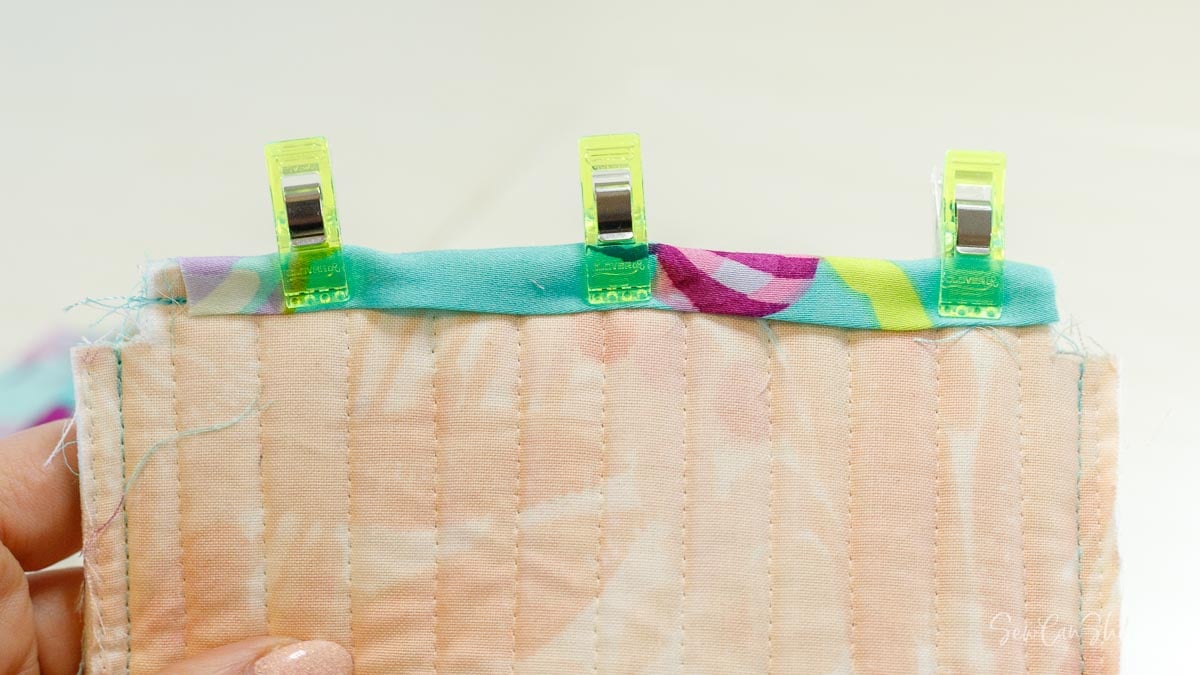
4. Wrap the binding over to the other side of the pouch, tucking the raw edge under. Secure with clips.
5. Sew the binding to the other side of the pouch close to the fold.

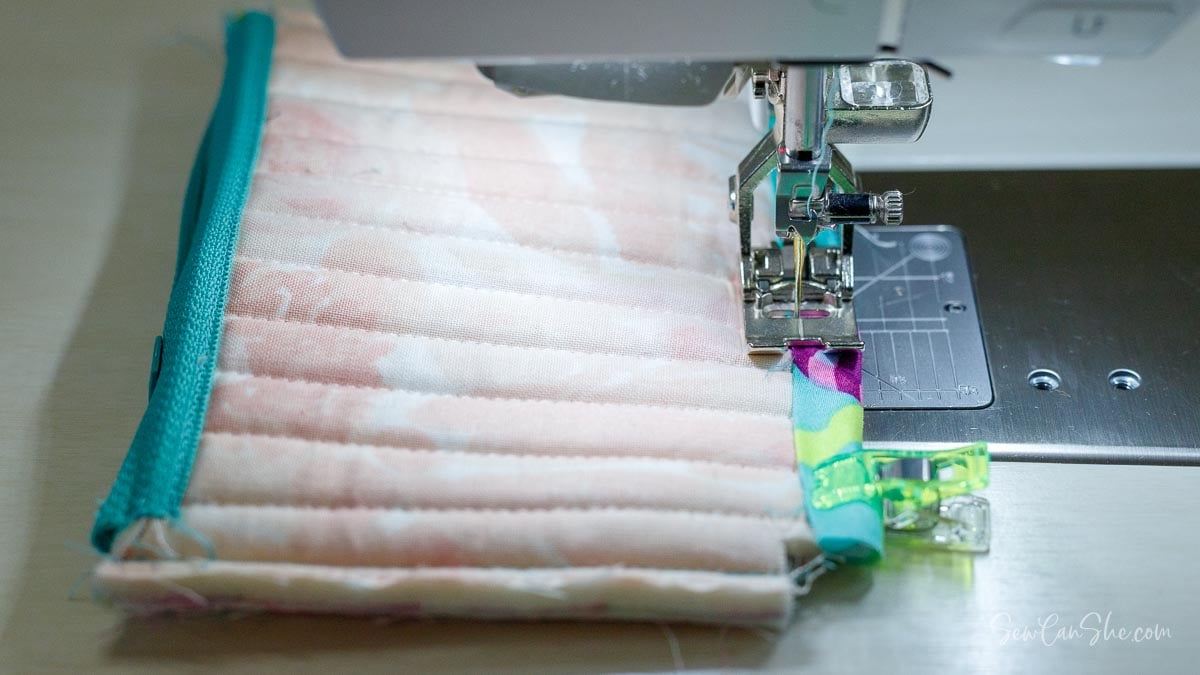
6. Use the 1 3/8” x 4” binding strips to bind the side edges of the pouch.
Box the Corners and Bind the Seams
1. Flatten the bottom of the pouch against one of the side seams, pinching the small opening at the corner together and nesting the two bound seams so they are folded in opposite directions.
Stitch across the raw edges with a 1/4” seam allowance.
Repeat with the other bottom corner.

2. Turn the pouch right side out to check that both corner seams look good and are the same size.

Tip: If one corner is a little bit larger than the other, you can re-sew the smaller corner, sewing just to the left of the previous seam to make that corner just a tiny bit larger.
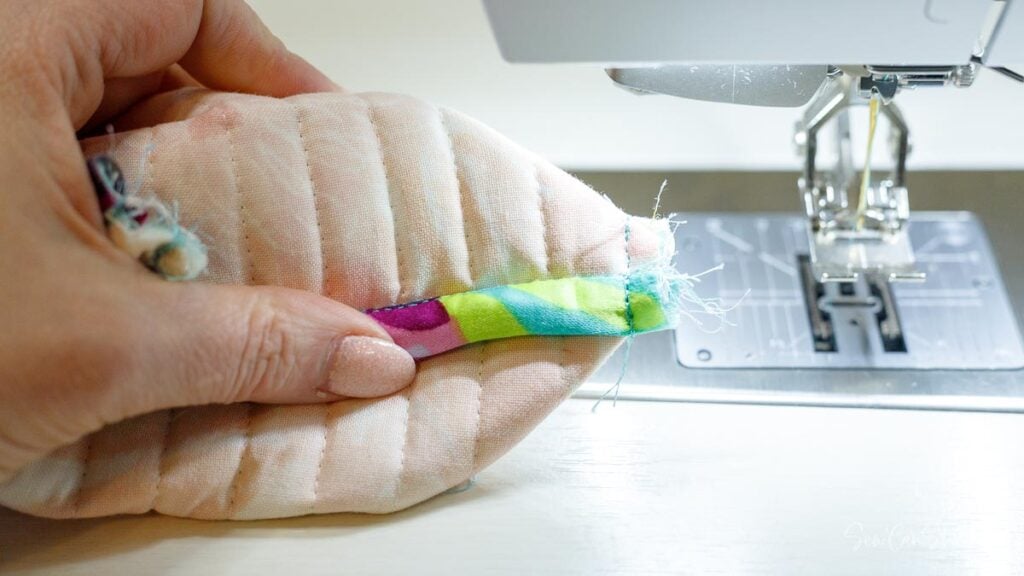
3. Box the zipper corners in the same way: flatten the zipper against the side edge of the pouch, folding the bound side seam one way or the other. Sew across the corner 1/4” away from the end of the zipper.
Bind the corners the same way, except by also folding the side edges of the binding under.
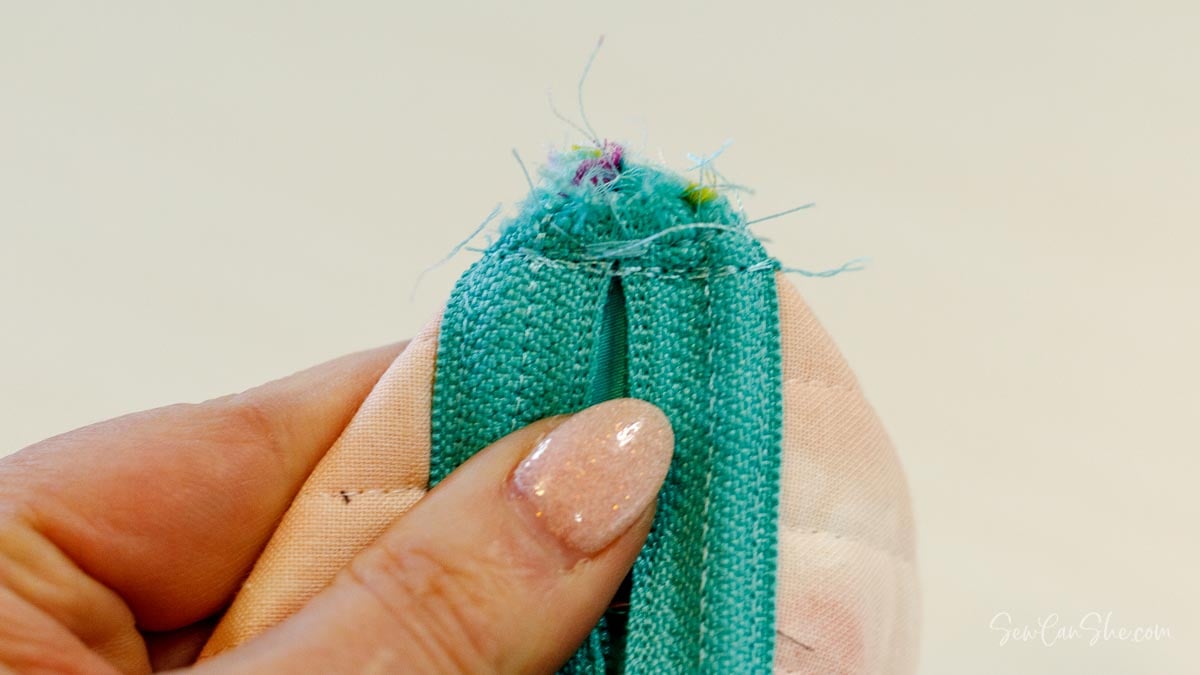
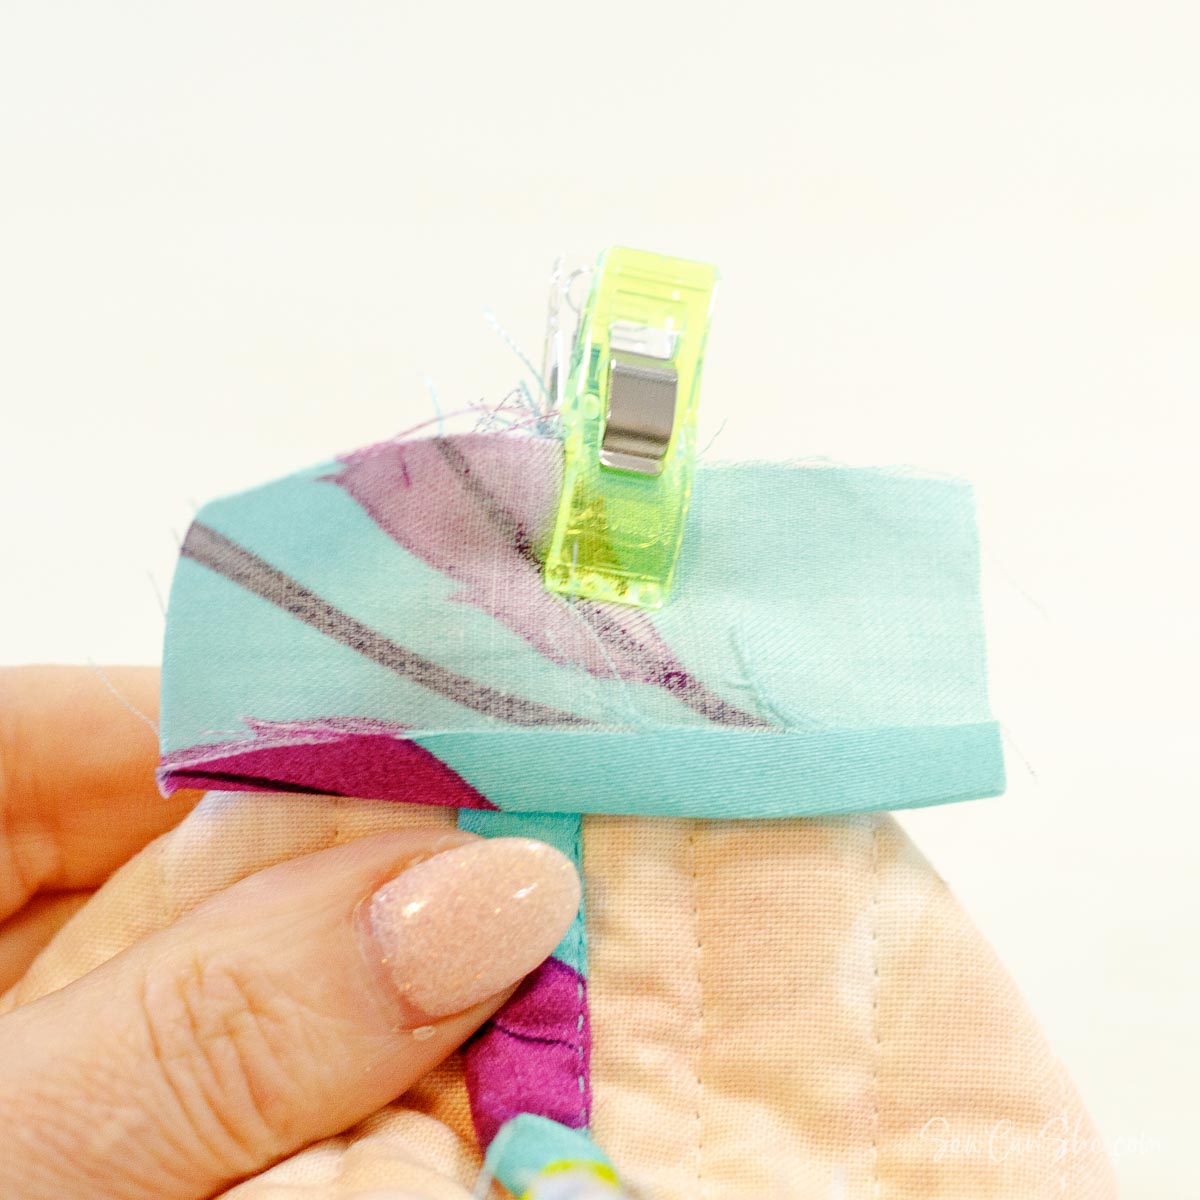
4. Center one of the small binding pieces over a corner and sew with a 1/4” seam allowance.
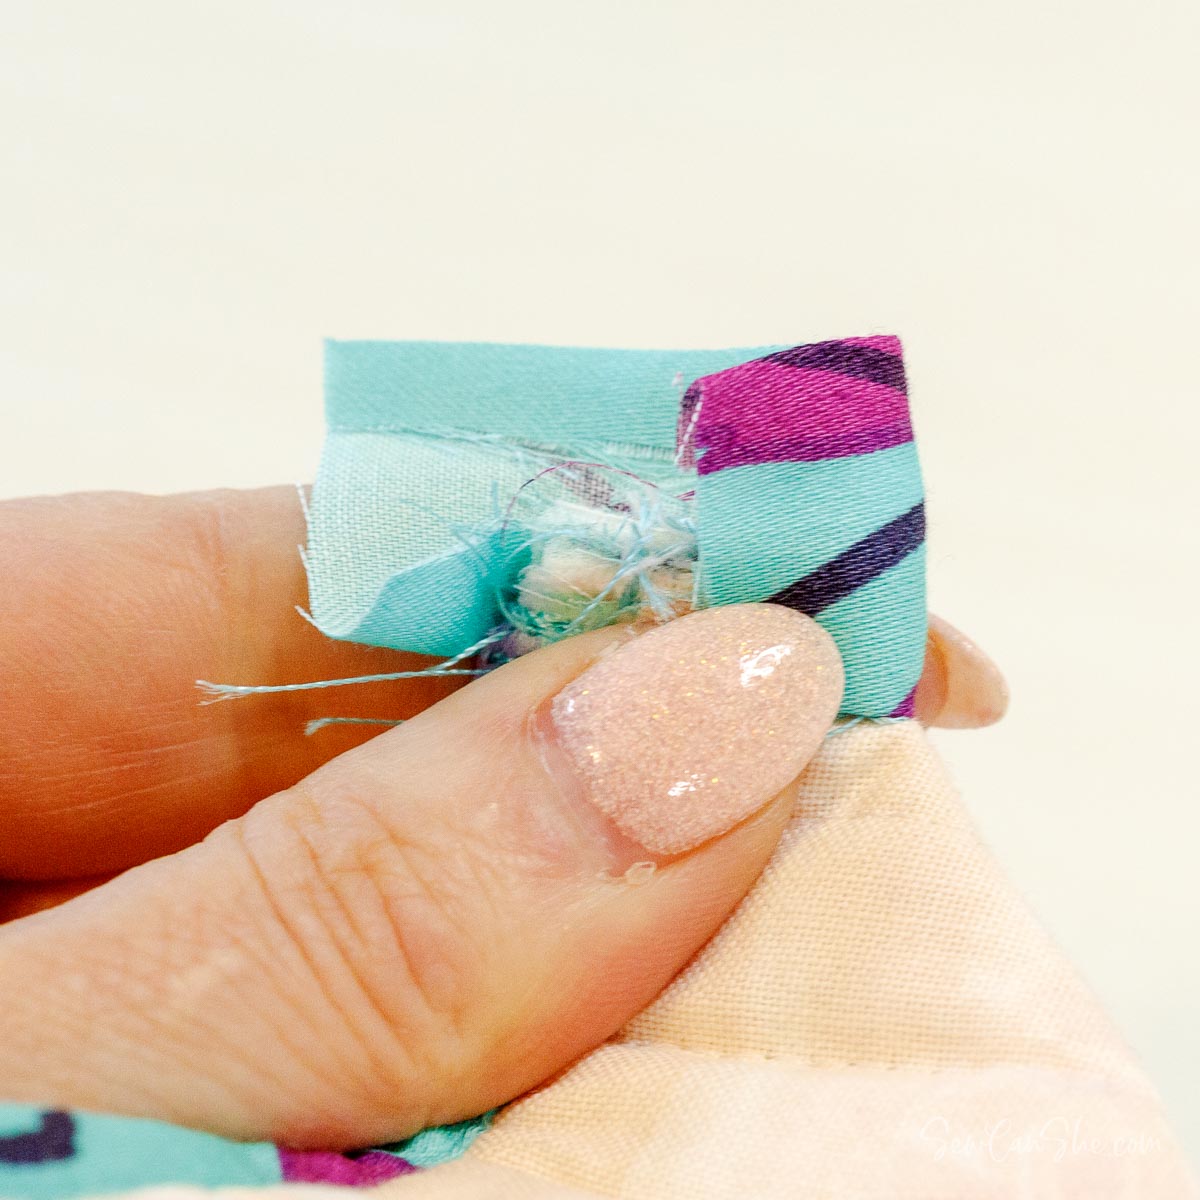
5. Turn the corner over and flip the binding up. Trim away the extra binding to leave only 1/2” free at either side. Fold the right side over.
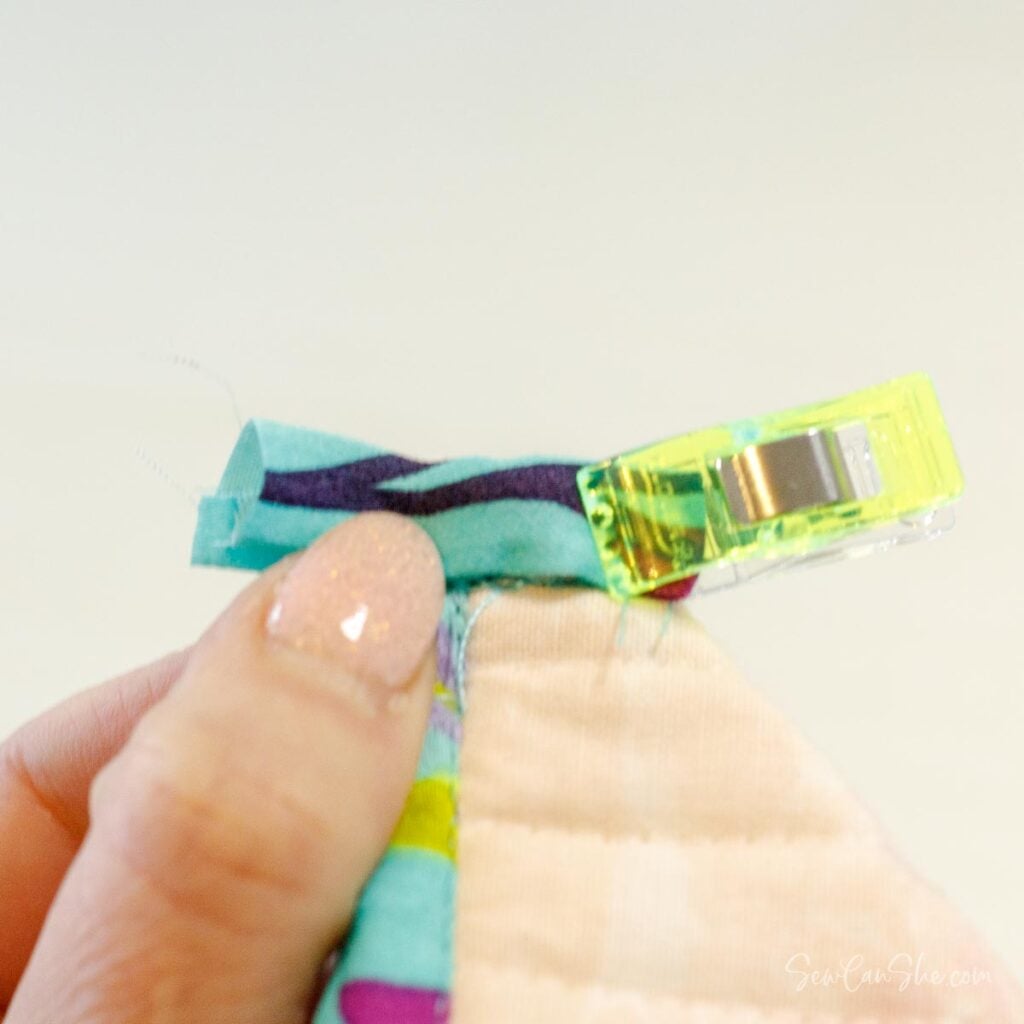
Fold the top edge down, tucking the bottom and right raw edges inside. Then fold the left side over, tucking the raw edges inside.
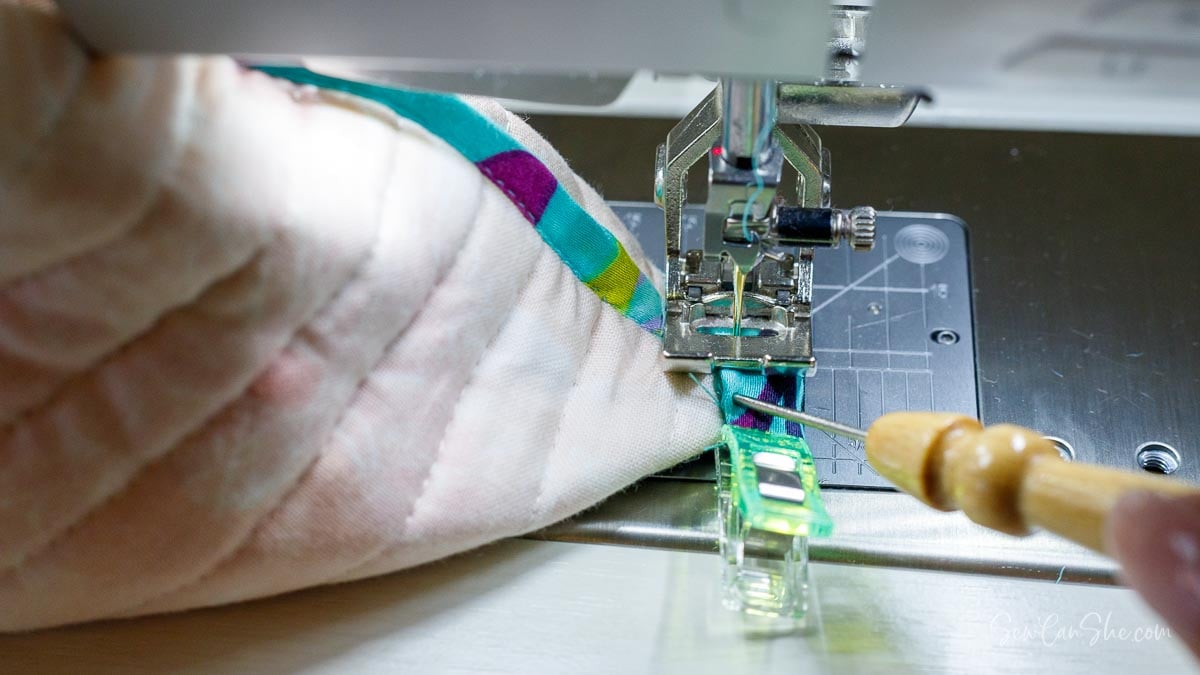
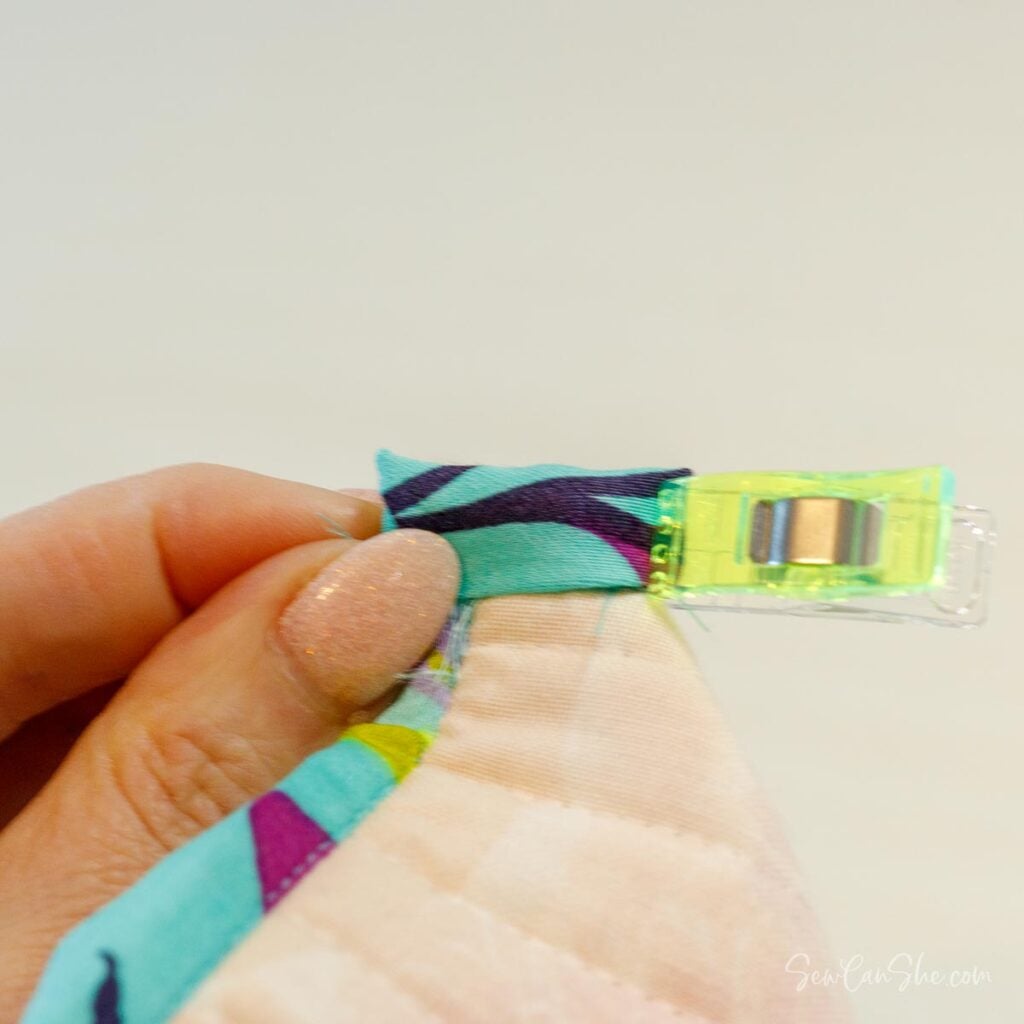
6. Sew across each the folded edge to secure the binding.
Repeat to bind the other 3 corner seams.
I love using a sewing stiletto to hold fussy pieces like this. The ByAnnie Sewing Stiletto is my favorite.
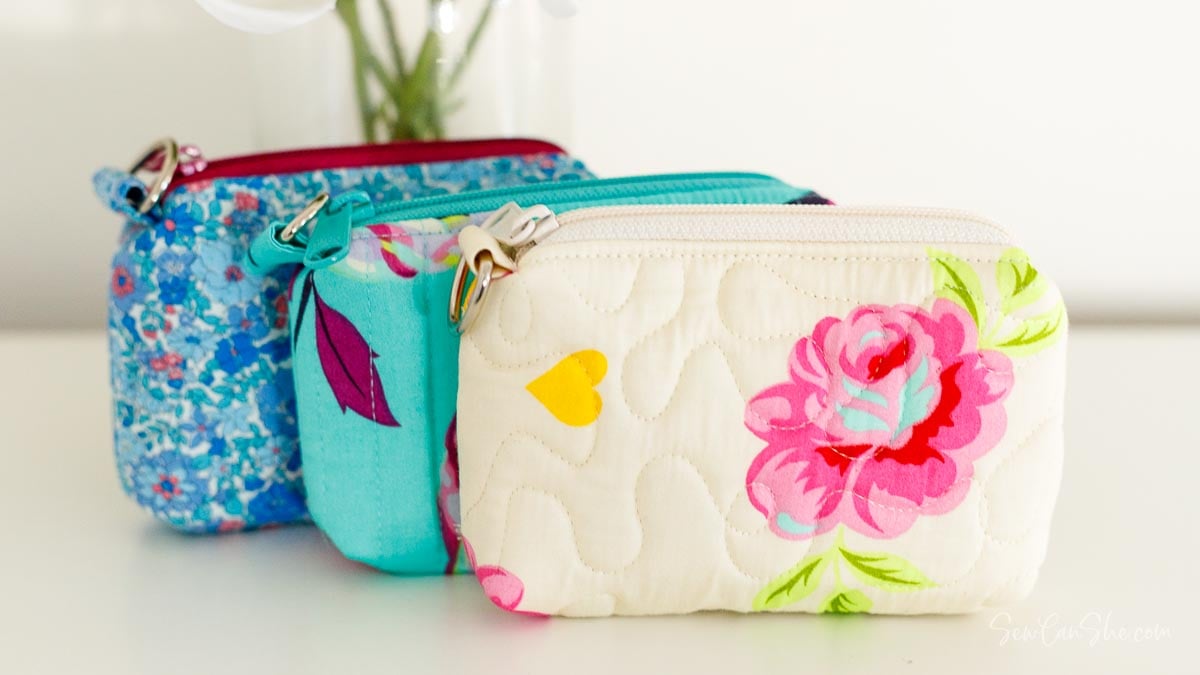
Enjoy your new quilted card wallet! How many will you make?
If you make this free boxy zipper pouch sewing pattern or any of my other ones, I hope you show me by posting a picture to Instagram and tagging me @sewcanshe or #sewcanshe.
Make sure you check out my other free bag patterns too.
Happy Sewing,


CHUBBY CARD POUCH SEWING PATTERN
Purchase this pattern in PDF format! The PDF file contains all of the instructions, plus the step by step photos that have been reduced to fit the page nicely with no ads.
Download the file immediately and keep your confirmation email so you can download it again later. Unlimited downloads are available from the confirmation email.
Disclosure: some of my posts contain affiliate links. If you purchase something through one of those links I may receive a small commission, so thank you for supporting SewCanShe when you shop! All of the opinions are my own and I only suggest products that I actually use. 🙂