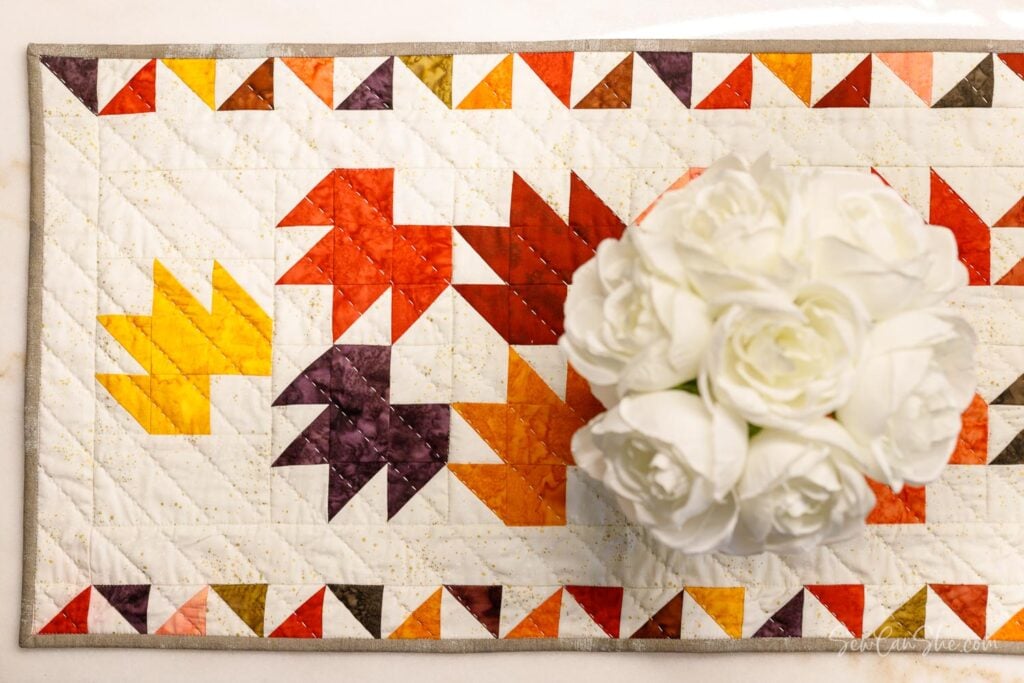
Fall Festival Patchwork Table Runner: Free Pattern for Charm square Bundles!
I’m so excited to share my free sewing pattern for the Fall Festival Table Runner. It features half square triangles and the classic Maple Leaf Quilt Block. Don’t let me forget to mention that I made this table runner from a single charm pack… it takes just 32 5” squares of fabric (plus some background and binding material)!
As the leaves outside begin to change, it’s the perfect time to bring those beautiful colors indoors. Nothing says “cozy fall” quite like a beautifully decorated home, and a patchwork piece can make all the difference.
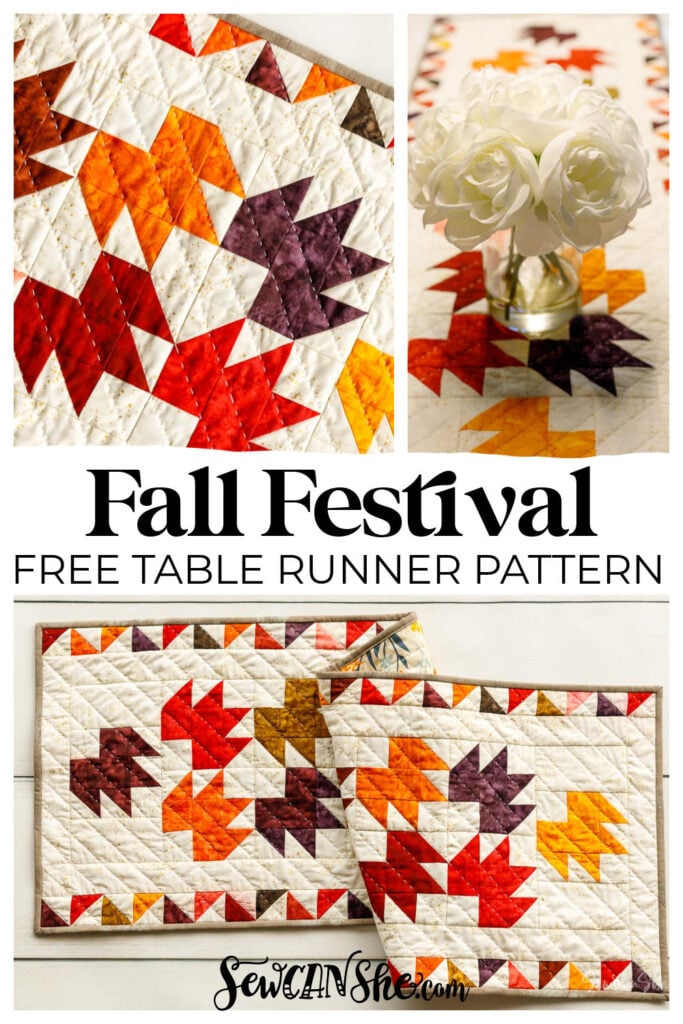
This table runner will perfectly complement your other fall season items and add a touch of handmade charm to your home. Whether you’re an experienced sewist or just starting out, this project is a fun and rewarding way to celebrate the season.
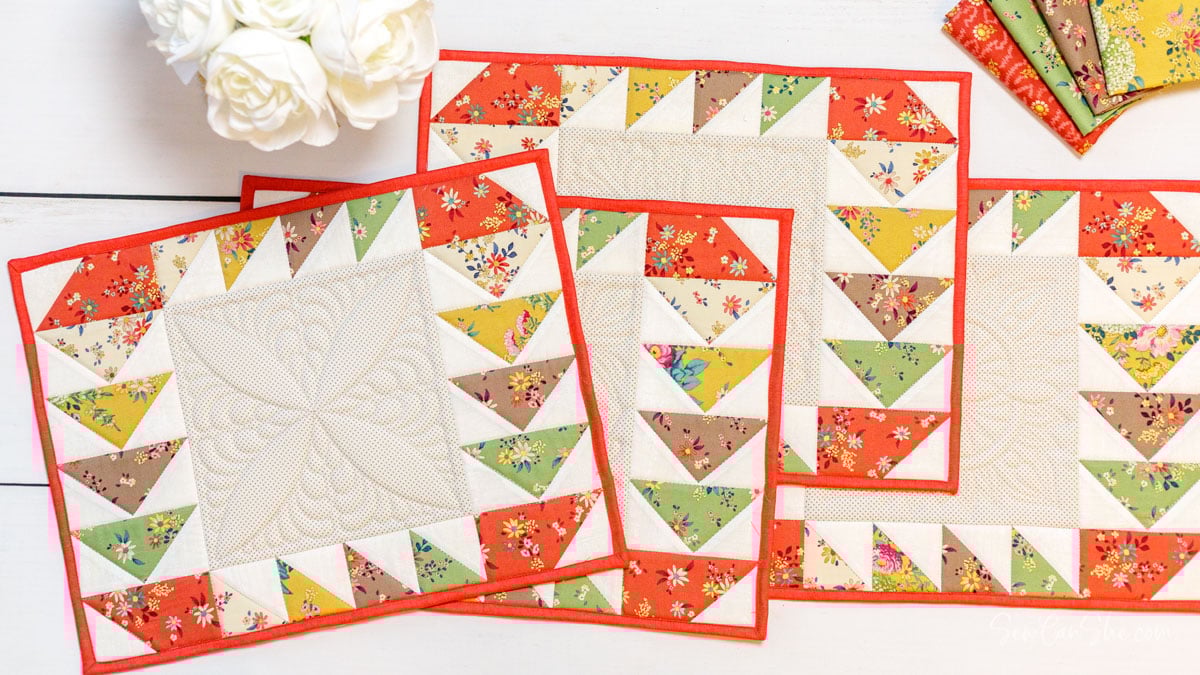
Make matching placemats too!
Have you sewn placemats yet? These gorgeous patchwork placemats can be made to compliment any season, but I love them in warm fall colors.
The Maple Leaf quilt block is a classic and popular pattern, especially for fall-themed projects. Our blocks will be created using a combination of squares, rectangles, and half-square triangles (HSTs).
To save time cutting and sewing, I’m going to show you 3 different ways to make the half-square triangles for this project using pre-cut 5” squares of fabric. You will love all three of these clever methods.
If you love to use your AccuQuilt fabric cutter, I’ll share some optional cutting die numbers to make this pattern Accuquilt-friendly. Using an Accuquilt is optional, but I love it and I know you’ll understand why. See all my Accuquilt-friendly quilts too.
How to Choose the Right Charm Square Bundle or Fabrics
Lucky me, I had a charm square bundle on hand in fall colors that was perfect for this project. It’s the ‘Warm Glow’ bundle in Riley Blake’s Expressions Batiks collection. Hand-dyed or batik fabrics are perfect for this project, but other bundles of 5” squares will look beautiful too.
This pattern requires 16 pairs of 5” squares. If you use a charm pack, make sure your bundle has 2 pieces for each fabric that you want to use. Most charm square bundles have multiples of each print, so that’s usually not a problem.
You can also cut the pieces that you’ll need from fabrics in your stash or scrap pile. Choose a coordinating fabric for your background. It’s important that it has good contrast with the fabrics you choose for your maple leaf blocks.
Fall Festival Patchwork Table Runner Pattern
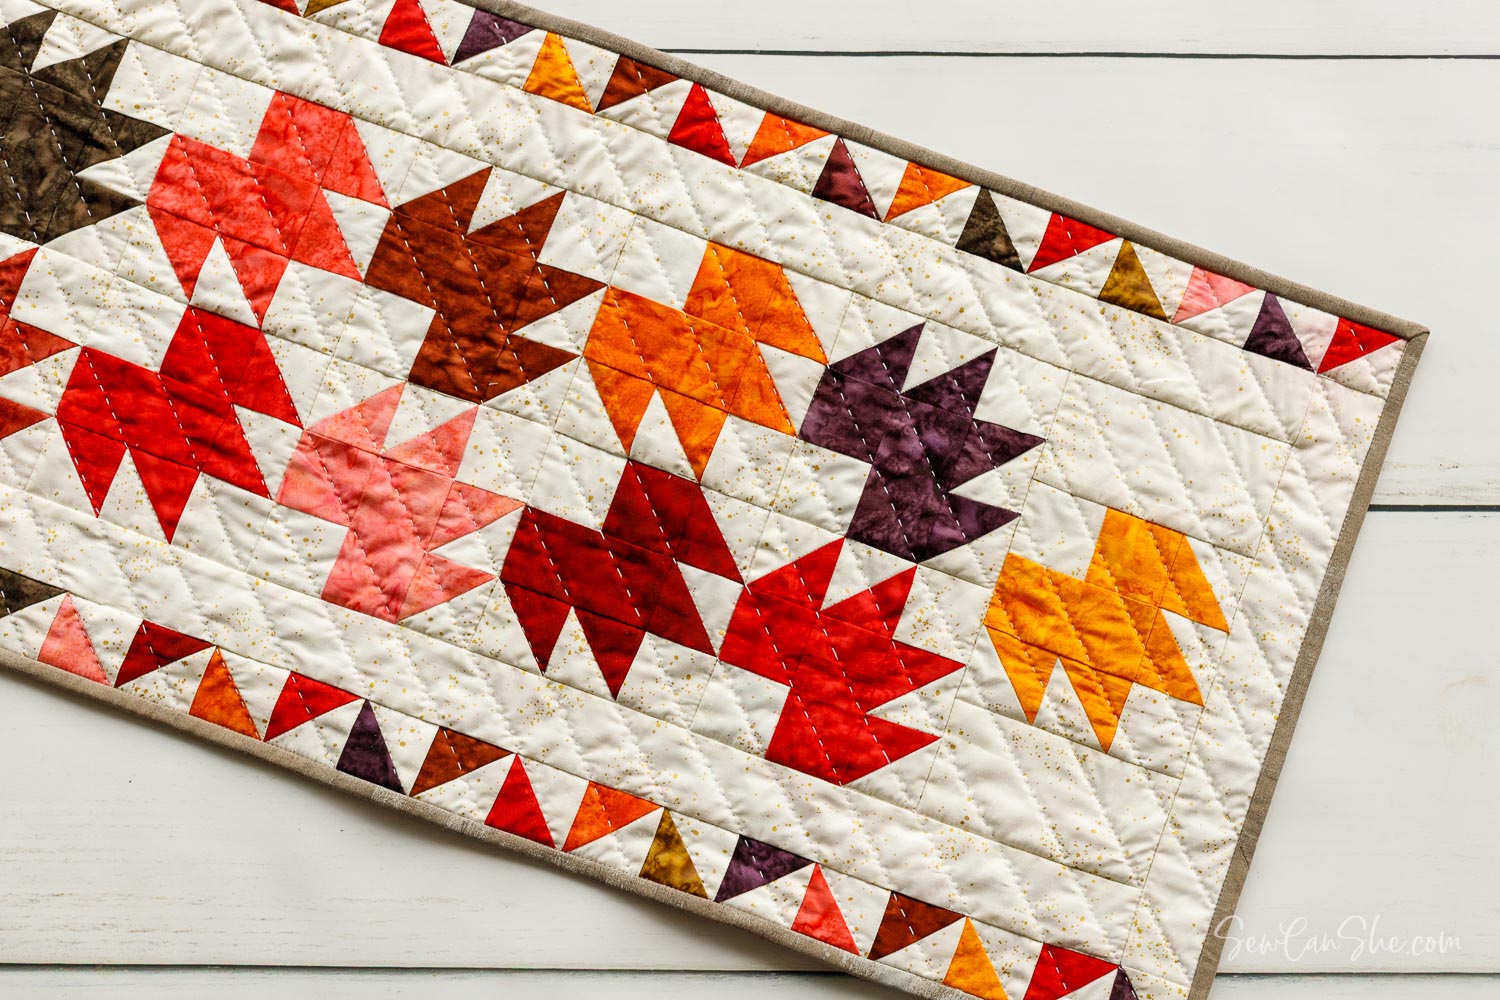
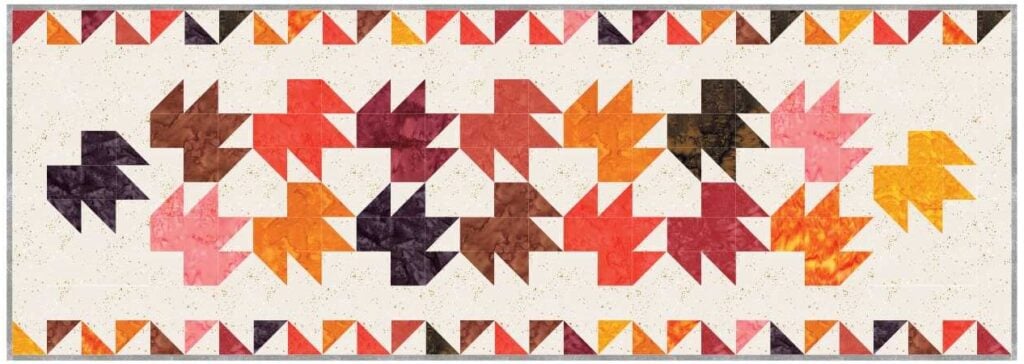
This free pattern includes instructions to make 4 1/2” (finished) Maple Leaf Quilt Blocks. You’ll make extra half square triangles to make festive sides for the runner.
Including the borders, this table runner is 15 1/2” x 44”. Measure your table to help you picture how it will fit. You could add more maple leaf blocks and half square triangles to make it longer.
Let’s get creative and sew a beautiful fall table runner today!
Important note: the red hand-dyed fabrics that I used bled into the background fabric a little bit when my table runner got wet. Washing it with ColorCatchers helped mitigate this after my project was finished, but I did wish I had pre-washed the fabrics with ColorCatchers before starting. The cutting instructions and HST building techniques in this pattern will allow for a small amount of shrinkage if you choose to pre-wash your charm squares.
You will need:
- 32 precut 5” squares of fabric in fall colors – 2 each of 16 fabrics, or
- 16 squares 5” x 5” and
- small scraps of the same 16 fabrics to cut squares and rectangles
- 3/4 yard fabric for the table runner background
- 1 yard of backing fabric (or enough to piece together a 19” x 48” backing piece)
- a piece of quilt batting at least 18” x 46”
- 1/8 yard fabric for the binding
- a rotary cutter, acrylic ruler, and cutting mat
- sewing machine
- a fabric marking pen or pencil
- thread (I suggest thread matching the lighter fabric)
- ironing board and iron
Cutting:
From the charm square bundle or main fabrics
Set aside 16 squares 5” x 5” (or cut 16 squares) to make half square triangles.
From each matching piece of fabric, cut:
- 1 square 2” x 2” (16 total – 1 from each print)
- 1 rectangle 2” x 3 1/2” (16 total – 1 from each print)
From the background fabric
Cut:
- 16 squares 5” x 5” for making half-square triangles
- 32 squares 2” x 2”
- 4 rectangles 2 3/4” x 5”
- 2 strips 2” x 12 1/2”
- 2 strips 2” x 41”
Optional Accuquilt cutting instructions:
- The 2” squares may be cut with die 55708 in the GO! Qube Mix & Match 6″ Block
- The border strips and 2” squares may be cut with the 2” strip cutter die 55025
- The 1 1/2” finished HSTs may be cut with die 55705 in the GO! Qube Mix & Match 6″ Block or die 55818 in the GO! Qube 12″ Companion Set-Corners
Quilt Piecing
Use a 1/4’’ seam allowance and a regular stitch length such as 2 – 2.5. A shorter stitch length is required when sewing HST pieces that will be cut apart. Separate instructions for that are provided below.
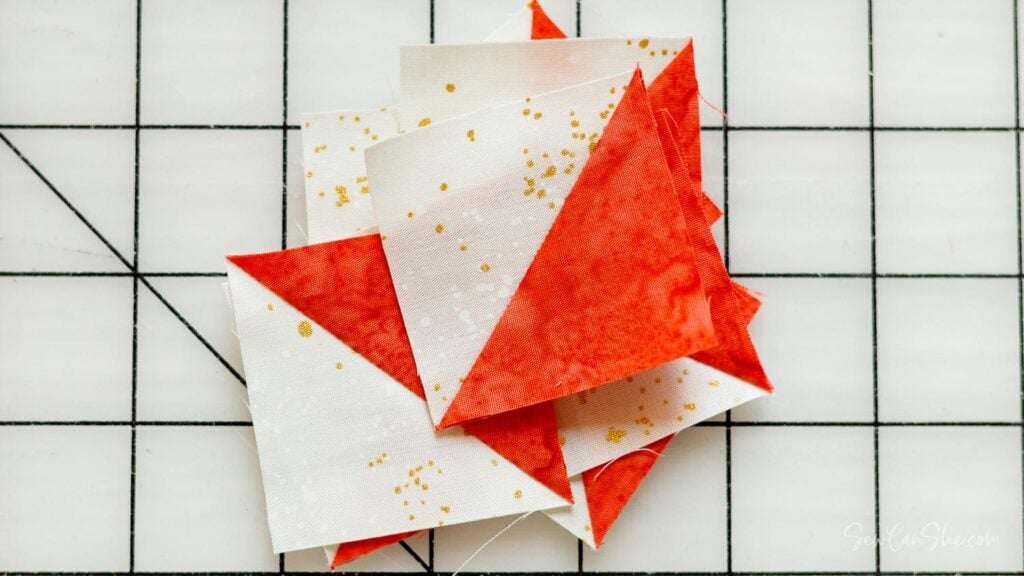
Make Half Square Triangles from 16 Charm Squares
As I was working on this pattern, I tested 3 different ways to make half square triangles. I’m going to share all three ways with you so you can pick which way works best for you!
Use one of the methods below to make 128 HST units – 8 from each of the 16 print squares that you set aside. You will have 6 HSTs left over.
HST Building Method #1 – Use paper to make 8 at one time
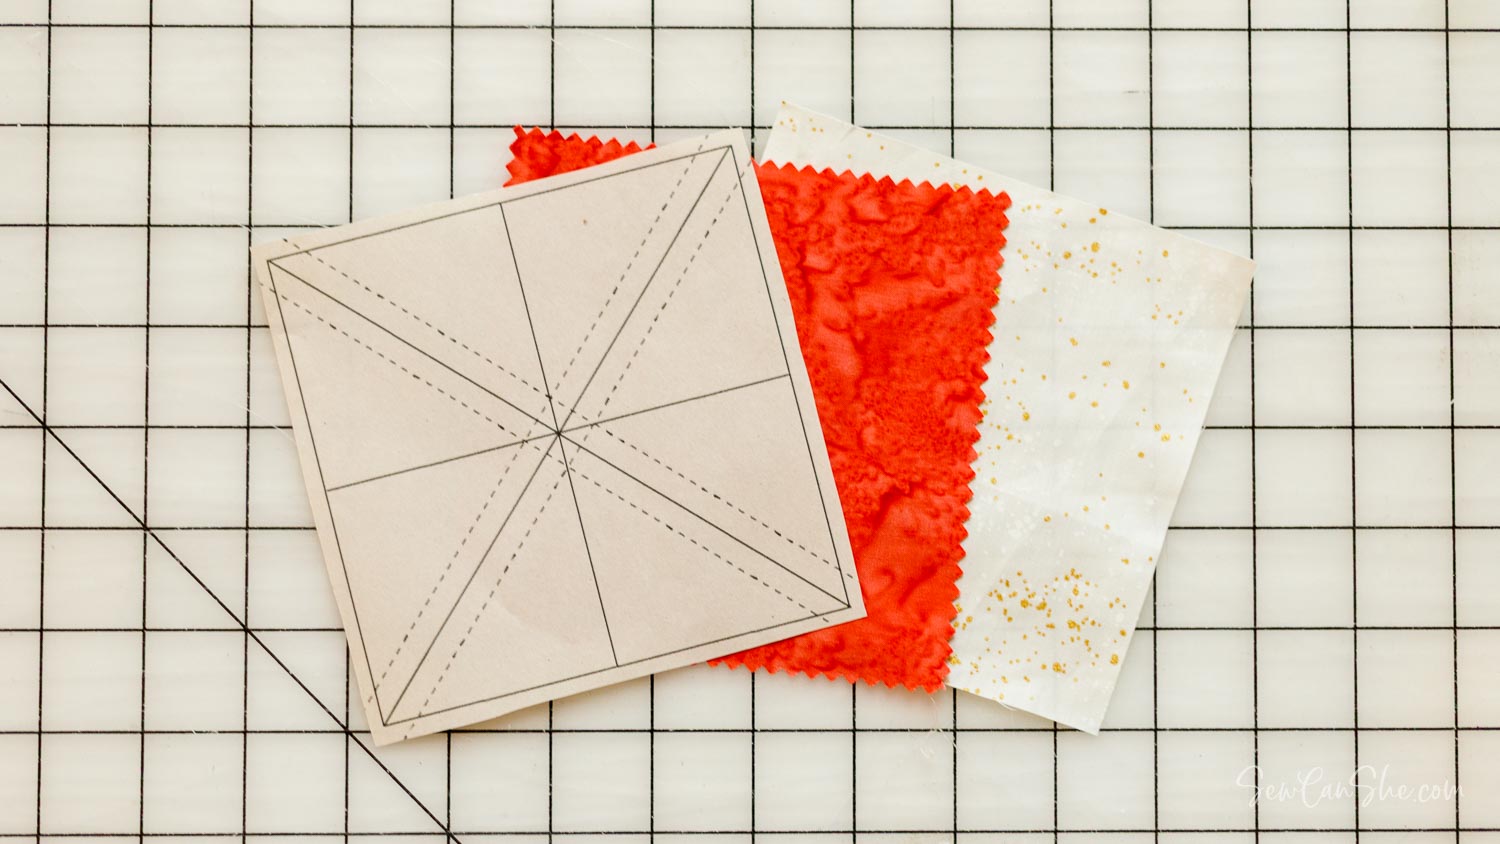
1. Download my free paper template with instructions:
You can download a free printable for 2” HSTs as well and see my video tutorial in this post. The video has lots of tips about what kind of paper to use.
Page 1 has instructions and one sewing template. Page 2 has two templates only. Be sure to print at 100% – do not enlarge or reduce the page size. Cut out the templates along the gray line.
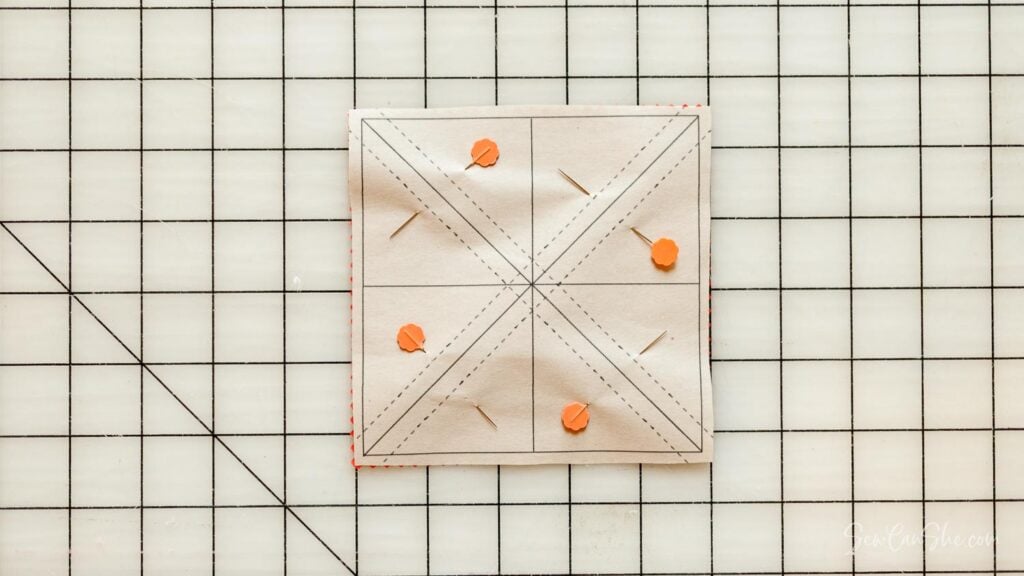
2. Place a 5” print fabric square and a 5” background fabric square right sides together. Pin a paper template on top.
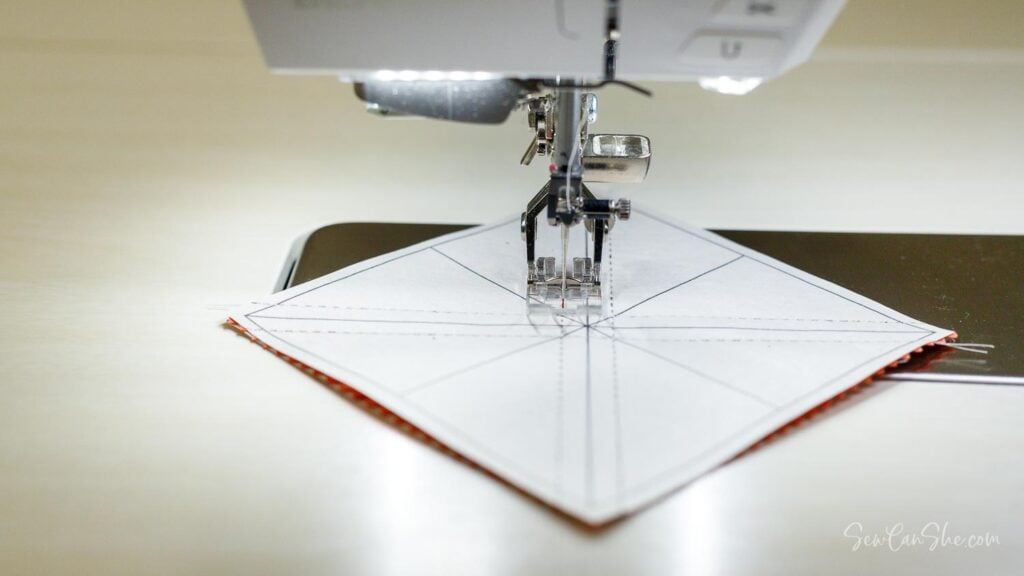
3. Sew along the 4 dashed lines on the paper. Use a short stitch length such as 1 or 1.5 to make tearing the paper away easier later.
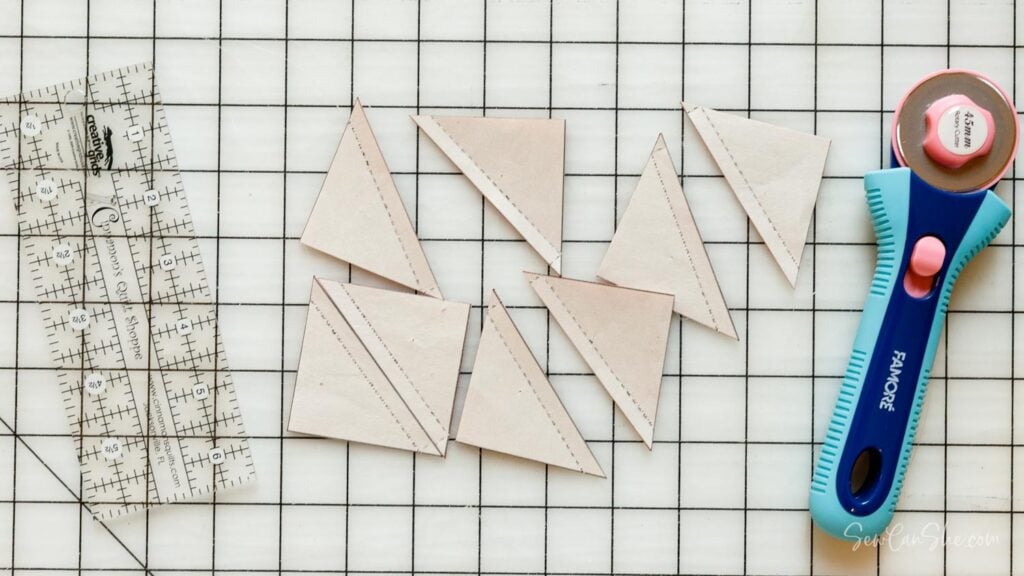
4. Trim around the outer line and then cut along all of the solid lines.
5. Carefully remove the papers. Press the half square triangles open and trim away the dog ear corners.
This method is great because the HST pieces are all perfectly square and there is minimal trimming at the end. You’ll only have to cut off the dog ear corners. I love this method for accurate piecing.
Repeat until you have sewn all of the 16 print fabric 5” squares into half square triangles – 128 in all.
HST Building Method #2 – Mark the fabric instead of using paper to make 8 HST at once.
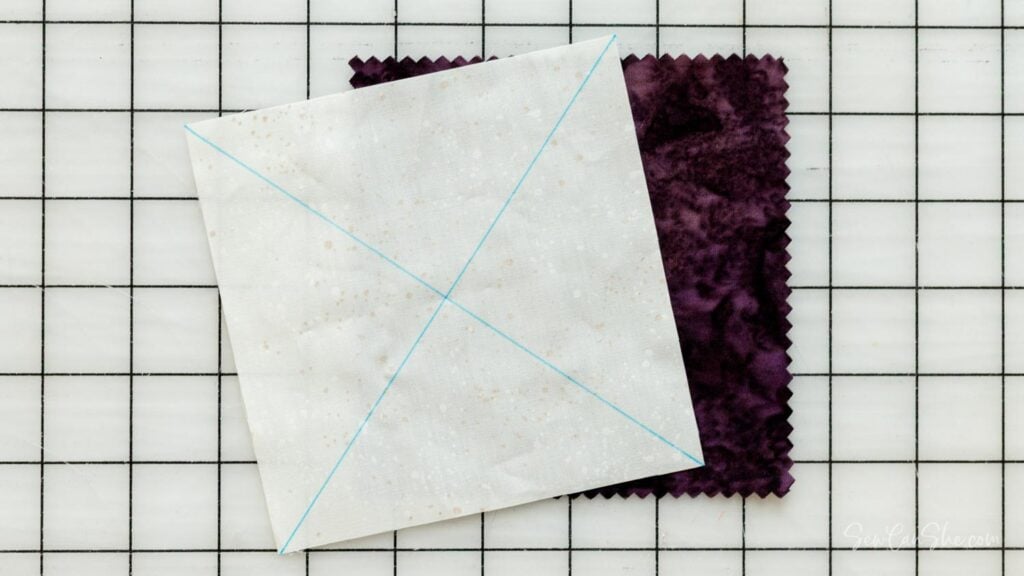
1. Use a pencil or fabric marking pen to draw two diagonal lines across the wrong side of a 5” square of background fabric. These are cutting lines.

2. Pin the background fabric right sides together with a 5” square of print fabric. Sew a scant 1/4’’ away from the cutting lines on on both sides of the lines.
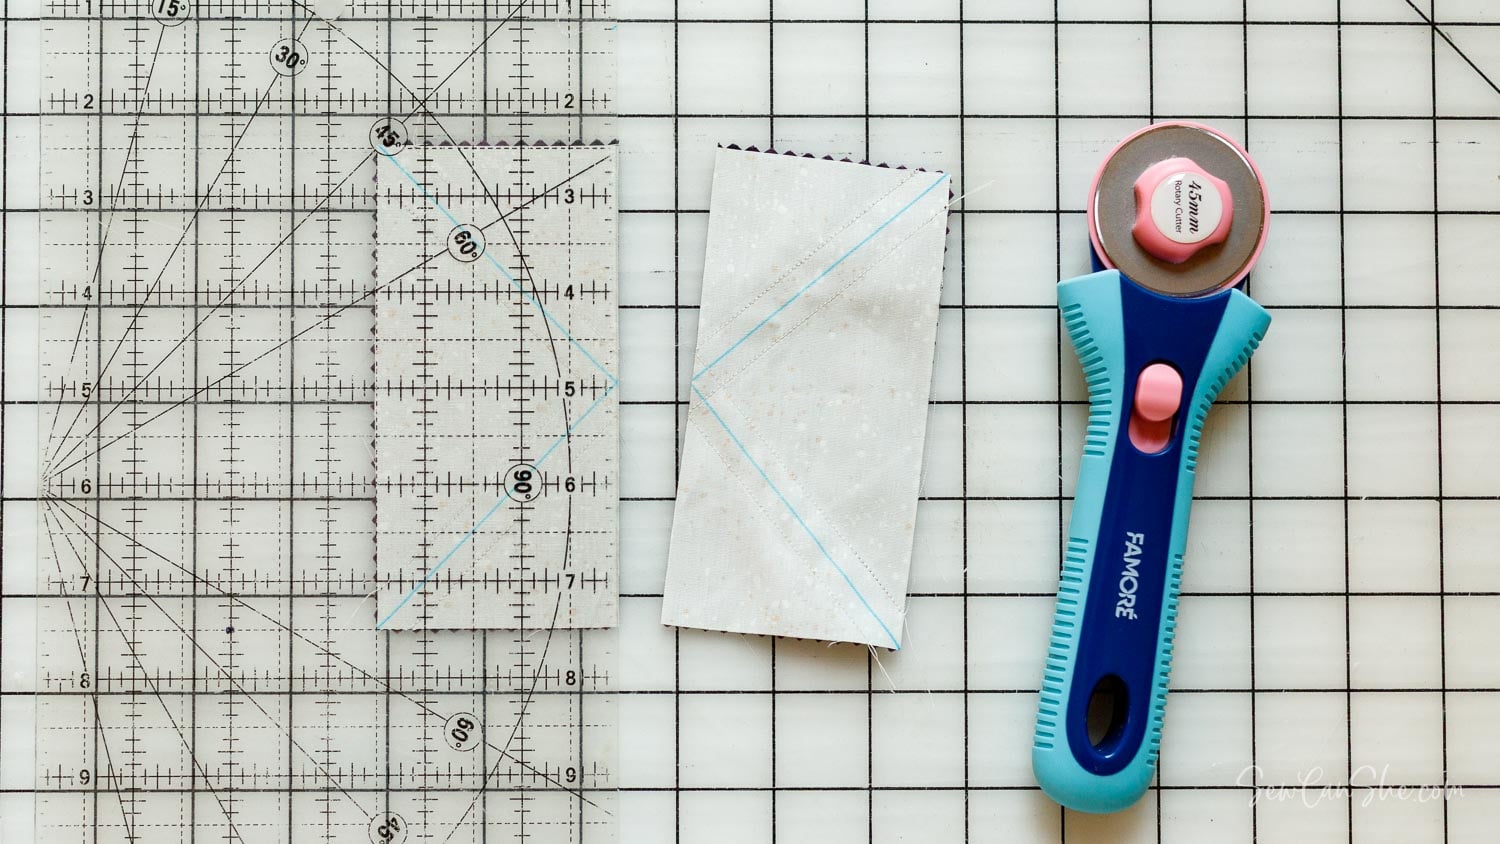
3. Use a ruler and rotary cutter to help you cut the piece into 4 equally sized squares that are approximately 2 1/2” x 2 1/2”.
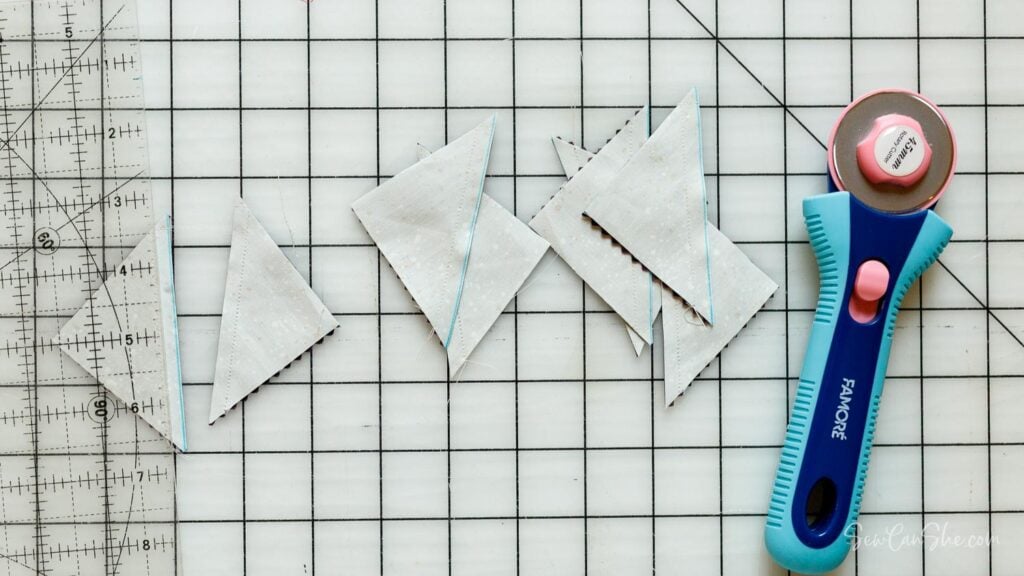
4. Cut the triangles apart along the marked lines.
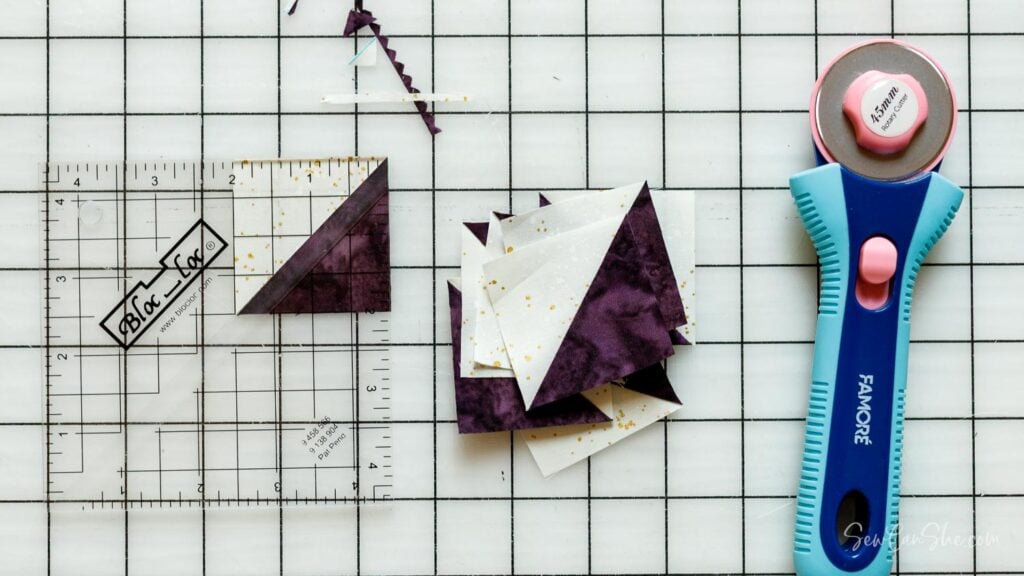
5. This method requires trimming each HST unit to 2” square. You can use any ruler with a diagonal line to help square up the piece, but I really like using BlocLoc rulers for trimming HSTs. They have a groove in the center for the seam, so they really hold each piece in place!
Repeat until you have sewn all of the 16 print fabric 5” squares into half square triangles – 128 in all.
HST Building Method #3 – cut 24 HST sets at once with an AccuQuilt Die
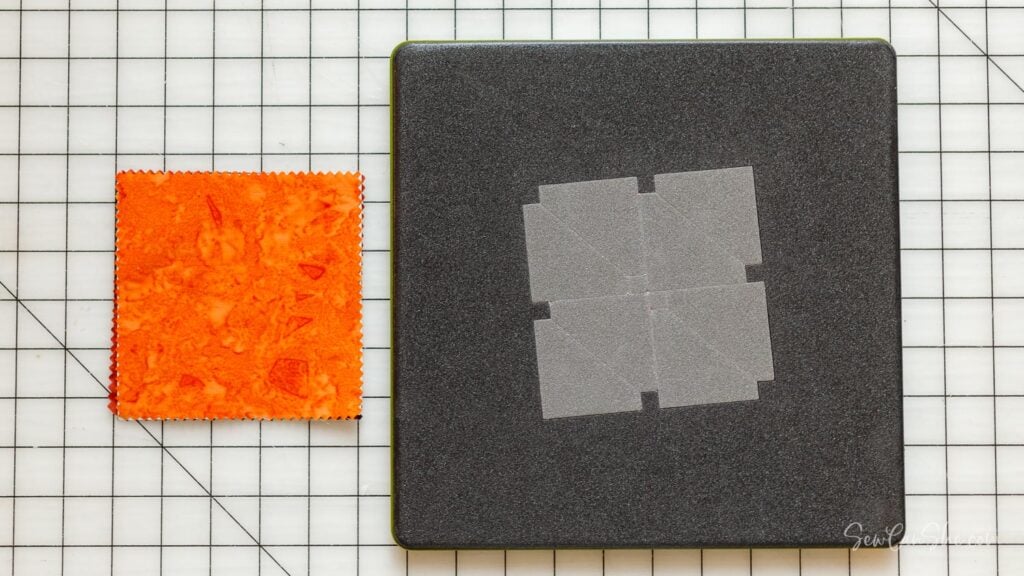
You know that I’m a huge AccuQuilt fan if you read about it in this post. There’s simply no other way to cut lots of pieces fast and perfectly accurate. It makes piecing quilts so much easier.
I found this amazing die in the GO! Qube 12″ Companion Set-Corners (55818). It can cut up to 48 1 1/2” triangles at one time – enough to make 24 HST units!
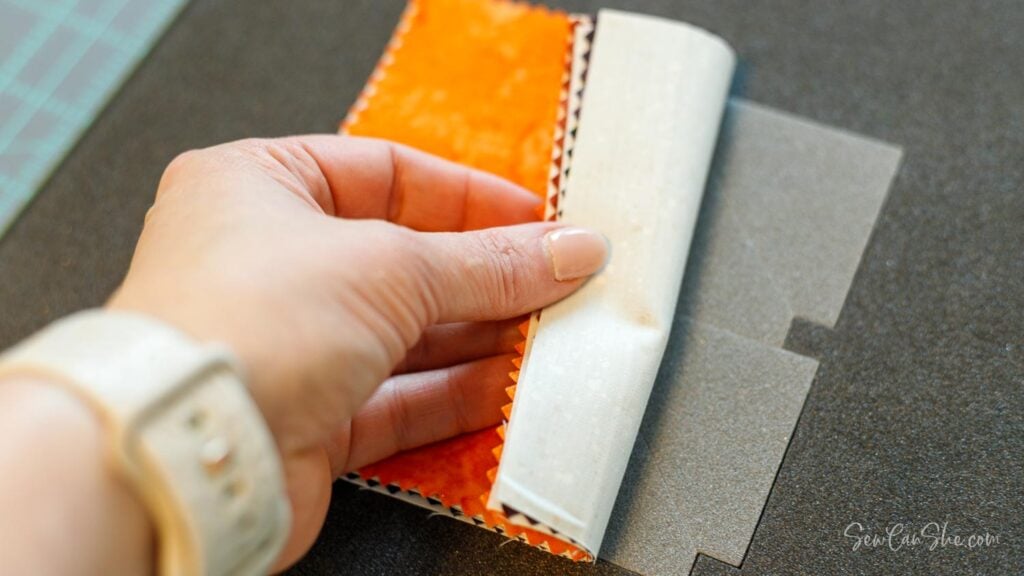
1. To use this die for this pattern, place 3 background fabric squares right sides together with 3 print fabric squares. Pile them up nicely and center the fabrics over the die. AccuQuilt suggests cutting larger squares of fabric to use with this die, so 5” squares require a little bit more effort to line all the layers of fabric up perfectly over the die lines.

2. Place an AccuQuilt mat on top and run the die through you machine. I am in love with my Go! Big.
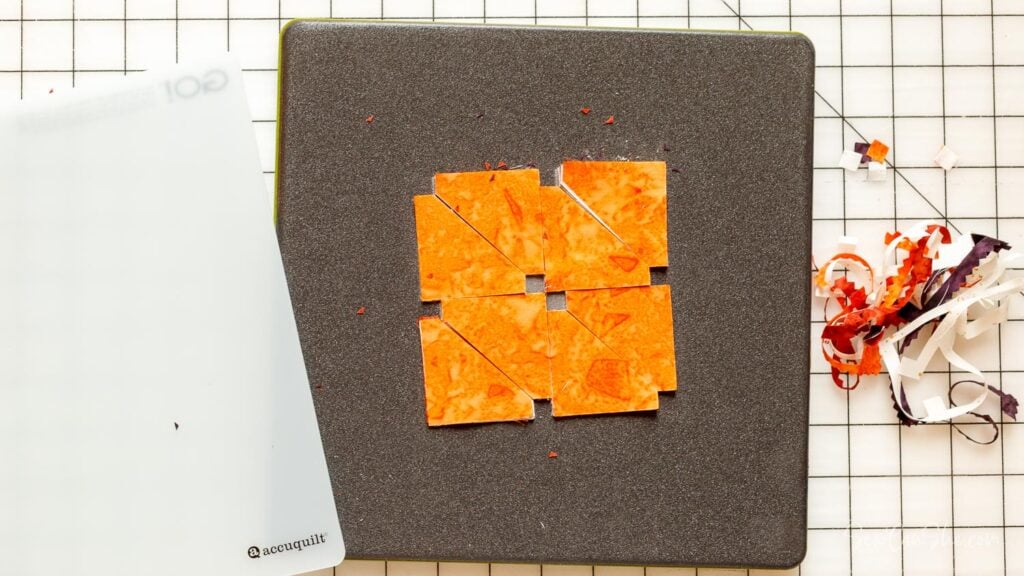
3. Remove the mat and carefully pull off the scraps around the triangles. Now you have perfect little piles of half square triangles ready to sew!
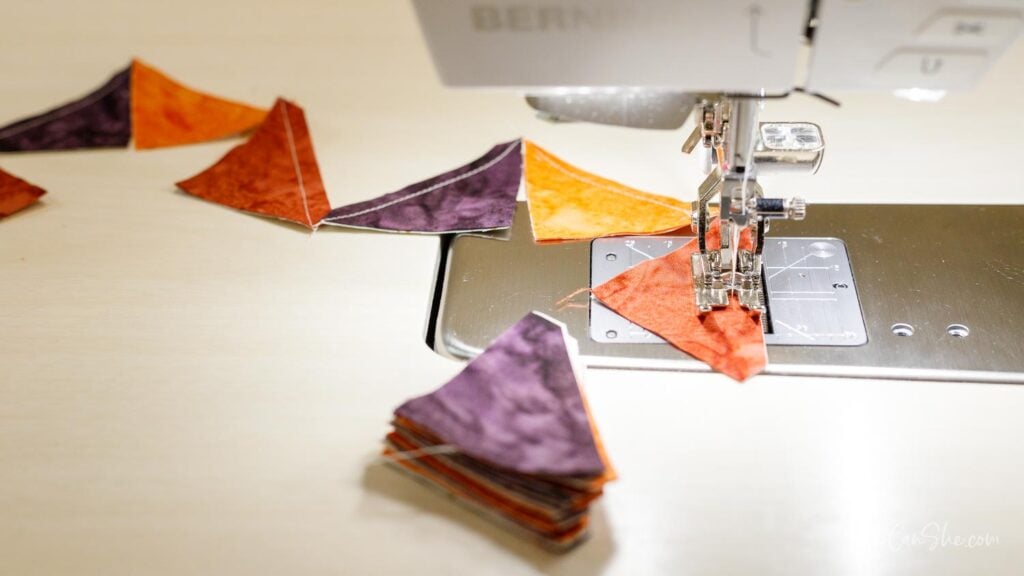
4. The triangle sets are already right sides together, so carefully stack them up and chain piece your heart out! Repeat until you have sewn all of the 16 print fabric 5” squares into half square triangles – 128 in all.
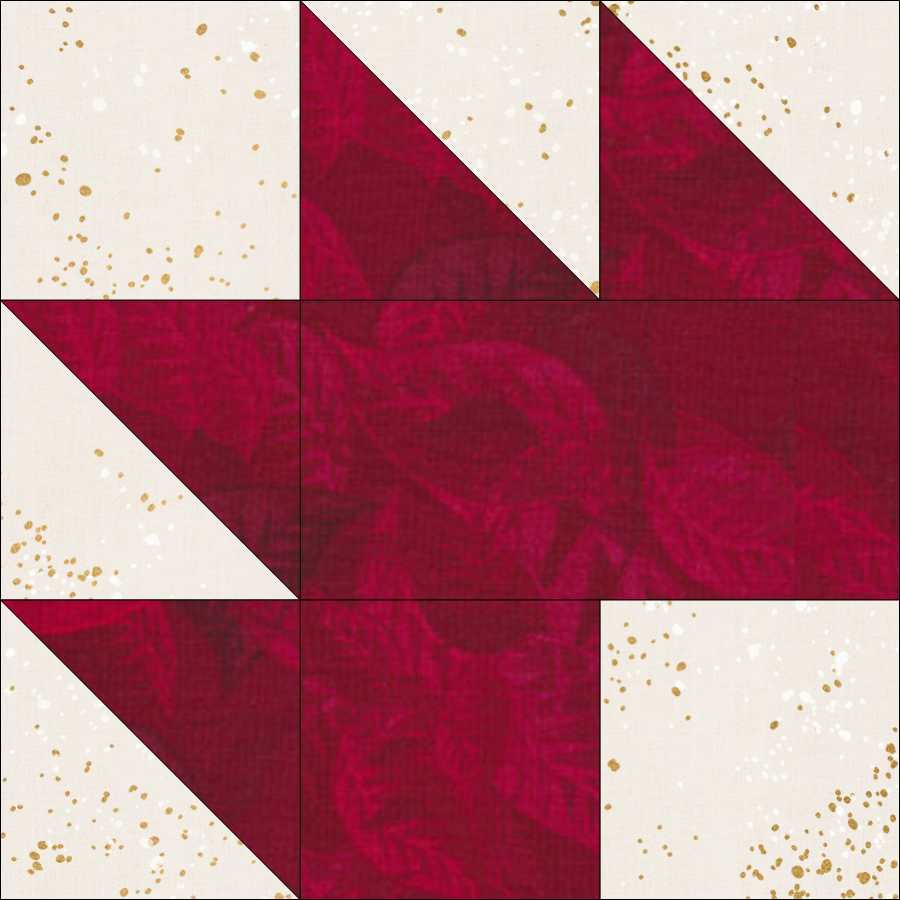
How to Sew the Maple Leaf Quilt Block
Group the following pieces together by color or print for each maple leaf block:
- 1 square 2” x 2” – print fabric
- 2 squares 2” x 2” – background fabric
- 1 rectangle 2” x 3 1/2” – print fabric
- 4 HST units

1. Sew a 2” print fabric square to a 2” background fabric square. Press.
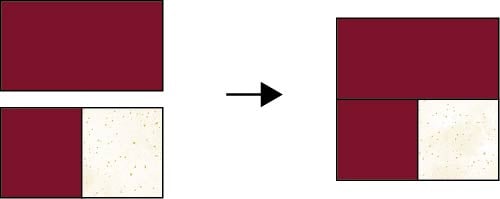
2. Sew a 2” x 3 1/2” rectangle to the top edge, as shown. Press.
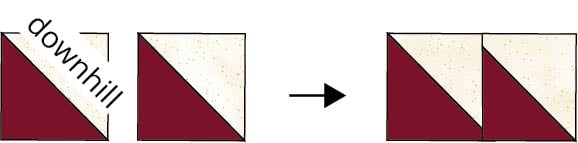
3. Sew two HST units together exactly as shown above – let’s call it going ‘downhill.’

4. Sew two HST units + one 2” background fabric square together exactly as shown above – let’s call it going ‘uphill.’
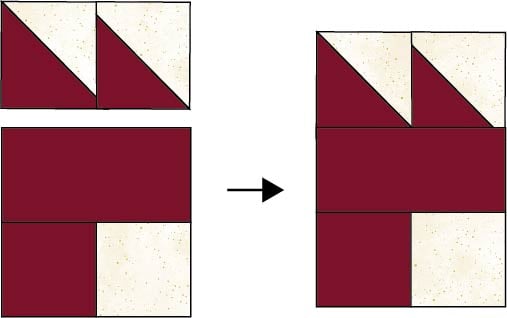
5. Sew the two HST units that are going ‘downhill’ to the top edge of the squares and rectangle that you sewed together in Steps 1-2.
6. Sew the two HST units and background fabric square that are going ‘uphill’ to the left side of the piece, as shown.
Repeat to make 16 Maple Leaf Blocks
Make the Border Pieces

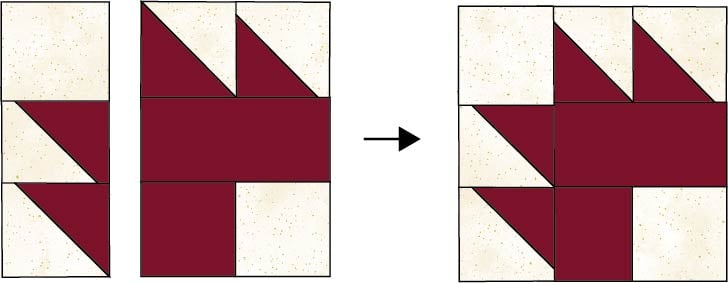
1. Select 27 HST pieces for the top and bottom edges of the table runner.
2. Sew the sets of HST pieces together as shown. Press.
Pay careful attention to the orientation of the half square triangles, or make up your own design for the borders.

3. Sew the 2” x 41” background fabric strips to the inside edges of the rows of half square triangles, as shown. Press.
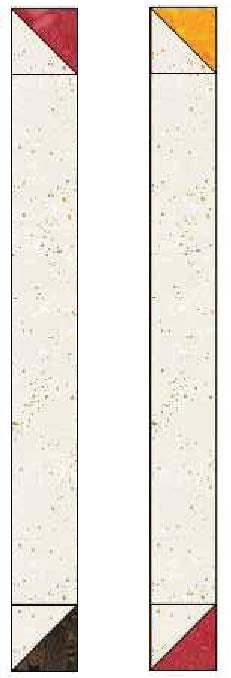
4. Select 4 HST pieces for the corners of the table runner. Sew these HST pieces to the 2” x 12 1/2” background fabric strips, as shown.
Assemble the Fall Fiesta Table Runner

1. Arrange the 16 Maple Leaf quilt blocks on a quilt design wall, table, or bed as shown.

2. Select a Maple Leaf Block for each end of the table runner. Sew a 2 3/4” x 5” background fabric rectangle to both sides of these blocks as shown. Make 2.
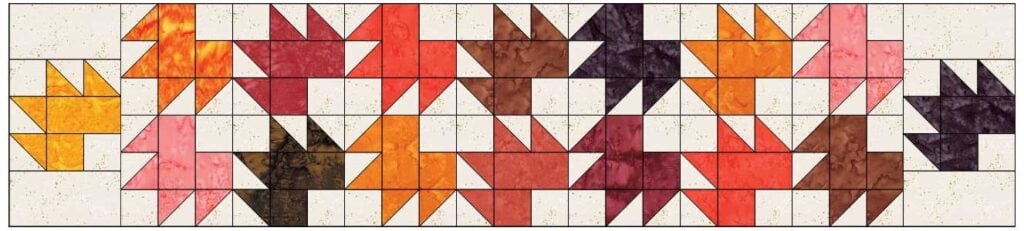
3. Sew center blocks into 7 vertical rows, each row with 2 blocks. Then sew the 9 vertical rows together.
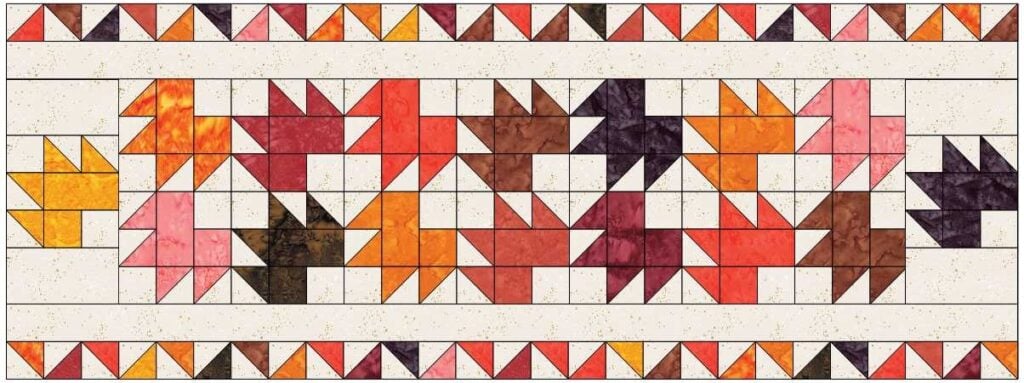
4. Attach the long border pieces.
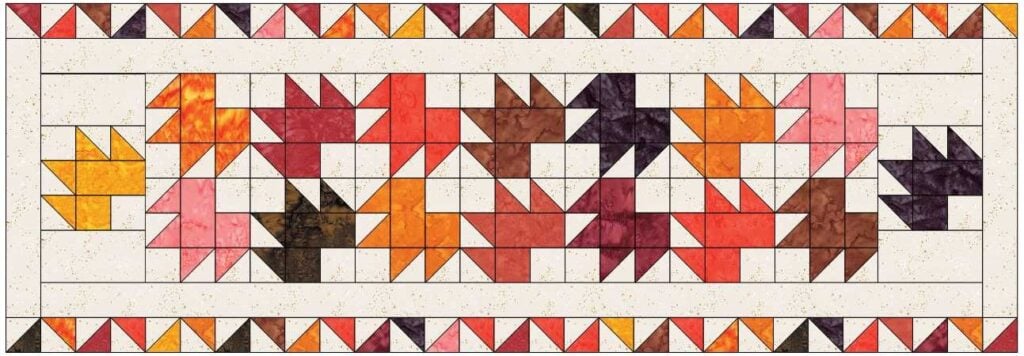
5. Attach the short border pieces.
Finishing the Fall Festival Table Runner Pattern
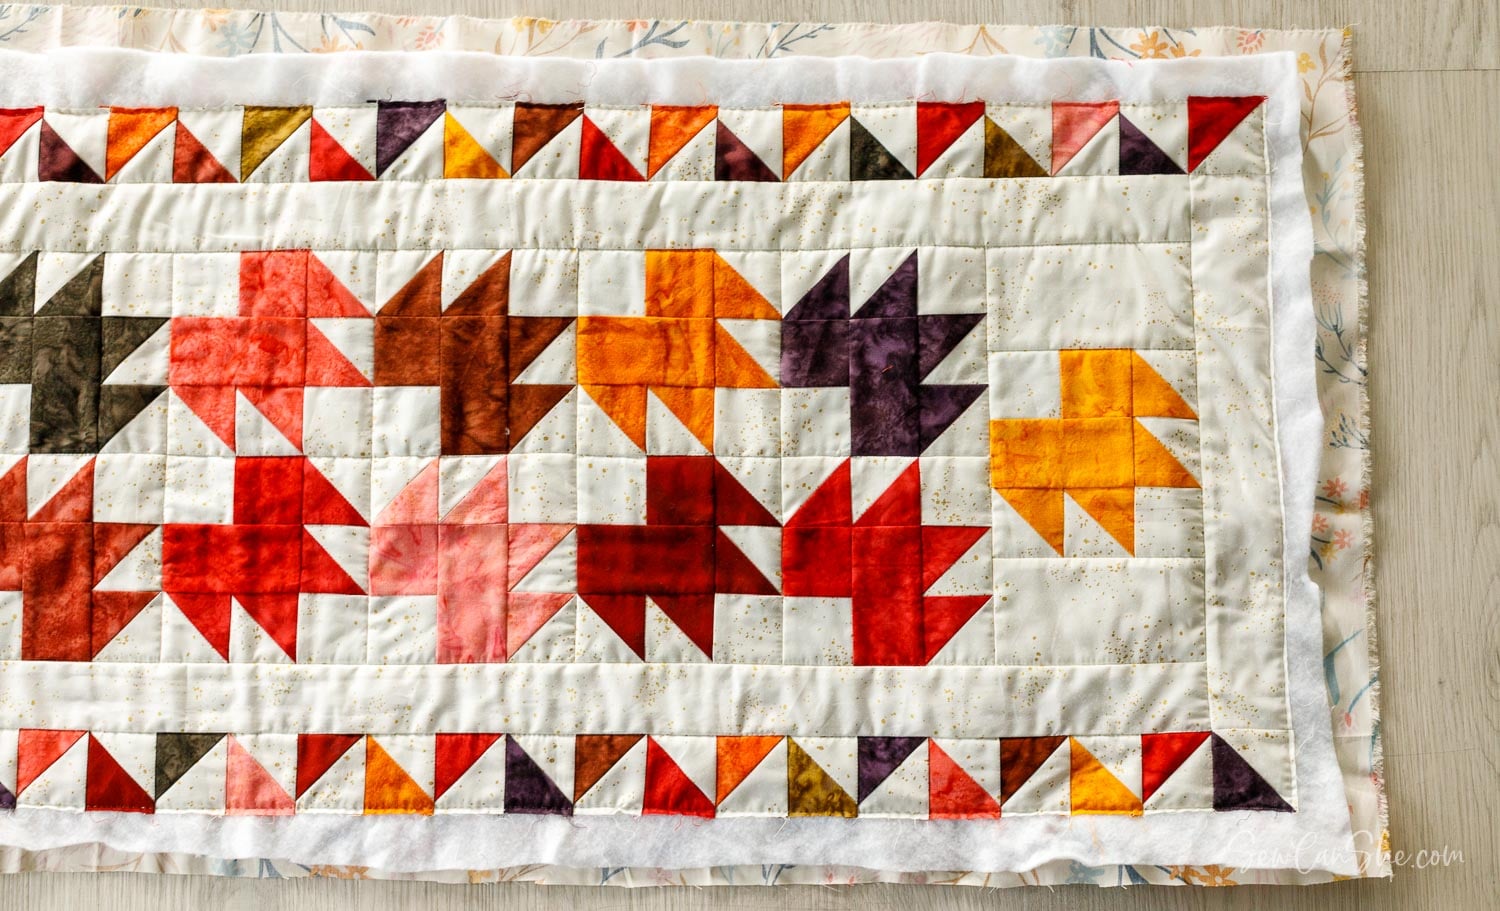
1. Make a quilt sandwich with the table runner top, the batting, and the backing piece.
2. Baste together with fusible batting, pins or basting spray.
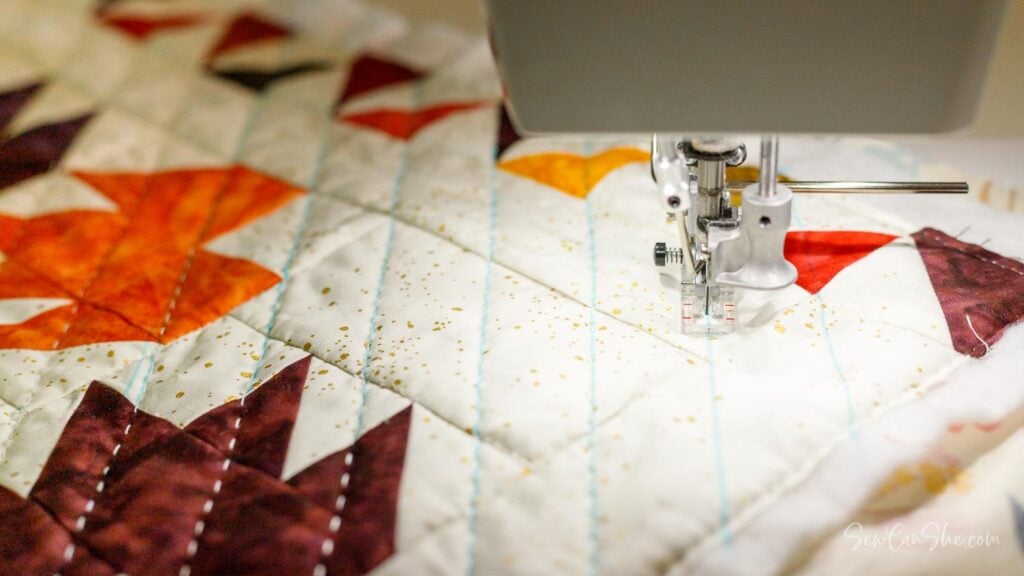
3. Quilt as desired. Straight line quilting or cross hatch quilting with your walking foot would be fast and easy.
I chose diagonal straight line quilting using my Babylock Sashiko 2 machine.
Tip: Before using the Sashiko machine, I always stitch in the ditch around my blocks (and sometimes around every piece) using invisible thread on my regular sewing machine. This helps the top stay straight and beautiful.
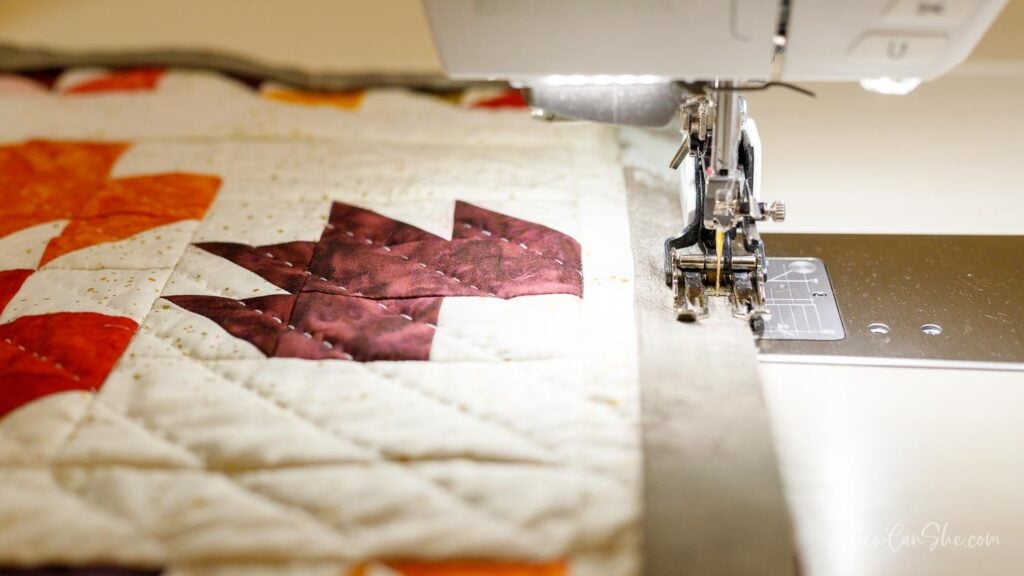
4. Cut 3 binding strips and bind using your favorite method. This is my favorite quilt binding method.
As always, I love seeing the quilts you make with my free sewing patterns. Please post a picture to Instagram and tag me @sewcanshe so I can take a look!
xoxo,


FALL FESTIVAL TABLE RUNNER PATTERN
Purchase this pattern in PDF format! The PDF file contains all of the instructions, plus the step by step photos that have been reduced to fit the page nicely with no ads.
Download the file immediately and keep your confirmation email so you can download it again later. Unlimited downloads are available from the confirmation email.
Disclosure: some of my posts contain affiliate links. If you purchase something through one of those links I may receive a small commission, so thank you for supporting SewCanShe when you shop! All of the opinions are my own and I only suggest products that I actually use. 🙂